About Me

My photo
My blog's main subjects are sewing, the thing in which I am experienced the most, and beadwork, which is, in fact, pushed me into blogging. I am also engaged in knitting and crocheting. All together they are the set of skills which I use to make my wardrobe my whole life. These are not my only interests, I also like the English language (that's one of the reasons that my blog is bilingual), try to travel around my country and abroad (when can afford it), am interested in art (to the degree of a dilettante but nevertheless) and adore the people who can create anything beautiful or useful whatever it is :-) So welcome to a needlecrafter diary!

27 March 2016

Antique Rose Earrings, or When Curiosity Doesn't Kill :-)


While checking if I remember the proverb about that curious cat properly, I learnt that it has a witty reply. And I must admit this latter expresses the exact idea of what I was going to write. So in full it sounds curiosity kills the cat but satisfaction brings it back. Curiosity was a basic push to make this project indeed. I simply bought funny pellet beads just because wondered why they are called "diabolo" and all the rest piled up around them like a snowball :-)
So in this project I had to do nothing - the variety of beads and +Moonrose creation with her design did all the job. I even had no need to invent myself the name of  the project - just called it by after the used rivoli's colour "antique rose":-))


Сережки "Старомодна ружа", або Як не втратити носа від цікавості :-)

Поки я перечитувала прислів'я про допитливість, неважко було помітити, що переважно  вони нас все ж таки заохочують до отримання досвіду чи знань, але як відомо, іноді можна і носа втрати, як та Варвара :-) Отже, до чого ж тут мої нові сережки? Все просто, цікавість - головна причина їхньої появи. Я просто купила без певної мети цікаві намистини (перекладати назви не буду) "pellet" лише через те, що мені стало цікаво, чому це вони називаються "diabolo", ну а все решта накопичилося навколо них, як сніговий ком :-)
Тому в цьому проекті мені нічого і робити не довелося - розмаїття намистин та дизайн +Moonrose creation зробили все за мене. Мені навіть вигадувати назву для сережок не треба було. Я просто назвала їх за кольором використаного ріволі - "антикварна троянда (ружа)" :-)


The first step - beading a rivoli. If you still need the tutorial, there are a lot of videos, but for the purity of the experiment this time I used this one in Italian (I understand only what they do and not what they say but I guess one or two more Italian tutorials and I learnt how to count:-)) My materials: rivoli 14 cm, 11.0 and 15.0. It was the first time when, because of curiosity I used 11.0, they are not Chinese but they are of awful quality, I had to re-make one of the READY earrings twice because the seed beads broke at the final steps of work, there were so many harmed seed beads that I had to check almost all of them and they broke anyway in the process. Hardly the cat could survive at this step :-)


Перший етап - обплетення ріволі. Якщо тобі для цього все ще потрібний МК, то є багато відео. Але цього разу для чистоти експерименту, я скористалась цим, італійською мовою (я розумію, лише що вони роблять, а не те, що кажуть, але ще два-три таких МК і вже напевно навчуся рахувати італійською :-)) Мої матеріали: 14 мм ріволі, бісер 11.0 і 15.0. Перший раз і лише через цікавість я використовувала 11.0. Він не китайський (який у нас чомусь всі зневажають), але жахливої якості: двічі одну з вже ГОТОВИХ сережок довелося переробляти, тому що бісер раптом ламався майжн на фініші, було так багато бракованих бісерин, що мала майже весь перевірити і все одно вони ламалися в процесі (Варвара тут була дуже близька до втрати носа:-))


All the rest was made by this tutorial.


Все решта було зроблено за цим майстер класом.


To embellish the hooks I removed the springs and added two seed beads on each of them.


Щоб прикрасити гачки, я зрізала пружинки і додала на кожний по дві бісерини.


Right after finishing the work I thought  this colour style reminds that one from my previous projects but as if that spring garden grew up and became mature... probably that's why this rose is antique...


Вже по закінченні роботи я подумала, що кольорова гама сережок нагадує фарби попереднього набору, але як наче той весняний сад подорослішав і став зрілим... мабуть тому ця троянда - старомодна...


23 March 2016

Spring Mambo

As the design of the bracelet belongs to +Jill Wiseman, I decided to save its name because I liked the way she represented her work very much. But as the colours I used belongs to spring pallete, as I see it, my intention is to dance this Mambo right now :-)

Весняний мамбо 

Оскільки дизайн цього браслету належить +Jill Wiseman, я вирішила зберегти його назву, тому що мені дуже сподобалося, як вона представила свою роботу. Але оскільки обрані кольори належать весняній палітрі, як я її бачу, то мій намір - станцювати цю мамбу вже зараз :-)


So the tutorial for the bracelet was found here. I chose it on few reasons. First of all I wanted something to use triangles which I had a lot left after beading this necklace. It happened because I bought the equal number of 8.0 seed beads and 3-cuts for that project. But in fact, the latter ones are much lighter and can be counted almost as 2 to 1 comparing with 8.0. I can't say if my conclusion works with other bead brands, but with those I used it does.
Secondly, I wanted to try making the fringe long ago but had no special plan so this variant suited for that. And the last one - I am a big fan of Czech flower beads and bought some. But as I my great wish to use them fought with the feeling of me being out of age to use them for earrings or a necklace, the fringe for the bracelet undoubtedly seemed to be the perfect idea to embellish with them.

Отже, МК для браслету знайшла тут. Зупинилася на ньому з декількох причин. По-перше, хотілося зробити щось з трикутників, яких у мене дуже багато залишилося після нанизування цього намиста. Трапилося це тому, що я купила однакову кількість бісеру 8.0 і трикутникі. Але така рубка з трьома гранями дуже легка і може розраховуватися майже як 2 до 1 в порівнянні з бісером 8.0. Не можу сказати, чи мий висновок справедливий для бісеру інших виробників, але для того, який був у мене - працює.
По-друге, я давно хотіла спробувати зробити таку бісерну бахрому, але у мене не було якогось певного плану, ось ця прикраса і згодилася. І нарешті, я велика шанувальниця чеських намистин квіточок і навіть прикупила їх. Але оскільки моє велике бажання їх використати боролося з відчуттям, що вони вже трохи  не по моєму вікові, щоб прикрашати ними сережки, або намисто, то декорувати ними бахрому на браслеті здалося виключно вдалою ідеєю.


What I yet changed. I made the bracelet wider. I also changed the order of beading the stripes. As my triangles and 8.0 are not exactly identical in the colour and just match in colour style, it looks better if to diffuse the beads a little while changing their rows. I mean not to bead them as solid stripes. And I didn't want to bead the toggle so used the ready one. 

Що я все ж таки змінила. Зробила браслет ширшим. Також змінила порядок нанизування смужок. Оскільки мої трикутники і бісер 8.0 не ідентичного кольору, а просто підходять за кольоровою гамою, то краще виглядає, якщо змінювати вид бісеру в смужках поступово. Також мені не хотілося робити тогл, тому я використала готовий.


This is the final item from the set. As usual the set is united just by common materials and the necklace, earrings and the bracelet can be easily worn either together or separately or with other items, for example with these ones.
So nice blossoming and happy mambo to everybody!

Це заключний предмет з комплекту. Як і зазвичай, набір об'єднаний лише спільними матеріалами, тому намисто, сережки і браслет можна носити як разом, так і окремо, або поєднувати з іншими прикрасами, наприклад, цими.
Отже всім гарного цвітіння і щасливого мамбо :-)


19 March 2016

Spring Blossoming Temptation (Earrings)

Sometimes there is a feeling as if life gets frozen inside of you as well as in nature and then awaiting becomes the main perception of the reality... I suppose this our instinct of self-preservation requires some pause for us to have a rest and accumalate some energy. Eventually spring is the time of the biggest expectations and hopes, you only need to wait for some time and the wheel of life will go round with new force. And to push its moving, just a little, we can materialize this "wheel" :-)
It was my exact idea while thinking over the earrings to pair this necklace.

Спокуса весняного цвітіння (сережки)

Буває таке відчуття, що життя нібито завмирає в тобі так само як і в природі і тоді твоїм основним сприйняттям дійсності стає очікування... Думаю, це інстинкт самозбереження вимагає якоїсь паузи для відпочинку і накопичення енергії. Адже весна - час найбільших сподівань і надій, просто треба трошки почекати і  коло життя закрутиться з новою силою. А щоб таке коло трішечки підштовхнути, можна його матеріалізувати :-)
Про це я і думала, поки вигадувала сережки в пару до намиста.


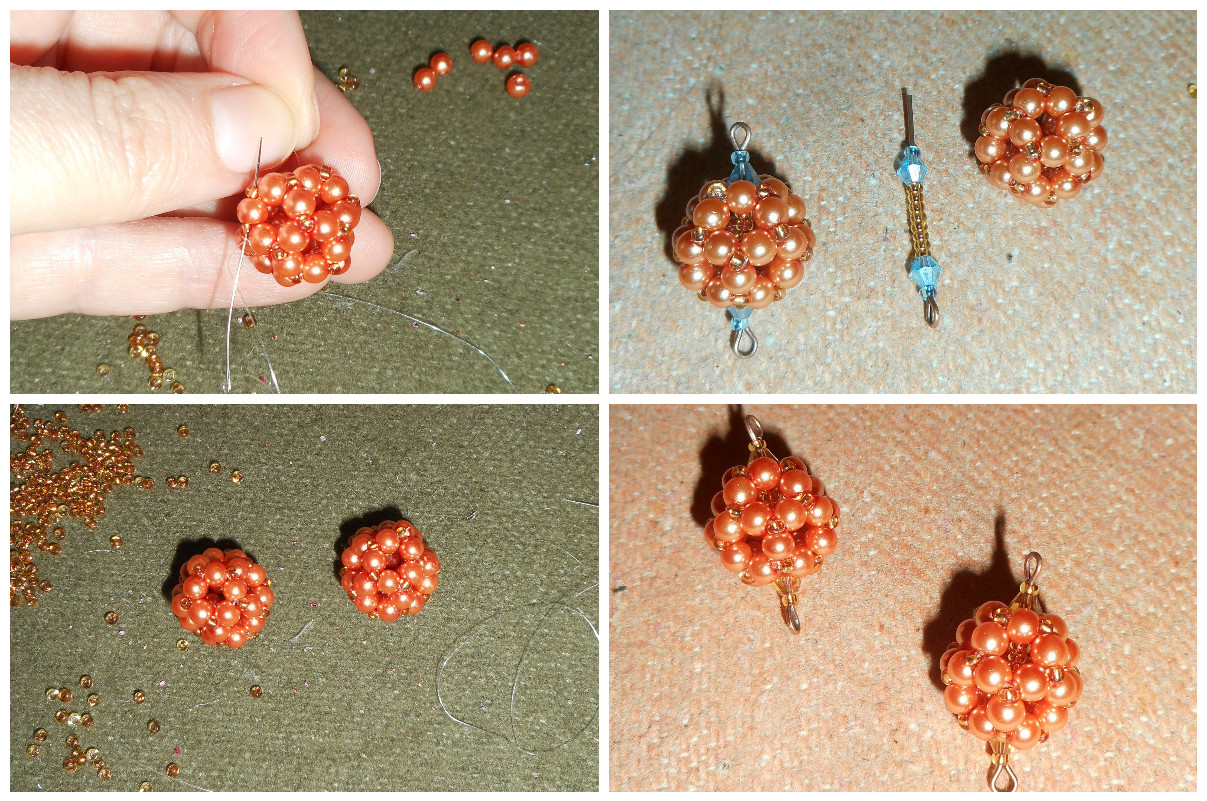
First of all I wanted to make a beaded bead using the same materials as for the necklace, but at once stuck to the idea of the moving piece... probably movement is the thing I feel the lack for right now. So the wheel seemed to be very suitable image.
At first I beaded the bead in usual way using the same tutorial as for these beads and got a good result. But I couldn't get the "belt" from 8.0 and 3-cuts in the middle of the bead. After forth try I gave up and changed the tactics:-)

Перш за все хотілося обплести намистину використовуючи ті самі матеріали, що і для намиста, але я одразу вчепилася в ідею зробити якусь рухому деталь... мабуть рух - це те, чого мені зараз не вистачає. Отже колесо здалося дуже відповідним образом.
Спочатку обплела намистину в звичний спосіб за допомогою того ж самого МК, що і для цих намистин і результат отримала гарний, але поясок з бісеру 8.0 і 3-cuts ніяк не виходив по середині намистини. Після четвертої спроби я здалася і вирішила змінити тактику:-)


I used the the idea I found here.  It means I beaded two halves from 10.0 seed beads and 3-cuts for one bead and then joined them with 8.0 seed beads. And thus got a belt right in the centre of the bead! After that I added one more row of 8.0 seed beads and then one row of 3 mm round crystal beads between the 8.0 seed beads of the second row. My wheel became exactly what I wanted!


Скористалася ідеєю, яку знайшла тут. Тобто, зробила оплетку намистини з двох частин, і таким чином поясок якраз вийшов посередині! Потім з'єднала їх бісером 8.0, потім додала ще один ряд бісерин 8.0 і потім між бісеринами 8.0 другого ряду додала ще ряд з круглих 3мм кристалів. І таким чином моє "колесо" стало виглядати якраз так, як я і хотіла!


To join the elements took me several minutes. To do that I took a piece of chain. I didn't measure it, just cut for two the leftover I had. I also haven't got thick silver wire so used two pins, cut their "pin"-part, made a first loop, added chain, crystal, big beaded bead, then crystal, chain and finished with the second loop. And then hung this construction on the hooks. They are ready!

На з'єднання елементів пішло зовсім трохи часу. Щоб це зробити, я розрізала відрізок ланцюжка на дві частини. Я його не міряла, просто використала залишок, який мала. У мене також немає товстого срібного дроту, тому я взяла піни, зрізала їхню"булавочну" частину, зробила петлі, нанизала ланцюжок, потім кристал, потім велику намистину, потім знову кристал, ланцюжок і друга петля. Потім всю конструкцію привішуємо на гачок. Готово!


And here they are - my Blossoming Wheels of Life!
Ось і вони - мої квітучі кола життя!

14 March 2016

Spring Blossoming Temptation (Necklace)

Undoubtedly the time of spring garden blossoming, that hasn't come here yet, by the way,  is one of the most inspiring and symbolic in a year. Which of us is not waiting  for it and who is able not to rejoice at the beauty of the real new life's feast? And it is almost impossible to keep oneself from the wish to get at least a tiny piece of this spring tenderness that is given to us by nature with the magnificence of gardens' blossoming. So, let's try to express this dreamlike impression in new jewelry :-)

Спокуса весняного цвітіння (намисто)

Без сумніву пора весняного цвітіння садів, яка ще тут не настала, до речі, є однією з самих натхненних і найбільш символічних в році. Хто ж її не чекає і не радіє красі справжнього свята нового життя. І дуже важко утриматися від бажання закарбувати хоча б маленьку часточку цієї весняної ніжності, яку дарує нам природа разом з пишним цвітінням садів... Отже, спробуємо виразити те казкове враження в новій прикрасі :-)

There is not much to tell about my work on the necklace because it is just a modification of a Cellini spiral (or peyote tubular), two of which I've already made before for  Carpathian Path  pendant and for  Catch the Wave bracelet. While choosing the colourstyle, I thought about Spring Blossoming, but when pondering about the materials, I thought about one of my favourite YouTube teachers ( +Jill Wiseman ) words who often finishes her basic tutorials with encouragement to try new techniques with different kinds of beads. And thus this time I chose three of them: 8.0, 10.0 and triangles. Before I started beading this spiral in this alternation of colours and beads, 7!!! samples were made. But having the result in front of my eyes I have none of regrets about the time spent for experiments. It was worthy and useful.

Про мою роботу над цим намистом особливо немає чого розповідати, тому що це просто одна з модифікацій джгута Селіні (Челіні), або джгута пейот, який я вже робила для кулону "Карпатський шлях" та браслету "Тримай Хвилю". Поки обирала кольорову гаму, думала про цвітіння садів, а ось коли замислилась над матеріалами, тримала на думці слова однієї з моїх улюблених YouTube вчителів +Jill Wiseman, яка часто закінчує свої базові майстер класи заохоченням пробувати нові техніки різними намистинами. Тому цього разу я зупинилася на бісері №№ 8 і  10 та трьох граній рубці (трикутниках, не впевнена, що обрала українською правильний термін, але "нехай буде гречка", як казала моя бабуся, коли щось не мало такого вже принципового значення). До того як почала плести джгут такої конфігурації, було зроблено 7!!! зразків. Але маючи перед очима результат, не маю жодного жалю що до витраченого на експерименти часу. Це було варто і корисно робити.

12 March 2016

Red Blouse, Simple & a Little Strange :-)


All what is worth saying about my new project is said in the title. In fact, I can avoid writing my little introduction. The blouse is so red that its bright and saturated hue makes you think there is no other colour in the world at all :-) And it is very a very simple pattern indeed, this ideal sewing project for a working woman took me just few hours to make. And this top, or blouse, is a little strange indeed... at least for me, with its designed unprocessed edges, long and wide sleeves that made an impression of an oversized thing although it is no so at all. But I chose it right because it is that kind :-)


Червона блуза, проста і трохи дивна :-)


Все що варто казати про мій новий проект вже сказано в заголовку. І насправді я можу і не писати мого маленького вступу, бо блуза настільки червона, що її яскравий насичений відтінок примушує думати, що інших кольорів в світі і не існує:-) І її крій такий простий, у мене пішло всього декілька годин на пошиття блузи - ідеально для жінки, яка працює. І вона справді трохи дивна, принаймні для мене, з її необробленими краями, довгими та широкими рукавами, які надають враження наче річ не по розміру, хоча це зовсім не так. Але я її обрала якраз через те, що вона така, яка є :-)


So the blouse #122 from Burda 10/2013.


Отже блуза 122 з 10/2013.


While sewing I, of course, couldn't submit unprocessed edges of the sleeves and neckhole. For me it is some extravagance. So I made a usual facing for the neckhole and hemmed the sleeves.
To cut the facing just put the front and back on the fabric (the front to the fold), outline the neckhole and shoulder and cut the details 4-5 cm in width.


Звісно, під час пошиття залишити необроблені краї вирізу горловини та низу рукавів було неприйнятно. Для мене це все ж таки екстравагантно. Тому горловину я обробила звичайною обшивкою, а рукава підшила.
Щоб викроїти обшивки, розкладаємо передню і задню частини на залишках тканини (передню частину до згину тканини), обводимо по контуру виріз горловину і плече і вирізаємо деталі завширшки 4-5 см.


Then work as usual: reinforce and stitch the details together. Then sew it to the neckhole. If you don't like top stitches, you can stitch the facing just to the seam allowance (on the right bottom photo shown with a needle and thread) but I prefer top stitching so i made it (the right top photo). The outside  edge of the facing can be either overlocked or rolled and stitched.


Потім працюємо як зазвичай. Зміцнюємо деталі, зшиваємо їх разом і пришиваємо вздовж краю горловини. Якщо тобі не подобаються оздоблювальні строчки, можна настрочити обшивку на припуск шва (показано голкою і ниткою на нижньому фото праворуч). Але я надаю перевагу оздоблювальним стібкам (верхнє фото праворуч). Зовнішній край обшивки можна або обмітати, або підігнути і настрочити.


The designed sleeve is 2.5 cm longer than usual and it is pretty wide at the hem. So to make it ordinary, the hem line should be changed. I used this extra length as seam allowance and narrowed the sleeve to the bottom.


Запропонований рукав на 2,5 см довший за звичайний, до того ж він доволі широкий по низу. Щоб його спростити, треба змінити лінію низу.  Я використала цю додаткову довжину як припуск на підгибку і звузила рукава до лінії низу.


As the sleeve's narrowing is quite remarkable, the hem allowance should  mirror  the sleeves' shape.
Otherwise after hemming the sleeve will have gathering and wrinkling at the bottom.


Оскільки звуження рукава досить помітне, припуск по низу повинен відзеркалювати форму рукава.
Бо інакше після підшивання рукав матиме зморшки і призбирання по низу.


I don't know what the reason that the pleats on the sleeves' caps are supposed to be folded in the same direction.
I made it in usual way as well: from both sides to the centre of the sleeve.


Не знаю з якої причини, але складки по окату рукавів зашиваються в одному напрямку.
Я заклала їх теж в звичний спосіб - від боків до центру.


To fasten the blouse on the back I used a hook and a loop.


Щоб застібати блузу по спинці, я пришила гачок і зробила петлю.


As the blouse has puffed caps, to help them keep the shape one can make some kind of shoulder pads. It is good to make them from  doubled (folded twice) tulle but as I had none, I used non-adhesive interfacing.

Cut the stripe from your material, fold and stitch pleats to get the ready length of the pad about 12-14 cm and then sew them to the sleeve caps' seam allowance.


Оскільки блуза має рукава з буфами, щоб допомогти їм тримати форму можна зробити своєрідні накладки. Краще це буде зробити зі складеного вдвоє фатіну, але у мене його немає, тому я зшила їх з неклейового флізеліну.
Вирізаємо смужку з наявного матеріалу, закладаємо і застрочуємо складки, щоб в готовому вигляді отримати довжину накладки 12-14 см, потім пришиваємо до припуску шва окату рукава.


Besides all the mentioned above features, this blouse is pretty universal and this aspect is always important for me because I like to combine  new items with those I've already got into my wardrobe.
So for everyday wearing I guess this pair with  the skirt from the previous project looks pretty.


Крім всіх вищезазначених якостей, блузка також є універсальною, і цей аспект завжди для мене важливий, бо мені подобається поєднувати нові речі з тими, що в мене вже є.
Отже для повсякденного варіанту досить гарно виглядає парочка зі спідницею з мого попереднього проекту.


Undoubt partner for red is black. The skirt is not new, it is pattern #114 from Burda 11/2006.
How to make a necklace was told here.


Безсумнівний партнер для червоного - чорний. Спідниця не нова, модель 114 з Burda 11/2006.
Як зробити намисто розповідала тут.


Іt is the only picture where the sleeves look the way they should be so red and black again :-) The skirt is one of my favourite ever and I like it so much that wear it very rarely not to have it worn out :-) The pattern #117 from Burda 11/2008.
All about the jewelry is here.


Це єдине фото, на якому рукава виглядають так, як вони і мають бути, тому червоний і чорний знову :-) Спідниця одна з моїх найулюбленіших. Вона мені так подобається, що я її дуже рідко вдягаю, щоб не зносилася:-) Модель 117 з Burda 11/2008.
Все про прикраси тут.


One more favourite to make a pretty couple with red is white. The blouse is long enough to be paired with trousers. The pants made several years ago, too. The pattern #107 from Burda 1/2006.
So let's wear red till we can afford it:-)


Ще один улюбленець для поєднання з червоним це - білий колір. Блуза достатньо довга, щоб носити її зі штанами. Штани пошиті кілька років тому, модель 107 з Burda 1/2006.
Ну що ж, носімо червоний, поки можемо собі це дозволити:-)


8 March 2016

Stripy Skirt, Business, Feminine & Playful


I guess there are much more epithets for this skirt that it really deserves. But very often what is simpler gets much more attention than what is more complex... Probably because it is easier to cope well with the first one:-) One made something quickly and well - and here you are, the hero of the day! Fast but undoubtedly good result motivates and pushes to new achievements anybody in any activity. And what I did so prominent to wish to start the next?  I've at last sewed a skirt from the stripy fabric that left from the trousers and the blazer :-)


Смугаста спідниця, ділова, жіночна та грайлива


Думаю епітетів для цієї спідниці набагато більше ніж вона на те заслуговує. Але дуже часто те, що простіше отримує більше уваги ніж те, що складніше... Мабуть тому, що з першим легше впоратись:-) Хутко і вправно щось зробив і ось - молодець! Швидкий, але обов'язково гарний результат мотивує і спонукає до чергових досягнень будь-кого і в будь-який справі. Отже, що ж такого я зробила, щоб вже хотілося взятися за наступне? Пошила нарешті спідницю зі смугастої тканини, яка залишилась від штанців та жакета :-)


I liked this model #115 from Burda12/2015 as soon as I saw it in the issue but thought I would make it only on occasion. It meant I was not going to buy any fabric to sew it at once. But I was lucky enough with the leftovers from the above mentioned projects not to make the pattern wait too long.
Wrap, optimal length and a little widened to the hem silhouette are the details attracting me. However, to have the skirt in its best the fabric should be soft...  at least softer than mine.


Мені ця модель №115 з Burda12/2015 одразу сподобалась, але я подумала, що шитиму її лише при нагоді, тобто, одразу не побіжу купувати тканину спеціально для неї. Але мені пощастило з залишками матеріалу з попередніх проектів, тому моделі не довелося чекати занадто довго на пошиття.
Захід, оптимальна довжина і трохи розширений донизу силует - якраз ті деталі, які приваблюють мене в цій моделі. Проте, щоб спідниця вийшла якнайкраще, тканину бажано обрати м'яку... принаймні м'якішу ніж моя.


The first notion about the sewing concerns the inner edge of the front facing. If your overlocking is good you can leave the edge in this way but if it is not nice enough, it is better to roll the edge and sew it either with hands or by sewing machine.


Перше зауваження щодо пошиття стосується внутрішнього зрізу обшивки передньої частини. Якщо ваш оверлок робить гарну строчку, можна залишити край лише обметаним, але якщо - ні, то краще підігнути його і підшити або руками або на машинці.


I sewed the lining not exactly as it's described in the magazine so after joining the front and back parts, basted the yoke lining to  the skirt. Then pinned the loops to hang the skirt. To make such loops any braid can be used but if you have none, it is easy to do from the lining fabric. Cut the diagonal stripe, fold with the right side inside, stitch, turn it out, press, cut for two parts, pin or baste to the side seams of the skirt.


Пришивала підкладку до кокетки не так, як описано в журналі, тому після з'єднання передньої і задньої частин, примітала підкладку до спідниці. Потім пришпилила петлі, щоб в подальшому вішати спідницю. Такі петлі можна зробити з будь-якої тасьми, а можна з підкладочної тканини. Вирізаємо смужку по діагоналі, складаємо лицем всередину, прострочуємо, вивертаємо, прасуємо, розрізаємо на дві частини, пришпилюємо або приметуємо до бокових швів спідниці.


To sew the band at first I basted it to the edge on the wrong side of the skirt; stitched, basted the seam allowance to the band, fold the band, rolled and basted the seam allowance on the front half of the band.


Щоб пришити пояс, спочатку примітала його до краю спідниці зі звороту, настрочила, наметала припуск на пояс, склала навпіл, підігнула і  замітала припуск по передній половині.


Then stitched around.


Потім настрочила по контуру.


As for the sewing the yoke, when pinning or basting it to the seam allowance, give a little overlap.


Щодо пришивання підкладки, коли наметуємо її, чи пришпилюємо, додаємо невеличкий напуск.


Hem the skirt with slip stitch like the pants.


Підшиваємо спідницю потайним стібком так само як і штани.


I also recommend to make a couple of slip stitches on the wrong side of the front along the facing because when wearing the skirt the wrap will be opening anyway and the facing can turn out. To fix the corners of the hem on the spot is recommended to make tiny bars.


Також рекомендую зробити пару потайних стібків з вивороту стороні вздовж обшивка передньої частини,  тому що під час носіння захід все одно буде розкриватись і обшивка може вивертатися. Щоб прикріпити нижні кути підгинки низу, рекомендується зробити коротенькі закріпки.

27 February 2016

Spikes & Co Pendant

Well, all the company is together now... And ready for the adventures... if, of course, anything like this ever happens to jewelry :-) I like the result I've got if to forget about the term of making the pendant. Three weeks of creative pangs can be justified only either by the author's inexperience or by making a masterpiece (and somebody must earn for living, by the way). So, although modesty is not my distinctive feature, I should confess it is something in the middle:-))

While designing the pendant the aim was to avoid the entire repetition of the earrings' and the bracelet's design. I only wanted to use the same colour style and materials.


Кулон "Шипи & компанія"


Ну ось вся компанія і в зборі... Готові до пригод... якщо, звісно, такі колись трапляються з прикрасами:-) Вийшло непогано, якщо забути про термін виготовлення кулону. Три тижні творчих мук можна виправдати або недосвідченістю автора, або створенням шедевра (та ще треба і на життя заробляти), то хоч скромність  не є моєю чеснотою, маю зізнатися, що результат десь по середині :-)) 

Коли вигадувала цей кулон, моєю метою було уникнути повного повтору дизайну сережок і браслета. Я лише хотіла використати однакові матеріали та дотримуватися заданої кольорової гами.

The process started with beading a cabochon. To choose what I need to do for it with my materials, I decided to string different kinds of beads alternating them with spikes and tried them on the pictures which were considered to be future cabochon's back. Very effective method, I certainly will use it again and again.


Процес розпочався з обплетення кабошону. Щоб вибрати, як я можу це зробити з матеріалів, які маю, вирішила нанизувати різні види намистин по черзі з шипами та приміряти їх на світлини, які могли б стати майбутнім фоном кабошону. Дуже ефективний метод, до речі, тому буду користуватись їм і надалі.


The variant of  the spikes  alternating with cuts seemed to be the best. So after gluing the cabochon to the piece of a postcard I beaded such first row.


Шипи поєднані з рубкою здалися мені найкращим варіантом, тому після наклеювання кабошону на клаптик листівки, я нанизала такий перший ряд.


At first I beaded the cabochon's back with twins. It was not long and hard because I already had done it for this rivoli. But this time I worked from the longer row and made decreasing of the twins to the centre.


Спочатку обплела задню частину кабошону твінами. Це було нескладно і недовго, тому що я вже це робила для цього ріволі. Але тут роботу розпочала з довшого ряду, а потім до центру твіни убавляла.


Then after some time of the experimenting beaded the front of the cabochon.


Потім, витративши трохи часу на експерименти, обплела лицеву частину.


After much more time of thinking and trying what necklace I wanted, the next steps were making the beaded beads. The first one is from 4 mm pearls and 10.0 seed beads. These latter ones are necessary not only to embellish the ready bead but to make it sturdy as well.
When making the element for the necklace as you see at first I used blue 4 mm bicones but in the ready piece they looked not so good so I changed them for topaz colour.
I already used the tutorials for making such bead, for example, in this project.


Після набагато довших спроб і роздумів, яке ж все ж таки я хочу намисто, наступними кроками були виготовлення намистин. Перші - з 4 мм перлів з додаванням бісеру №10. Цей останній необхідний не лише для краси, а і для зміцнення намистини.
На фото видно, що для створення елементу спочатку я використала блакитні 4 мм біконуси, але в готовому виробі вони виглядали недоречно, тому замінила їх на кольору топаза.
МК з виготовлення таких намистин я вже використовувала, наприклад, для цього намиста.


To make a  beaded bead from twins I used this tutorial from +Beadaholique. This bead turned out to be very wobbly so it had to be reinforced with seed beads as well. To make the elements the blue bicones matched well here.
Good question is why I so insisted on adding blue colour to the necklace... Just because the ready pendant remind the sun and the sun needs some sky:-)


Щоб зробити намистину з твінів, скористалася цим МК від +Beadaholique. Ця намистина була дуже "живою", тому її теж довелося зміцнювати бісером. Для виготовлення елементу тут блакитні біконуси  згодилися краще.
Гарне питання,  чому я так наполягала на додаванні блакитного кольору до намиста... просто тому, що кулон формою нагадує сонечко, а сонечку потрібно трохи неба:-)


So the elements are ready and now the rope should be made. I chose the tubular herringbone bead weaving with some inclusions... after much experimenting... yes... chose twins for that. Such alternating made a slight spiral effect and the rope reminded some tree branch with buds (my mum said, the branch is old and dry and my opinion is it is awaiting the sun shine to start blossoming).


Отже елементи готові і настав час сплести якусь основу. Я обрала  техніку "ндебеле" з включенням додаткових намистин... після декількох експериментів... так... додавати вирішила твіни. Таке чергування створило дуже легкий ефект спіралі, а готовий джгут нагадав мені гілочку дерева з  бруньками (мама сказала, що гілочка стара і суха, а на мою думку, вона просто чекає на сонячне світло, щоб почати розпускатися).


And the final step is connecting all the elements and waiting for the occasion to wear the necklace:-)


Останній крок - з'єднання всіх елементів у намисто... І чекання на момент, коли його можна буде вдягнути:-)


19 February 2016

The Red Is for Love and the White Is Just Seed Beads :-) (Filled Tubular Netting Necklace)


The idea to embody the impression made by red berries on the snow got the logical continuation  into a new necklace created with new for me beading technique not to leave these earrings without a company:-)
The technique is simple although requires many materials. At the same time everybody can be a good designer using this filled tubular netting lace because it is very easy to create something new beautiful and really individual with it. 


Червоний - то любов, а білий - то просто бісер :-)

(Сітчастий джгут з наповнювачем)


Ідея втілити враження вид червоних ягід на снігу в якійсь прикрасі логічно отримала продовження у намисті, яке я зробила в новій для мене техніці, щоб не залишати ці милі сережки самотніми :-)
Ця техніка проста хоча і потребує багато матеріалів. Натомість сітчасте плетіння з наповнювачем дозволяє кожному почуватися гарним дизайнером, оскільки не так вже і важко створити з його допомогою щось нове красиве і справді індивідуальне.


So  my interpretation needed about sixty-six 6 mm cherry pearls, eighty-four 4 mm cherry pearls, forty-two 6 mm red crystals, twelve 8 mm crystals, thirty 3x4 red rondelles, about twenty-five grams of seed beads of main colour (pearl white) and not so much of the second colour accent seed beads (transparent with silver tunnel).


Отже моя інтерпретація цієї техніки потребувала шістдесят шість 6 мм вишневих перлин, вісімдесят вісім 4 мм вишневих перлин, сорок два 6 мм червоних кристали, дванадцять 8 мм червоних кристалів, тридцять червоних ронделів 3х4 мм, біля 25 грамів білого перлового бісеру (основний колір) і не дуже багато додаткового (прозорий зі срібними внутрішніми стінками).


It is one of  classic basic techniques and there are many different tutorials on YouTube to learn. As for me, I like this one from +Jill Wiseman. But after looking through several videos I sticked to the idea to use different sizes of the beads for the filling. As I couldn't know what would be the ready length of the rope with bigger beads, I decided to make the central part of it at first and arranged the beads on the mat in the wanted order to include them into the work. Then finished the beading from the ready front piece to both sides. I also changed the beads for smaller sizes and lessened the number of the seed beads. 

Це одна з класичних основних технік і на YouTube є багато відео для навчання. Особисто мені подобається цей майстер клас від +Jill Wiseman. Але переглянувши декілька з них, мене спокусила ідея використати намистини різних розмірів для наповнювача. Оскільки я не могла знати точної довжини цієї частини готового намиста,  то вирішила спочатку нанизати передню частину і просто виклала на столі бажаний порядок намистин, щоб визначитись що за чим нанизувати. По закінченні роботи доплела бокові частини, для чого змінила розміри намистин на менші. Кількість бісеру також змінюються   в залежності від розміру намистин.


The clasp is a usual toggle.


Застібка - звичайний тогл.


  That  what is love on (or under) the snow :-) Cold but very beautiful:-)

                                                      ... I surely have a couple of pieces of red silk somewhere...


   Ось така вона - любов на, чи то під, снігом:-) Холодна, але красива:-)

                                                                ... Десь є у мене пара відрізів  червоного шовку...