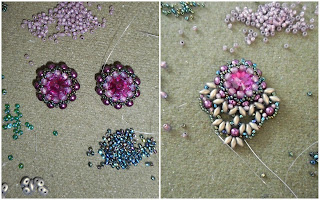
I used to see such bird at the picture in some kid's book. Since then I imagined it as a small bright creature with a long fluffy colourful tail. The idea for the earrings was inspired by that vision and the tutorial by Alessia Principe. And only when the earrings were ready, I googled the name of the bird to check if it exists in real or it was only half invented image in my memory. And it turned out the bird is real but looks differently from what I had expected to see. As well as my earrings, which after being finished remind the paradise bird's tail as little as the real bird reminds my idea of the bird from kid's book :-)
Сережки "Райська пташка"
Колись я таку пташку бачила в дитячий книжці. З того часу я уявляла її собі як маленьку яскраву істоту з довгим пухнастим хвостом. Ідея сережок і була навіяна тим видінням та цим майстер класом від Alessia Principe. І лише коли сережки вже були готові, я погуглила назву пташки, щоб з'ясувати, чи вона справді існує чи це лише напіввигаданий образ. Виявилося, пташка справжня, тільки виглядає вона не так як я її собі уявляла. Те саме і з моїми сережками, які по закінченню роботи так само мало нагадують пташиний хвіст райської пташки як і справжня пташка схожа на моє уявлення про неї з дитячої книжки:-)
The tutorial is very good and clear despite it is in Italian. I followed all the steps but started with 3 mm firepolished beads because have no 3 mm bicones.
After the rivoli was bezelled, it was not steady in it so added aches of 3 seed beads between every two seed beads and then added one more row of seed beads. It made the bezel tight.
МК чудовий і все зрозуміло хоча він італійською. Я слідувала інструкції, але почала з намистин firepolished 3 мм, тому що біконусів 3 мм у мене не було.
Коли обплетення було готове, ріволі в ньому тримався не дуже жорстко, тому я додала арки з 3 бісерин між кожних двох і потім додала ще один ряд бісерин. Так обплетення стало щільним.
I also recommend after the bezel is ready to start with new thread. At least it was right for me because there were so many passes of the thread through some seed beads and superduos that few of them broke during the work. And I just had to unpick the "tail" without touching the bezel.
A couple of times I added seed beads where the designer hadn't because the thread was seen too much.
Також рекомендую продовжувати роботу новою ниткою після обплетення ріволі. Принаймні мені це згодилося, тому що через деякі бісерини і супердуо нитка стільки разів проходила, що декілька намистин зламалися. І мені достатньо було просто розпустити "хвіст" не чіпаючи обплетення.
Також пару разів я додавала бісерини там, де дизайнер - ні, тому що надто було видно нитку.


Gorgeous earrings!
ReplyDeleteThank you very much, Maria:-)
Delete