Розумна, гарна та вправна :-) Useful fun for needleworkers / Корисні розваги для рукотворниць
About Me
- Oksana Starzhynska
- My blog's main subjects are sewing, the thing in which I am experienced the most, and beadwork, which is, in fact, pushed me into blogging. I am also engaged in knitting and crocheting. All together they are the set of skills which I use to make my wardrobe my whole life. These are not my only interests, I also like the English language (that's one of the reasons that my blog is bilingual), try to travel around my country and abroad (when can afford it), am interested in art (to the degree of a dilettante but nevertheless) and adore the people who can create anything beautiful or useful whatever it is :-) So welcome to a needlecrafter diary!
Showing posts with label geometry. Show all posts
24 March 2024
3 June 2022
Iris Necklace and Earrings Set
Today the third day of summer. I made a new set of jewellery. I don't remember when its beading started as probably none of us noticed there was spring this year and I began my project on some day in spring, maybe in March or April. We are mostly focusing on the main things now, really main and important. Our life saving and our victory. To have joyful moments are as meaningful to survive. My set seems to be full of delight and brightness as well as plenty of flowers around now. For example, irises. A lot of them fill the hot southern air with their saturated astringent scent and triumphant beauty now. It cannot but inspire, can it? :-)
Намисто і сережки "Ірис"
Сьогодні третій день літа. Зробила новий набір прикрас. Не пам'ятаю коли почала плетіння, тому що мабуть жоден з нас цього року не помітив, що була весна, а робота розпочалася якогось весняного дня, можливо десь у березні чи квітні. Ми зараз зосереджені на головних речах, справді головних і важливих. Збереженні життя і нашій перемозі. Дозволяти собі хвилини радості теж дуже вагомо для виживання. Мій набір, здається наповненим радістю і яскравістю так само як квіти, яких зараз навколо дуже багато. Наприклад, ірисів. Незліченна їх кількість наповнює спекотне південне повітря своїм насиченим терпким ароматом та тріумфальною красою. Це ж не може не надихати?
The materials were prepared long ago the used pattern for the pendant and the earrings by Helena Tang-Lim from B&B August 2019. The pendant has more interesting rope in the magazine but I didn't have enough seed beads for it as to make the earrings was more important for me.
Матеріали для набору були давно підготовлені, модель кулону і сережок від Helena Tang-Lim з B&B серпень 2019. В журналі кулон має цікавіший джгут, але у мене на нього бісеру не вистачило, оскільки зробити сережки було для мене важливіше.
22 July 2019
Hibiscus Necklace
If put some project aside, it can stay unfinished indefinite time so to avoid it and having on mind some ideas, last few days I spent for making this Hibiscus Necklace. The necklace consists of three parts: the flower itself (the details are here), an open shape frame as a base for a pendant and a herringbone rope. The extra bonus - I bought nothing to make this necklace because used only the materials from my stash. And it is good because when the stash is becoming emptier, it means some day I can indulge myself in making it full with something new :-)
Намисто "Гібіскус"
Якщо відкласти якійсь проект на потім, він може залишатися незавершеним невизначений час, тож, щоб цьому запобігти і маючи декілька ідей, останні декілька днів я витратила на виготовлення цього намиста. Воно складається з трьох елементів: самої квітки (докладніше про неї тут), рамки-трапеції як основи для кулону і джгута ндебеле. Додатковий бонус - нічого не купувала для роботи, скористалася тим, що було в запасах. І це добре, бо якщо запаси чогось закінчуються, одного дня можна буде дозволити собі їх трохи поповнити :-)
At first I made a pendant. Since I beaded my first open shape, I had some practice to make them, in the blog the projects are labelled as "geometry". I chose trapezium form to try new variant. The common idea of the beading them is, for example, here. Then sewed the flower to the frame.
Спочатку зробила кулон. З того часу як я нанизала мою першу відкриту форму, у мене ще були можливості тренуватися., у блозі такі проекти ідуть під тегом (міткою) "geometry". Вибрала форму трапеції, щоб спробувати новий варіант. Загальне уявлення про таке плетіння можна знайти, наприклад, тут.
Then I beaded a new for me type of a herringbone rope from Leslee Frumin tutorial. Its pattern you can find free here. I am planning to add one more rope but in the colours of the flower.
Потім сплела новий для мене тип джгута ндебеле з майстер класу Leslee Frumin. Його модель можна безкоштовно взяти тут. Збираюся додати ще одну стрічку такого джгута, але в кольорах квітки.
9 June 2017
Shaped CRAW Bracelet
It is worth saying that apart from the projects made by my own designs, this new piece is one of the most intricate patterns I've made. This new bracelet is beaded in CRAW technique. I have already made a simple CRAW rope and a couple of CRAW bracelets: simple and not simple at all :-) This time I tried to make a bracelet with 3D effect, it means it is shaped, consists of five double layered motifs. It was interesting indeed to work on it and I'd love to go on developing my skills in this technique.
The bracelet made by Gabi Gueck design from Beadwork February/March 2013.
The bracelet meant to be an accessory to this dress. But since my deep plunging into beading, it is the rare occasion when the dress was ready much earlier than the matching jewellery. At least I am almost on time to the summer dresses season:-)
Об'ємний браслет в техніці CRAW
Техніка, в якій сплетений цей новий браслет у нас не називається CRAW, але переклад її назви - право-кутне плетіння - якнайкраще відповідає її сутності, тож я її так і називатиму (хоча слова "правокутний" може і немає, то буде :-)).
Якщо оминути прикраси, виконані за моїм власним дизайном, цей браслет можна назвати однією з найбільш хитромудрих моделей, яку я робила. В цій техніці вже колись був виконаний простий джгут і пара браслетів: простий і зовсім непростий :-) Цього разу я спробувала нанизати об'ємну модель, це означає, що виріб має певну геометричну форму і складається з п'яти двошарових мотивів. Це було справді цікаво і я із задоволенням продовжу практикуватися в цій техніці. Модель браслета за дизайном Gabi Gueck з журналу Beadwork лютий/березень 2013.
Виріб призначався аксесуаром до цієї сукні. Але з часу мого глибокого занурення у виготовлення прикрас, це той рідкісний випадок, коли вбрання було пошито набагато раніше за відповідну прикрасу. Принаймні, я встигла до сезону носіння літніх суконь :-)
The scheme in the magazine is clear so I just followed it. Made five motifs and connected them in a bracelet. But I didn't have 3 mm bicones so added 4 mm and they are bigger than it needed. For the clasp bars I made only one cube of CRAW to shorten the bracelet.
I also broke the pattern when stitching the pearls but only noticed that after finishing the bracelet. So left them as they are.
Схема в журналі зрозуміла, тому я просто все робила за інструкцією. Нанизала 5 мотивів і з'єднала їх в браслет. Тільки у мене не було біконусів 3 мм, тож я додала 4 мм і вони таки завеликі. Для застібки я нанизала лише один кубик CRAW, щоб зробити браслет трохи коротшим.
Також пару раз я збилася зі схеми поки додавала перлини, але помітила це, коли браслет вже був готовий, тож залишила як є.
20 May 2017
Romantic Geometry (Ring)
Once upon a time I came across some pictures from Contemporary Geometric Beadwork by Kate McKinnon. The works on them were stunning. Although then almost all the beadwork seemed to be absolutely incredible for me so I even cannot say I felt inspired, merely speechless:-)) Because at that time I had only initial beading experience and couldn't think I would ever be able to make something from that book. Besides, the publication was unavailable here anyway. The story has continued and now it turned out I am not just able to bead something from the book, I believe I would be able to guess how some of those stunning works were made using the known techniques and available on YouTube tutorials... I am not too self-confident, am I?... Hmm... :-)
Каблучка "Романтична геометрія"
Якось давно трапились мені світлини з книги Kate McKinnon Contemporary Geometric Beadwork. Вироби на них були приголомшливі. Хоча тоді мені майже будь яке нанизування здавалося абсолютно неймовірним, тому я навіть не можу сказати, що мене це надихало, лише відбирало мову:-)) Бо на той момент у мене був лише початковий досвід плетіння з бісеру, тож я і подумати не могла, що колись буду в змозі зробити хоч щось з тієї книги. До того ж все одно та публікація у нас недоступна. Історія отримала продовження і зараз виявляється, я не лише здатна дещо сплести з тієї книжки, думаю навіть можу здогадатись як виготовити деякі з тих приголомшливих робіт послуговуючись відомими техніками та майстер класами на YouTube... Я ж не занадто самовпевнена, ні?...:-)
A couple of weeks ago I cut a dress which is now looks in this way.
The reality my of my needlework life is that at first I make some accessory to the certain clothes and then the outfit itself. After looking through my treasure box it became clear I have the matching jewellery. But on the other hand, I wanted at least something fresh and it had to be something small. A ring was the right choice and I remembered about this tutorial to the book.
Пару тижнів тому я покроїла сукню, яка наразі виглядає ось так:
Реалії мого рукотворного життя складаються так, що спочатку я роблю якісь доповнення до певного одягу, а вже потім шию саме вбрання. Переглянувши мою скриньку скарбів, зрозуміла, що маю прикраси, які пасуватимуть до сукні. Але з іншого боку, хотілося зробити щось свіженьке і воно мало бути невеличким. Каблучка - те, що треба і я згадала про цей майстер клас до тієї книжки.
What is MRAW from the tutorial is clear but how to define the size of the ring I had to invent myself. And here my knowledge about triangles became in use probably first time in my life. My seed beads are Czech 10/0. For my size I added 7, 5, 7 spacers.
Що таке модифіковане плетіння в хрестик з майстер класу зрозуміло, а ось вигадувати як визначити розмір каблучки довелося самій. І ось тут мабуть перший раз в житті мені знадобилися мої знання про трикутники. Мій бісер 10/0 "чех". Для мого розміру я додала 7, 5, 7 бісерин спейсерів.
While beading the "wings" I thought I would omit the increasing on the corner which would be worn inside. Without that increasing the bellyband became stiff and wide and it wasn't comfortable. Besides, I thought I could want to make one more ring to wear two together and then the comfort wearing would be forgotten entirely.
Поки нанизувала "крильця", подумала, що можна обійтися без розширення з внутрішньої сторони каблучки. Без цього розширення пасок став жорсткішим і ширшим і це не було зручно. До того ж я подумала, раптом захочу зробити ще одну таку каблучку, щоб носити дві разом, то тоді про комфортне носіння можна забути взагалі.
It is not very difficult project but surely needs some skills and attentiveness. In fact it is an interpretation of the geometry which I've already made enough to understand the idea.
And why this time the Geometry romantic? Just because of the colour:-)
Це не дуже складний проект, але такий, що потребує певних навичок і уважності. Насправді, це інтерпретація геометрії, якої я вже наплела достатньо, щоб зрозуміти її ідею.
А чому цього разу геометрія романтична? Лише через колір:-)

26 December 2016
Peyote Pyramid Earrings, or Funny Geometry
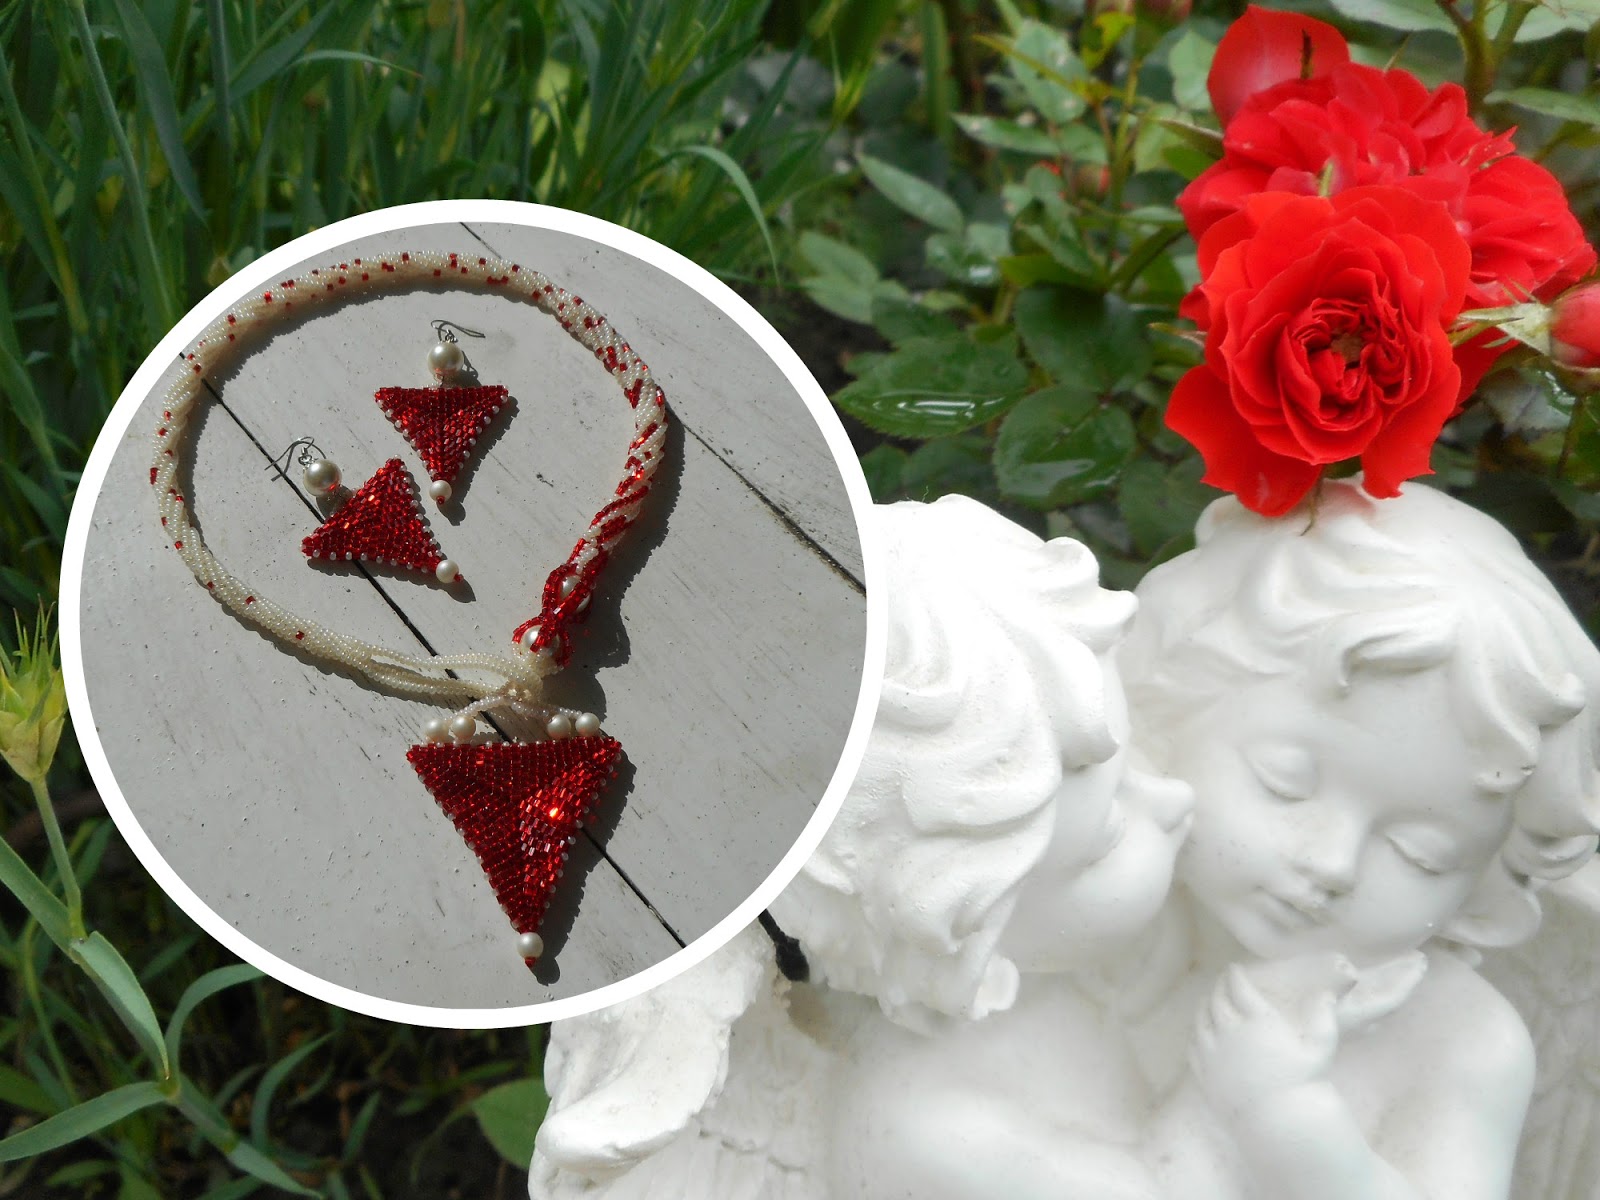
After making the pendant I asked myself why I'd been so indifferent to Geometry at school. It turned to be so interesting unless to learn any theorem :-) And it could be absolutely exciting if to use the beaded simple geometric figures, for example triangles, to create as many new beaded elements as you want. The previous project got the quick continuation. I thought the pendant wouldn't mind having a couple of friends and made a pair of earrings as soon as I became sure I am able to compile the motifs in any figures... well, maybe not in any but if to talk about the simplest pyramid of four triangles, I managed pretty well :-)
Сережки "Мозаїчна піраміда", або Весела геометрія
Зробивши кулон, я запитала себе, чому була такою байдужою до геометрії в школі. Адже вона виявилася такою цікавою, якщо не вчити жодних теорем:-) Вона може бути навіть захопливою, якщо використовувати сплетені з бісеру прості геометричні фігури, наприклад трикутники, для створення нових елементів у великий кількості. Попередній проект отримав дуже швидке продовження. Я подумала, що кулон був би не проти отримати собі компанію і зробила до нього пару сережок щойно зрозуміла, що можу зібрати з таких мотивів будь яку фігуру... ну, може і не будь яку, але якщо говорити про найпростішу піраміду з чотирьох трикутників, у мене вийшло непогано:-)
So to make such pyramids I made four triangles (the same as for the pendant) per an earring. I added extra row to every other motif to sew them together this time, too.
Отже, щоб зробити такі піраміди, я сплела по чотири трикутники (такі ж самі як для кулону) на кожну сережку. І так само в кожному другому додавала додатковий ряд для кращого зшивання мотивів.
Every of three corners were decorated with one 10/0 seed bead, one 4mm crystal and one 10/0. Then on the pin I assembled 4 mm crystal, the pyramid, 4 mm bicone, a drop bead and added a hook.
Кожний з трьох кутів прикрасила однією бісериною 10/0, 4 мм кристалом, бісериною 10/0. Потім зібрала на пін кристал 4 мм, піраміду, біконус 4 мм і намистину краплю. Додала гачок.
That's all. I can't help admitting that I'd love to go on playing with such elements.
Це все. Не можу не визнати, що із задоволенням продовжила б експерименти з цими елементами.
24 December 2016
Snowflake for Forest Nymth, or Webinar Experience
The other day it occurred to me that it is the right time to think about a New Year or Christmas present for myself. Thus, I started beading a necklace to pair these earrings. However, to predict when the work is over, is impossible so I wanted some quick project just to make the spirit bright and festive. The idea to join the beading webinar held by +Наталья Кузьма. Школа Бисероплетения to follow her new tutorial seemed to be the one I needed. Besides, I hadn't taken part in any along-project before so was curious enough.
Сніжинка для Мавки, або досвід вебінару
Днями мені спало на думку, що вже час подумати про новорічний або різдвяний подарунок для себе і розпочала плести намисто в пару до цих сережок. Але передбачити, коли ж та робота закінчиться, неможливо, а мені ж так кортіло зробити щось швиденько просто заради святкового настрою. Тож ідея приєднатися до вебінару від +Наталья Кузьма. Школа Бисероплетения, щоб скористатися її новим майстер-класом, здалася тим, що треба. До того ж я ніколи не брала участі в таких проектах-посиденьках, коли багато людей роблять одне й те саме і мені було цікаво.
The first part of the event was dedicated to the lecture about beading materials, instruments, inspiration, new ideas and so on. All that time I spent for matching the cutbeads. The tutorial required delicas but as I have none, wanted to use cutbeads which I like a lot. The tutorial included the common bead-along of one triangle and an explanation of what to do after making 12 such elements.
Перша частина вебінару була присвячена лекції про бісероплетіння: матеріали, інструменти, натхнення, нові ідеї і таке інше. Весь цей час я витратила на підбір рубки. МК вимагає деліки, але у мене її немає, тож я вирішила використати рубку, яка мені дуже подобається. Сам майстер-клас включав спільне виготовлення одного трикутника і пояснення, що робити після того, як наплетеш 12 таких елементів.
The beading is pretty quick but the sewing is very ... let's say troublesome. I yet had to add an extra row in every other element to sew the ready triangles. It decreased the curving of the sides and to some degree let me avoid the ruffling of the ready detail. I also decided at first to sew both of the 6-triangle circles and then join them together.
Плетіння трикутників доволі швидке, а ось зшивання… скажімо, клопітке. Я все ж таки додала ще один ряд бісерин в кожному другому трикутнику для кращого зшивання. До того ж це трохи випрямило бокові частини трикутників і дозволило уникнути зайвих шлярок вже готових сніжинок. Крім того, я спочатку зшила по 6 трикутників у кола, а вже потім з'єднала ті кола між собою.
My snowflake is stuffed with a piece of a nylon rope.
Only in the picture I noticed the rope is seen through the snowflake but I hope at the day light it won't be so remarkable.
I combined nice green and gold colours in my snowflake (which reminds a star if to say true:-))... May be some forest Nymth would wear the pendant before the holidays...:-)
Для наповнювача використала відрізок нейлонової мотузки. І лише на фото побачила, що він просвічує через сніжинку, але сподіваюся, що при денному світлі це не буде так помітно.
У сніжинці поєднала гарні зелений і золотистий кольори, тож може якась лісова Мавка і приміряє кулон перед святами...:-)
29 July 2016
Hexagon Peyote Pendant
The sea story is going on, and today it is represented by the Hexagon Pendant that makes up a set with the earrings from the previous post.
Funny thing with my bead weaving happens. My favourite kind of jewellery to wear is earrings but after starting this hobby, it became clear that necklaces are the main consumers of my creativity:-) And, of course, if the necklace catches the eye a lot, the earrings should be less remarkable and more modest in shapes and sizes. So this time I yet started with the earrings and my idea was to make the pendant more delicate and simpler to balance the set. I guess I managed.
Мозаїчний шестикутник (кулон)
Морська історія триває, і її продовження сьогодні представлене шестикутним мозаїчним (пейоточним) кулоном, який утворює набір із сережками з попереднього допису.
Кумедна річ відбувається з цим моїм нанизуванням. Мій улюблений вид прикрас, який я переважно волію носити, - сережки, але занурившись у це моє захоплення, стало зрозуміло, що намиста - головні споживачі моєї творчості:-) І, звісно, якщо намисто впадає в очі, то сережки мають бути менш яскравими і більш скромними за розмірами і формами.. Отже, цього разу я розпочала із сережок, а кулон було задумано зробити більш простим і делікатним, щоб врівноважити набір. Здається, мені вдалося.
To make a pendant, I used my first biggest hexagon from the previous project and made one more, the smallest, exactly like the one for the earrings. Then sewed them together only by the middle seed beads (as you see in the photo). As at once I decided to use a simple cotton lace as a rope for the pendant, the last joining stitches were made after the rope was added.
Щоб зробити кулон, я використала мій перший найбільший шестикутник з попереднього проєкту і зробила ще один найменший, такий самий, як для сережок. Потім зшила обидва шестикутники лише по середніх бісеринах (як видно на фото). Оскільки одразу вирішила, що намисто триматиметься на простому бавовняному шнурку, то останні з'єднувальні стібки були зроблені вже після того, як прикріпила шнурок.
To embellish the pendant and give it some extra sparkle, I added two big crystal beads.
And, as the rope is long enough, this time I omitted any clasp at all, just tied the ends of the rope.
Щоб прикрасити кулон і надати йому ще трохи мерехтіння, додала два великі кристали.
Оскільки шнурок достатньо довгий, цього разу я вирішила обійтися без жодної застібки і просто зв'язала його кінці вузликами.
It's hard to express how much the sea inspires:-))
Як все ж таки море надихає:-)
26 July 2016
Hexagon Peyote Earrings, or As Thick As Thieves :-)
Although I promised hold the course but turned aside for some time... just a little :-) so let's come back to the sea theme. On the simple reason that the memories about sea rest is still fresh and, fortunately, summer is not over so there is a chance to enjoy seascapes and sea voyages and to luxuriate on the sea waves and get some suntan (every time when buying the sun protection lotion, I think how much one should lie in the sun to use it fully:-)) In summer at the seaside I always feel as if I am at some festival and am surrounded with inseparable in their eternity bright sun and blue sky and sea...
Мозаїчний шестикутник, або Друзі "не розлий вода" (сережки) :-)
Щось останнім часом я ухилилася від морської теми, хоча збиралася не міняти курсу:-) Спогади про морській відпочинок ще яскраві та і літо ще не закінчилося, то можна ще насолоджуватися і морськими пейзажами і прогулянками під вітрилом і без і поніжитися на морських хвилях і позасмагати (щоразу купуючи захисний засіб від сонця питаю себе, скільки ж це треба на пляжі вилежуватись, щоб використати увесь той крем? :-)) Влітку на березі моря завжди відчуваю себе наче на якомусь святі, а оточують мене на ньому нерозлучні у своїй вічності яскраве сонце і синя блакить моря і неба...
It turns out I am becoming a fan of open shapes and after making a square, diamond and drop, wanted to give a try to a hexagon. The idea for the earrings were found on one of the Pinterest boards. Then gathered all the materials of blue and yellow colours which I have, finally stopped on cut beads and started combinating.
Схоже на те, що стаю справжнім любителем відкритих форм. Зробивши квадрат, ромб і краплю, мені захотілося спробувати шестикутник. На ідею для сережок я натрапила на одній з дошок Pinterest. Потім зібрала всі матеріали жовтого і синього кольорів, які у мене є, зрештою зупинилася на рубці і почала комбінувати.
The first hexagon was made two big for my idea so I left it aside. The second try was better. The smallest hexagon made twice. First time started with blue and the second with yellow. The latter was better choice.
Перший шестикутник виявився занадто великим для моєї ідеї, то я його відклала. Друга спроба була кращою. Найменший шестикутник плела двічі: починаючи із синього кольору та з жовтого. Останній варіант ліпше підійшов.
The ready earrings were too light and seemed to me to be unfinished. So I added a crystal as a dangle both to make them heavier and add some zest:-)
Готові сережки були надто легкими і, як на мене, виглядали якимись незакінченими. Тому я додала кристал як підвіску. І щоб вони стали трохи важчими і щоб пожвавити враження:-).
And in this way they look now. And sea topic is still actual:-)
Ось так вони виглядають зараз. А морська тема все ще актуальна:-)
24 June 2016
Peyote Triangle, or a Pointer Pendant
What a charming thing our mood is: a couple of weeks ago, these earrings made me think about the arrow's tip but now, when the pendant is ready, I only see a pointer on the road in this peyote triangle:-))
Probably on the simple reason that rainy days make us more romantic and sentimental but now I am mostly focused involuntarily on the dreams about some summer trips. So let this triangle point only the right direction to the places where we can find some fun, stay safe and some of our dreams come true:-)
Мозаїчний трикутник, або Кулон "Дороговказ"
Яке ж все ж таки чарівне явище наш настрій: пару тижнів тому ці сережки наводили лише на думку про наконечник стріли, а зараз, коли кулон готовий, я лише бачу в цьому мозаїчному трикутнику дороговказ :-))
Мабуть, причина тут дуже проста: дощові дні схиляють нас до більш сентиментальних і романтичних думок, а зараз я мимоволі більш зосереджена на мріях про якісь літні подорожі. Отже, нехай цей трикутник вказує лише правильний напрямок руху до місць, де ми почуватимемося в безпеці, дозволимо собі трохи розважитися і, можливо, навіть збудуться якісь наші мрії.
The triangle for the pendant is made by the same technique and tutorial as for the earrings but with a few rows bigger. After finishing the element, I gathered the materials left from the earrings and made up a few variants of their combinations. The final one is on the photo.
The rope was made of two parts. At first, I made a short spiral tubular herringbone with a loop, long enough to use it as a part of the clasp. How to make such a loop is here, start from min 32:36.
Трикутник для кулона зроблений в тій самій техніці і за тим самим МК, що і сережки, але на декілька рядів більший. Коли елемент був готовий, я зібрала всі матеріали, що залишилися від сережок, і скомбінувала декілька варіантів. Остаточний - на фото.
Джгут для кулона робився з двох частин: короткий відрізок спіралі "ндебелє" і закінчила його петлею достатньо великою, щоб вона стала частиною застібки. Як зробити таку петлю, знайшла тут. Початок від 32:36 хв.
Then in the one but last row of the white seed beads I added two more white seed beads, locked them in the ring and made few rows of tubular herringbone, then added tow more between every pair of the seed beads and got eight seed beads. They were divided and then beaded separately to hold the big, 10-12 mm pearl. After that I experimented a couple of evenings again and at last just added one more pearl.
Потім в передостанньому ряду з білих бісерин я додала ще дві білих бісерини, замкнула їх в кільце і нанизала декілька рядів прямого джгута "ндебелє", потім додала ще по дві білих бісерини між кожної парою і отримала вісім. Потім поділила всі на пари і нанизувала чотири кінці окремо, щоб утримати велику, 10-12 перлину. Після цього я знову експериментувала пару вечорів і врешті решт просто додала ще одну перлину.
Then went to the spiral herringbone and while beading alternated the colours and the types of the seed beads in free oder, decreased to six seed beads. When got the desired length of the rope, sewed the loop part to it.
Потім перейшла до спірального джгута "ндебелє" і, поки плела, чергувала види і кольори бісеру у вільному порядку, убавила дві бісерини, щоб джгут став на шість. Коли сплела його бажаної довжини, зшила з першою частиною.
13 June 2016
Peyote Triangle, or Cupid's Arrows Earrings :-)
Playful summer time and the month of red let us fantasise about small baby look creatures who are considered to be flying around and aim our hearts with their arrows. I haven't seen any for ages but who cares? :-)
These deep and clever thoughts occurred to me while I was focusing on the idea for the new earrings. The only data was to have them red and white because they are meant to be an accessory for the outfit in the same colours. A few attempts to create something left me in the cold zone. And it is always a clear sign of my wrong choice either of the pattern or the materials. Changing the materials was the first need and as soon as red cut beads in my stash caught my eye, the second problem - choosing the pattern - was solved on its own because there are a lot of patterns that I'd like to make from these beads. The result is these shining triangles reminding the arrowhead.
Мозаїчний трикутник, або Сережки "Стріли Амура":-)
Грайливий літній настрій та червень місяць дозволяють нам пофантазувати про маленьких істот, по вигляду - маляток, які, кажуть, літають навколо і вражають наші серця своїми стрілами. Я, правда, вже сто років жодного не бачила, але що з того? :-)
Такі глибокі і розумні думки роїлися у мене в голові, поки я обдумувала ідею для нових сережок. Єдиними вихідними даними була червоно-біла кольорова гама, тому що сережки задумані як аксесуар до відповідного вбрання. Декілька спроб щось створити залишали мене в зоні "холодно". А це завжди очевидний знак того, що я помиляюсь або з вибором моделі або з матеріалами. Зміна останніх - перша необхідність, і щойно моє око зупинилося на цій червоній рубці - проблема з дизайном вирішилася сама по собі, тому що є дуже багато виробів, які б мені хотілося зробити з рубки. В результаті я отримала ці сяючі трикутнички, які нагадують наконечник стріли.
To make such an element is easy. Different kinds of seed beads are possible to use but the best are considered to be delica beads, which are very expensive and not very available here, so I used Czech cut beads, they are cheap and inspiring enough. I already made a few projects from them and they never betrayed my expectations.
There are many tutorials to make such triangles in different languages but I followed this one. The video is short, very instructive and wordless:-)
The tutorial is for a pendant so for the earrings, I beaded fewer rows.
One more notion. Such elements can be volume (3D). In this case, two triangles are made, sewn partly, stuffed and then sewn fully and then the tutorial can be used only for making a triangle because here the second triangle is beaded from the first one and the ready element is flat (on the photo).
Зробити такий елемент просто. Різні види бісеру можна використати, але ідеальним вважається деліка, дуже дорогий і у нас не дуже доступний сорт, тому я користуюся чеською рубкою. Вона дешева, але створює чудовий переливчастий ефект у виробі. Я вже зробила декілька речей з такого бісеру, і він виправдовує всі сподівання.
Майстер-класів, як зробити такий трикутник, багато і різними мовами, але я обрала цей. Відео - коротке, інструктивне і без слів:-) Майстер-клас для кулону, отже, для сережок я нанизала менше рядів.
Ще одне зауваження - такі елементи можуть бути об'ємними. В такому випадку плетуть два трикутники, частково їх зшивають, потім наповнюють чимось і потім зшивають до кінця. Цей МК для цього підходить лише в частині плетіння першого трикутника, тому що другий плететься з середини першого і готовий елемент виходить пласким (на фото).
When the elements is ready the crafter's soul can't sleep at all because the most interesting part starts. Compiling the earrings: the moment be dependent from the imagination and taste.
Коли елементи готові, душа рукотворниці не може спати, тому що починається найцікавіше. Збирання сережки - час бути залежним від уяви і смаку.
Finally, it turned out to be pretty quick to make. And I guess it is a nice variant of Cupid's belongings :-)
Зрештою, це було доволі швидко зробити. І думаю, це гарний варіант атрибутів Амура :-)
17 April 2016
Peacock's Feather (Earrings)
The necklace from my previous project yelled for a pair of earrings. And I had a firm intention to make them at once. I tried few techniques and a couple of designs but none of them encouraged further actions. But when finishing a new dress today at about 2.30 a.m., it suddenly occurred to me that I still had no earrings to make a set with the necklace and if I didn't make them at the moment I wouldn't make them ever and then remorse for the wasted materials (implying money) would corrupt my brain. The idea appeared in no time:-) It was simple and obvious. I thought if the main motif of the necklace is a cabochon inserted into the open diamond, then the earrings should be some open shape as well.
Despite that yet I suspect if instead of sewing at night I slept, good ideas come more often to my mind...
Сережки "Перо павича"
Намисто з попереднього проекту волало про сережки до пари. І у мене було стійке бажання їх зробити одразу. Я спробувала якісь техніки і двійко моделей, але жодна з них не заохотила мене до подальших дій. А ось поки дошивала нову сукню сьогодні десь о пів на другу ночі, мені раптом спало на думку, що сережок у мене все ще немає і якщо я їх не зроблю зараз, то не зроблю ніколи. Тоді докори сумління щодо змарнованих матеріалів (читай грошей) вигризуть мій мозок. І ідея не забарилась: проста і очевидна. Я подумала, якщо головним елементом намиста є кабошон, вставлений у відкритий ромб, то і сережки мають бути якоїсь відкритої форми.
Незважаючи на все це, підозрюю, що якби замість шити по ночах, я спала, то гарні ідеї відвідували мене частіше...
So the first step is sketching. As I have some experience with open shapes, made a square and a diamond, I wanted to try something else. I chose the one reminding a drop because wanted to add a dangle detail with a teardrop crystal.
The materials had to be the same as for the necklace but finally only cut beads and 4 mm bicons of two colours and teardrops crystals were used.
Перший крок - малюнок. Оскільки у мене вже є досвід нанизування відкритих форм, квадрат і ромб, хотілося спробувати щось нове. Обрала фігуру, яка нагадує краплю, бо збиралася використати кристал краплю як підвісок.
Матеріали мали бути ті самі, що і для намиста, але зрештою знадобилися лише рубка та біконуси двох кольорів і кристали краплі.
To bead the open shape I found the scheme on Pinterest and just follow it. The number of the necessary seed beads to start I counted by my drawing.
Then made a dangle element, connected the details and added the hook with a bicon.
Щоб нанизати таку фігуру, я знайшла схему на Pinterest і просто все по ній робила. Кількість необхідних бісерин для початку роботи я розрахувала по моєму малюнку.
Потім виготовила елемент-підвісок, з'єднала деталі і додала гачок з біконусом.
So the earrings are a clear provement that even remorse can be inspiring and productive but it is much better to avoid it, of course :-)
Have an inspiring week, everybody:-)
Отже ці сережки доводять, що навіть докори сумління можуть бути надихаючими і продуктивними, але, звісно, краще їх все ж таки уникати:-)
Натхненного всім тижня!
9 April 2016
Peacock's Feather Necklace, or Why to Buy a Souvenir
Spring time and warm weather provoke musing about both past and possible future trips. And the first of them are the source of inspiration for the latter ones. For instance, last year about at this time I and my friend went to one of the most picturesque places of Ukraine, to Askania-Nova (it is the link to my album), old and beautiful national park. Despite I live pretty close to the sight I visited it first time and enjoyed my staying there very much... Observing the birds and their diversity made me feel like a child who saw something absolutely amazing :-) And one shouldn't be super smart to guess that such excitement couldn't but cause desire to embody some of the images in my handmade work. I bought a couple of peacock's feathers as a souvenir then and at last this year have made a necklace using one of them.
During the work none of the peacocks suffered, the park's workers gather feathers after the birds put them off and sell as souvenirs for tourists.
Намисто "Перо павича", або Навіщо купувати сувеніри
Весна у розквіті і теплі дні самі повертають до думок про подорожі, як про минулі, так і про можливі майбутні. І перші з них є безумовним джерелом натхнення для других. Наприклад, приблизно о цій порі минулого року ми з подругою відвідали одне з наймальовничиших місць України, старий і прекрасний парк Асканія-Нова (посилання на мій альбом). Хоча я і живу не дуже далеко від нього, потрапила туди вперше і отримала багато задоволення. Спостерігаючи там за птахами та їхньою різноманітністю, я почувалася як дитина, яка побачила щось надзвичайно дивовижне :-) І не треба довго думати, щоб здогадатися, що таке захоплення не могло не зародити бажання втілити якийсь з образів в моїх рукотворах. Я купила пару пір'їв павича і нарешті вже цього року зробила намисто використавши одне з них. Під час роботи жоден павич не постраждав:-) Працівники парку збирають пір'я після того, як птахи його скидають, і продають в якості сувенірів туристам.
So tell me, what colour the feathers of the peacock's tail are... at once, without looking at any pictures or photos... Yes, sea wave, blue, green, or to be exact emerald,... some hues of bronze.. OK, I see... No, its feathers are mostly dark purple and grey... well... some shining gold and green is present as well when the light is proper :-))
Making a cabochon. I already have the experience and it persuaded me in the fact that cabochon base can be made from whatever. Besides, I can avoid the procedure of embroidery and just pretend I bead a bezel for a rivoli. The only thing put me to doubt was how to glue the feather to the transparent piece of glass and keep it on the spot. At random I came across the advice from a very nice girl who recommends glue any cabochon base to the adhesive stripe first. I did, then glued the feather to the glass along the edges only and cut the rest of the feather.
От скажіть мені, якого кольору пір'я на хвості павича... тільки одразу, не розглядаючи жодних малюнків чи фото... Так, морська хвиля, синій, зелений краще скажімо - смарагд,... ну можливо.. якісь відтінки бронзи... Так... зрозуміло... Ні, пір'я в нього переважно темно сіро фіолетових кольорів... добре, якимось золотаво-зеленим теж відблискує при певному освітленні :-))
Виготовлення кабошону. У мене вже є такий досвід і він мене переконав в тому, що основу кабошону можна зробити з чого завгодно. До того ж можна уникнути процедури вишивання і просто прикинутись, що я обплітаю ріволі. Єдине, що мене бентежило, як приклеїти перо до прозорого скла так, щоб воно трималося на місці. Випадково я натрапила на пораду від дуже милої дівчини, яка рекомендує приклеювати основу кабошона спочатку на скотч. Так і зробила, потім наклеїла основу до кабошону (лише уздовж краю), залишки пера обрізала.
Now the idea of the necklace... When starting gathering materials and, most important, matching the colours, I just dived into the richness of all the hues, halftones and gleaming and instead of any imitation of the feather decided just to express the impression from my perceiving of the bird. Probably I am yet a usual woman as the peacock' feathers still impress me :-))
After making three peyote rows of cut beads I beaded the back of the bezel with 10.0 seed beads. To get the oval the decreasing were made along the two sides (on the drawing).
The next step - making an open diamond from cuts. I already made a square so just had to find some scheme for other figure. When it was ready, sewed the cabochon in the diamond. It is better to do that from the back side.
Then added embellishments from teardrops, 4x4 cubes and seed beads of different kinds.
Коли почала підбирати матеріали і, головне, кольори, я так захопилась розмаїттям та багатством всіх тих відтінків, напівтонів та переливів, що просто вирішила спробувати передати враження від їхньої гри та моє сприйняття пташки замість будь-якої стилізації. Мабуть таки я звичайна жінка, бо пір'я павича все ще діє на мою уяву:-)) Після нанизування трьох рядків рубки пейотом, перейшла до виготовлення задньої частини оплетки з бісеру 10.0. Щоб отримати овал, скорочення робила уздовж двох сторін (по малюнку).
Наступний крок - виготовлення відкритого ромбу з рубки. Я вже робила квадрат, тому потрібно було просто знайти схему для відповідної фігури. Коли він був готовий, вшила кабошон в ромб, робити це краще зі зворотньої сторони.
Потім додала оздоблення з крапель, кубиків 4х4 та бісеру різних видів.
The next stage is stringing. It is pretty free process although I made an approximate drawing for that as well. Not to use any ready spacers I made own from 4x4 cubes with brick stitch.
Далі просте нанизування - процес доволі вільний хоча і для нього я зробила приблизний ескіз. Замість готових роздільників, я зробила власні цегляним стібком з кубиків 4х4.
And finally - adding a clasp. It looks nice but I still have doubts if it's secure enough.
І нарешті - застібка. Виглядає гарно, але я все ще не впевнена, чи вона достатньо надійна.
When making such a piece of jewelry it is imporatant not to overdo. As whatever I make, it has the practical use, I mean it either is being worn or waiting for the certain outfit to be worn, I don't want to become just a showcase for such a bright item... But on the other hand, maybe it is exactly what I need to do, why to attract attention to the wrinkles... I still have a bust :-))
(The matching earrings are here)
З такою прикрасою - головне не переборщити. Оскільки все, що я роблю, має прикладне значення, тобто або носиться, або чекає на певне вбрання, щоб носитись, то не хочеться перетворитися просто на вітрину для такої яскравої прикраси... З іншого боку, може так і краще... навіщо привертати увагу до зморшок... у мене ще є бюст...:-))
(Сережки до пари тут).
Subscribe to:
Posts (Atom)