About Me

My photo
My blog's main subjects are sewing, the thing in which I am experienced the most, and beadwork, which is, in fact, pushed me into blogging. I am also engaged in knitting and crocheting. All together they are the set of skills which I use to make my wardrobe my whole life. These are not my only interests, I also like the English language (that's one of the reasons that my blog is bilingual), try to travel around my country and abroad (when can afford it), am interested in art (to the degree of a dilettante but nevertheless) and adore the people who can create anything beautiful or useful whatever it is :-) So welcome to a needlecrafter diary!

31 December 2019

Ruby Garnet Earrings


The final part of the jewellery set that already has a short and a long necklaces. It is surely my favourite part: the quickest and the most effective. The earrings are made of the beads from the mentioned before mix


Сережки "Рубіновий гранат"


Фінальна частина набору прикрас, який вже має коротке і довге намиста. Це точно моя улюблена частина: найшвидша і найефектніша. Сережки зроблені з намистин з тієї самої раніше згаданої суміші.


Thus almost all the beads from the mix were used. I only have few of them left. Those which were the only one and which were a lot. 


Таким чином майже всі намистини з суміші були використані, залишилося лише декілька штук. Або ті, які були в єдиному екземплярі або такі, яких було дуже багато.

30 December 2019

Ruby Garnet Necklace II

The second, a long one, Ruby Garnet Necklace to pair the first short one when it is needed. I wanted to have a choice to wear them separately on occasion so made in this way. The necklace made using the materials from those two mentioned before bags of beads as well. 


Намисто "Рубіновий гранат" ІІ 


Друге, тепер вже довге, намисто "Рубіновий гранат зроблено, щоб у разі необхідності надягати разом з першим. Хотілося мати можливість носити їх окремо у разі потреби, тому так і зробила. Намисто так само виготовлено з матеріалів з тих, згаданих раніше, двох упаковок намистин.


The work was not hard but time consuming. Among the beads there were three big fire polished beads: two of them I put aside for the earrings and third meant to be used for the necklace. But this latter one had the defect, very essential deep cut along the bead. Not to throw it away, as I liked it, around it I beaded a belt of three rows: 1 RAW, 1 peyote with 10.0 and 1 peyote with 15/0 seed beads. As it supposed to be the centre of the rope, I put it on the thread at once. 


Робота була нескладною, але час на неї пішов. Серед намистин тих наборів було три великі намистини fire polished: дві з них я відклала на сережки, а одну на намисто. Але ця остання має дефект: суттєву глибоку щілину уздовж намистини. Щоб її не викидати, бо вона мені сподобалася, я оплела навколо неї пасок з трьох рядів: 1 ряд - RAW (в хрестик), 1 пейотом бісером 10.0 і 1 пейотом бісером 15.0. Оскільки передбачалося, що вона займе місце по середині низки, то одразу розташувала її на тросику.


Then the thread was strung  to opposite sides starting from this central one. 


Потім низка збиралася в обидва боки починаючи з цієї як центральної.

29 December 2019

Ruby Garnet Necklace I

The most corresponding name for this work would be "if you want a new dress, at first make a necklace to match it". Despite such the definition is too long, it would reflect the whole story of making the necklace so I could go to the procedure of the stringing at once. But it is too long indeed, so instead I gave it the name of the beads' mix used for creating the necklace.


Намисто "Рубіновий гранат"I 


Найбільш відповідною назвою для цієї роботи стало б "якщо хочеш нову сукню, спочатку зроби до неї намисто". Хоча таке визначення було б занадто довгим, воно відзеркалювало б всю історію створення намиста, тож одразу можна було б переходити до процесу нанизування. Але це і справді дуже довга назва, тож натомість я перенесла на намисто назву суміші намистин використаних для його виготовлення.


I bought two bags of Ruby Garnet Mix of the same producer but the sets of the beads had both the same and the different beads. And it is good because the more diversity the better. It let me change the idea of the necklace I had planned to make before. I started with two short threads necklace containing the biggest and most shining beads. 


Я купила дві упаковки "Ruby Garnet Mix" одного виробника, але набори відрізнялися: вони містили і однакові і різні намистини. І це добре, бо чим більше розмаїття, тим краще.  Це мені дозволило змінити ту модель виробу, яку я планувала спочатку. Роботу розпочала з намиста з двох коротких низок, на які пішли всі найбільші за розміром та найбільш сяючи намистини.


22 December 2019

Cake Brooch


Brooch show is going on :-) There is still no system in the order of their making. Only pure interest and fun. When choosing the kits to purchase, I had doubts about this brooch. It seemed to be not very neat on the producer's site photo and it was clear that the pearls which are main elements of the embroidery here have defects. But then the curiosity won the practicality and the the decision was making in the Cake favour:-) I did like the pretty fresh and not usual colour combination and the materials for the basket here: they are gathered better than on the box's photo. I also liked the alternation of bugle beads and seed beads to cover the base so I used all the creamy bugles for that. Finally, I've got a sweet thing indeed, haven't I?:-) 

Брошка "Тістечко" 


Шоу брошок триває:-) Жодної системи порядку їхнього  виготовлення все так само немає. Лише чиста цікавість і забава. Обираючи набори для покупки у мене були сумніви щодо цієї брошки. На фото сайту виробника вона не виглядала дуже охайно і вже було зрозуміло, що перлини, які тут є головними елементами вишивки, будуть з дефектами. Але потім цікавість взяла гору над практичністю і рішення було прийнято на користь "Тістечка":-) Мені  справді сподобалося доволі свіже і незвичне сполучення кольорів і матеріали для кошика: тут вони кращі ніж на фото на коробці. Також сподобалося чергування стеклярусі та бісеру для зашивання фону, тому для цього я використала весь кремовий стеклярус. Зрештою, солоденька дрібничка у мене вийшла, чи не так?:-)


As for the materials I was right but, being prepared, wasn't upset:-) The worst is the biggest pearl because there is no part of it without any scratching. Mid side pearls are very old and even have rusty holes but let them consider to be just of a dark creamy hue. The pin was rusty again as well so I changed it for mine. Despite all that the outcome makes me forget about any flaws so it a worthy piece. 

For the trimming row I used the seed beads of three colours. 


Щодо матеріалів я була права. Але ж підготовлений - означає озброєний, тож не засмутилася:-) Найгірше: найбільша перлина немає жодного  боку без подряпин. Перлини середнього розміру такі старі, що мають іржаві отвори, але ж можна вважати, що це просто створює темніший відтінок кремового кольору. Булавка знову була іржавою і довелося замінити на свою. Незважаючи на це, результат примушує забути про всі недоліки тож це гідна річ.

Для обшивки використала бісер трьох кольорів.

19 December 2019

Watermelon Brooch

The post fixes the start of the second series of embroidered brooches which are planned to be six, too. Deep in my mind I hope the approaching holidays will let me have more time not only for beading but just to spend time well to feel the festive spirit. But, of course, any favourite activity is appreciated anyway not depending on which one it happens to be:-) This series compiled of very different brooches and has only one fruit piece which I've made today. But either it is not my favourite fruit or I am quite tired in the end of the term, all the beads, except the biggest red one in the centre, were sewed twice during the work because I wasn't satisfied with what I'd made at once. Finally it is ready and looks very bright and cheerful as any juicy fruit :-) 


Брошка "Кавун" 

Допис фіксує початок виготовлення другої серії вишитих брошок і їх також буде шість. Десь у глибині душі я сподіваюся, що прийдешні свята подарують мені можливість не лише виготовляти прикраси а і просто дозволять добре провести час, щоб відчути святковий настрій. Але, звісно, заняття будь якою улюбленою справою високо цінується незалежно від того якою :-) Ця серія складається з дуже різних брошок і лише одна з них - шматочок умовного фрукта, який я сьогодні і зробила. Але чи то через те, що це не мій улюблений фрукт, чи через втому в кінці семестру, всі намистини, крім найбільшої червоної у центрі, перешивалися двічі під час роботи, тому що я весь час була не задоволена тим, що у мене одразу виходило. Нарешті вона готова і виглядає дуже яскраво і життєрадісно, як будь який соковитий фрукт:-)


Almost everything was well with the work but the fixing the fastening. To keep the brooch's balance while wearing it the pin should be set closer to the top. I glued it as high as the length of the pin let. 


Майже все в роботі було гаразд крім фіксування застібки. Щоб зберегти баланс брошки під час носіння, застібку варто прикріпити якнайвище. Я її підняла настільки, наскільки дозволила її довжина.

15 December 2019

Sky Kiss Hat


The hat, obviously, has nothing in common with kissing, the name is just a reverence for the pattern from DropsDesign used as a prototype and that is called Lavender Kiss :-) I know it is winter now but it didn't feel like it is here. But on Thursday despite of absence of snow and frost, the air became so cold that reminded at once about the real season and I suddenly realised that probably I should make a warm hat matching my fabulous Colour Block Super Scarf  which I wear very often, by the way. The yarn was bought right after the scarf was ready so these Friday and Saturday nights were spent for the knitting. 


Шапка "Небесний цілунок" 

Шапка, вочевидь, жодного стосунку до цілунків не має, це просто реверанс у бік DropsDesign, чию модель використано як прототип і яка у них називається "Лавандовий цілунок" :-) Я знаю, що зараз зима, але тут цього не відчувалося. Проте, у четвер, незважаючи на відсутність снігу і морозу, повітря стало таким холодним, що одразу нагадало, яка зараз пора року і я раптом зрозуміла, що мені все ж таки варто зробити теплу шапку у пару до мого надзвичайного супер шарфу "Кольорові блоки", який я, до речі, надягаю дуже часто. Пряжу було куплено ще по закінченню роботи над шарфом, тож ці п'ятничний і суботній вечори було витрачено на плетіння.


The hat was knitted in three threads: one Alize LanaGold Classic and two Alize Kid Mohair, knitting needles 4. My hat differs from DropsDesign's but I used the way of decreasing and the idea of garter stitch band from them so without it I wouldn't manage. I started with 92 stitches because my thread is thicker and I knitted the hat flat so needed two edge stitches. The band is double for warmth. The decreasing was started with their round 3 and with 2 sts tog then 7 k. As I knitted flat in this way it looks neater.


Шапку сплетено в три нитки: одна Alize LanaGold Classic і дві Alize Kid Mohair, спиці №4. Моя шапка відрізняється від тієї, що на сайті DropsDesign, але я використала їхній спосіб убування петель та ідею планки платочною в'язкою, тож без них я б не впоралася. Набрала 92 петлі, тому що моя нитка товстіша і плела пласко, тому знадобилися кінцеві петлі. Планка подвійна для тепла. Убування почала з їхнього 7 ряду і  в іншому порядку: 2 л. разом потім 7 л. Оскільки плела не по колу, так це виглядає охайніше.


Today I am very glad with my outcome and gladly share it here. But, in fact, I knitted two hats. The first one was finished yesterday and unpicked almost at once as it turned to be too big. So late at night yesterday I started the second time and finished today at about lunch time. 


Сьогодні я дуже задоволена результатом і з радістю тут ним ділюся. Але насправді я сплела дві шапки. Першу було закінчено вчора і майже одразу розплетено, тому що виявилася надто великою. Тому так само вчора пізно вночі почала плести другий варіант, який і закінчила вже сьогодні десь до обіду. 

12 December 2019

Lemon Brooch


The other days one of my colleagues wondered if there were planned  addition to Fruit Brooches Collection and which ones. I replied I was going to continue with some more and offered her to guess the possible variants. The first of her ideas were some citrus fruits. And she was absolutely right. Because, for example, lemons put in good mood with their look even being just brooches:-) This Lemon is the last item of the kind from the first series but not the last fruit item as I have the second series ready to be made:-) This Lemon is supposed to be paired greatly with Orange Slice and I'm going to wear them together. Is there more cheerful and charming couple? 


Брошка "Лимон" 


Днями одна моя колега поцікавилася  чи планується поповнення колекції фруктових брошок і, якщо так, якими ще плодами. Я відповіла, що збираюся продовжувати і запропонувала її вгадати можливі варіанти. Її найперша здогадка була цитрусові і вона була цілком права. Тому що, наприклад, лимони поліпшують настрій своїм виглядом навіть якщо вони лише брошки:-) Цей "Лимон" - останній подібний виріб з першої серії, але не останній фрукт, оскільки маю напоготові ще другу серію:-) Поєднання цього "Лимона" з "Апельсиновою долькою" чудово виглядатиме, тож так разом я і збираюся їх носити. Чи є ще якась більш життєрадісна та чарівна пара:-)


Comparing with the previous five brooches, this one has the biggest variety of used beads, 17. I liked some of the materials and don't mind using the same for other projects, e.g., necklaces or bracelets. Here even the pearls had no defects, however, I had to replace the pin as the kit's one was rusty. 


В порівнянні з п'ятьма  попередніми брошками, ця має найбільше розмаїття використаних намистин, 17. Мені сподобалися деякі матеріали, я навіть не проти використати такі самі для інших проектів, наприклад, намист чи браслетів. Тут навіть перлини були без дефектів, проте, довелося замінити булавку, оскільки в наборі була іржава.

8 December 2019

Pomegranate Brooch


Once upon a time I used to see and eat, of course, a lot of pomegranates when living in Azerbaijan. Huge piles of the ripe fruits rose (and I guess still do) at the markets there. And I also saw pomegranate orchards both blossoming in spring and abounded with the red fruit in autumn. Along those gardens one could come across the rows of long cone baskets full of the fruits as well. I consider pomegranate to be not only very tasty but also very decorative that's why I was intrigued with the brooch's kit as I knew exactly what outcome I would like to get. It worth mentioning that my mom said it looked like a Christmas tree ornament more than pomegranate but I don't mind such a definition, let it be :-)

Брошка "Гранат"


Колись давно, коли мешкала в Азербайджані, я бачила і, звісно ж, їла багато гранатів. Цілі гори цих стиглих фруктів височили на тамтешніх  ринках. І також бачила квітучі гранатові сади на весні та ті ж сади, що рясніли червоними плодами, восени: в цю пору року вздовж тих садів по всяк час можна було натрапити на ряди довгих конусоподібних кошиків також наповнених фруктами. Гранат, на мою думку, не лише смачний, але і дуже декоративний, тож мене дуже зацікавив набір для виготовлення цієї брошки, адже я напевно знала, який результат хотіла б отримати. Правда, мама зауважила, що це радше схоже на ялинкову кульку ніж на гранат, та я і не проти, нехай буде так:-)


However, I was very disappointed with the kit as soon as I opened the box. The materials were different from the picture almost entirely. Main beads were 8 mm pearls. I don't mind sewing the pearls but, as I mentioned in last post, they are of bad quality, besides, 12 eight mm pearls would make the brooch very heavy. I was upset enough to stop this brooches marathon until I found some other materials and  to start a new project, a necklace. But, when I opened the bag with the beads for the necklace, I saw flat ones, which, in my opinion, are exactly the beads I needed for the brooch. So I replaced the pearls  for these coin beads and beads 5 from the kit for the round 6 mm crystals. In this way the work went on and was finished. 


Проте, щойно відкрила коробку, набір мене розчарував. Матеріали майже повністю відрізнялися від тих, що на малюнку. Головні намистини були перлини 8 мм. Не маю нічого проти пришивання перлин, але в попередньому дописі вже відзначала, що вони поганої якості, до того ж 12 перлин по 8 мм зробили б брошку дуже важкою. Я засмутилася достатньо аби припинити цей брошковий марафон допоки не знайду якісь інші матеріали і розпочати новий проект - намисто. Але, коли відкрила пакет з намистинами для нього, побачила пласкі "монетки", які, як на мене, саме те, що треба для брошки. Тож замінила перлини на ці "монетки", а намистини №5 з набору на круглі кристали 6 мм. Так роботу було продовжено та закінчено.

5 December 2019

Pineapple Brooch


When telling about sewing this blouse, I mentioned how special were pineapples for me this summer. Obviously, to pass by the pineapple brooch was impossible and now it has already taken its place in my collection as a part of Fruit Salad Brooches:-) It is the fourth brooch from the parcel and I feel like wanting a kind of a display board to put them all together :-) This kind of jewellery is pretty massive and not delicate at all so they are the best accessories for sweaters, which I mostly wear in winter, or jackets or some thick warm dresses. 


Брошка "Ананас" 


Коли розповідала про пошиття цієї блузки, згадувала, якими особливими фруктами виявилися для мене ананаси цього року. Вочевидь, оминути брошку "Ананас" було неможливо і зараз вона вже займає своє місце в моїй колекції як частина "Фруктового салату":-) Це четвертий виріб з посилки і маю таке відчуття, що мені варто завести якусь виставочну дошку, щоб розмістити їх всі разом:-) Цей вид прикрас доволі масивний, зовсім не делікатний, тож, щоб їх носити, потрібні светри, які я переважно переважно і одягаю взимку, або жакети чи теплі товсті сукні. 


During the work there was the lack of golden bugle beads (7) so I had to pick out the upper ones to fill the "body" of the fruit and replaced them with short green bugles. All the empty spaces of the "body" I filled with yellow seed beads (2). The brooch is pretty big so I would recommend to set two fastenings. 


An awesome piece I've got here:-) 


Під час роботи не вистачило золотого стеклярусу (7), тож довелося випороти його з верхньої частини, щоб заповнити "тіло" фрукта, а натомість пришити короткий зелений стеклярус.  Всі пустоти "тіла" я заповнила жовтим бісером (2). Брошка доволі велика, бажано пришити дві застібки. 


Гарнa дрібничка у мене тут вийшла:-)

1 December 2019

Viscose Dress, or Autumn Doubts


Today is the first day of winter and I am here with my new project which is surely inspired by autumn. Not because I love this season so much but mostly because it was on my working table, in fact, the whole autumn:-) Despite this long time sewing the outcome corresponds the expectation in full. Although, while cutting and sewing, I had few moments of despair. At first I thought I was mistaken with matching the fabric and the pattern. Then I was disappointed with the quality of my cutting as I couldn't keep the symmetry of the fabric pattern for the front and back. When I saw me in this outfit on the first photos, I said that I looked like a retired accountant although while trying the dress on, I had enjoyed my image. When you are your own tailor and have less practice than you need not to lose confidence in your skills, it happens. Most of all I hate the minutes of doubts as for the matching fabrics and patterns. Especially when you are obsessed in both and am sure they are an ideal match. It is one of not many cases in this occupation, when nothing can be corrected in some way. Now, when the dress is ready and I am satisfied with the result, I even don't know what rejoices me more: either the fact I finished the work or that I was wrong with all my doubts :-) Yet there is one thing making me upset to some degree - hardly I can wear this dress on the nearest suitable occasion, it is too cold, it is winter now:-) Frosty Ornament Necklace was made to complete right this outfit but... much before the fabric was found and bought :-)


Сукня з віскози, або Осінні сумніви


Сьогодні перший день зими і я тут зі своїм новим проектом, який точно натхненний осінню. Не тому що я так вже сильно люблю цю пору року, а переважно через те, що він залишався на моєму робочому столі майже всю осінь:-) Незважаючи на таке довге пошиття, результат повністю відповідає очікуванням. Хоча, поки кроїла і шила, мала декілька хвилин відчаю. Спочатку я думала, що помилилася з підбором тканини і моделі. Потім була розчарована кроєм, тому що не змогла дотриматися симетрії передньої частини і спинки. А коли побачила себе в цій сукні на фото, сказала, що схожа на бухгалтерку на пенсії, хоча під час примірки я собі в ній подобалася. Коли сам собі кравчиня і маєш менше практики ніж потрібно, щоб не втрачати впевненості в своїх навичках, таке трапляється. Більш за все ненавиджу помилки з підбором тканини і моделі. Особливо коли ти від обох в захваті і вони видаються ідеальною парою. В цій справі це один з небагатьох випадків, коли якось щось виправити неможливо. Зараз, коли сукня готова і я задоволена результатом, навіть і не знаю від чого більше радію: від того, що нарешті закінчила роботу чи від того, що була неправою зі своїми сумнівами:-) Є ще одна річ, яка мене засмучує: навряд чи зможу одягти сукню найближчої відповідної нагоди, адже зараз надто холодно - зима:-) Намисто "Морозний візерунок" було зроблено саме до цього вбрання... ще до того, як я знайшла і купила тканину:-)


Not only sewing was long, cutting itself took me two days. First day was spent for tracing the pattern and sewing the skirt. The positive moment: the skirt paper pattern is not a half but the full back/front. It simplifies the cutting a lot especially when the fabric is silky and slipping. To get symmetry on the skirt part I drew the part of print when cutting the front and checked it when cutting the back. When the skirt is ready, the depth of the folds need to be trimmed along the top as the paper pattern doesn't provide it. 


Не лише пошиття було довгим, на крій пішло два дні. Перший день витратила на креслення викрійки та пошиття спідниці. Позитивний момент: викрійка спідниці подана повністю замість половинки спинки/переду. Це спрощує процес крою особливо, коли тканина шовковиста і ковзає. Щоб отримати симетрію візерунку на спідниці, намалювала візерунок на викрійці, коли кроїла передню частину, потім підібрала таку саму частину для крою спинки. Коли спідниця готова, глибину складок треба вирівняти по верхньому краю, оскільки викрійкою це не передбачено.


On the second day I cut the rest of the details with modifying the placket. I made it as a single piece with the front because I always do in this way, if it's possible, not to make extra cuts of the fabric and to avoid extra seams on silky material.


На другий день покроїла решту деталей зі зміною крою планки переду. Я її зробила цільною з передньою частиною, тому що я завжди так роблю, якщо це можливо, щоб додатково не різати тканину і уникнути додаткових швів на шовку.


I also try to stitch the yoke by sewing machine. When the fabric is so thin and soft, it is not hard to stitch all the yoke's seams one by one and turn it out.


Також намагаюся прострочити всі шви кокетки на машинці. Коли тканина така м'яка і тонка, не важко прострочити один за одним шви притачування кокетки, а потім вивернути її.


Sewing the collar is almost always the same. I make it without hand work as well. To avoid the fabric stretching when sewing the zipper, the sides seam allowance were reinforced with stripes of interfacing.


Пришивання комірця майже завжди однакове. Теж роблю це повністю на машинці. Щоб запобігти витягуванню тканини під час вшивання блискавки, припуск на шов зміцнила смужками прокладки.


This time I even sewed the inner part of the belt by the instruction, but without handwork as well:-)


Цього разу я навіть внутрішню частину поясу пришила за інструкцією, але, знов ж таки, без ручної роботи:-)


Probably it is  time to say what model I made:-) The dress #118 from Burda 9/2018. From the first sight I was sure I would make it as soon as some right  fabric appeals to me. 


Мабуть саме час сказати, яку це я модель пошила:-) Сукня 118 з Burda 9/2018. З першого погляду була впевнена, що пошию її щойно мене покличе якась відповідна тканина:-)


30 November 2019

Orange Slice Brooch


The third brooch from the parcel. Comparing with the previous Paisley and Clover it is smaller in size and simpler in work. I would recommend it for those who enjoy wearing two or even three brooches at the same time. Maybe, when all my "fruit salad", that I will get after making the rest of the brooches from that parcel, is ready I will wear all of them or at least three at once :-) My mum says this brooch looks quite childish because of its simplicity. But thanking to the colour and the idea of orange it also looks so cheerful. Besides, if not being used as jewellery this small piece can become a sweet decor for a Christmas tree :-)


Брошка "Апельсинова долька"


Третя брошка з посилки. В порівнянні з попередніми "Пейслі" та "Конюшиною" вона менша за розміром і простіша за виконанням.  Я б рекомендувала її тим, кому подобається носити дві або навіть три брошки водночас. Можливо, коли мій фруктовий салат, який я отримаю після виготовлення решти брошок з тієї посилки, буде готовий, я носитиму їх всі, або щонайменше три, одразу :-) Мама каже, що ця брошка виглядає дитячою через свою простоту. Але ж завдяки кольору та ідеї апельсину вона також виглядає дуже життєрадісною і, якщо не використовуватиметься як прикраса, завжди може стати гарним вбранням для різдвяної ялинки :-)


The fail. The producer gives extra quantity of all the materials to make the pieces and it is very very good. There were two pearls in the bag to choose but both has noticeable defects. So I decided to replace it with one of my own beads. One of them turned to be much bigger and another - smaller. So I left what they suggest. 


Невдача. Виробник вкладає більшу кількість необхідних матеріалів для виготовлення виробу і це дуже дуже добре. Тут було дві перлини на вибір, але обидві вони виявилися з помітними дефектами. Тож я вирішила замінити її на одну зі своїх намистин. Одна з них була набагато більшою, інша - меншою, тож залишила ту, яку вклав виробник.

23 November 2019

Lucky Leaf Brooch


The second project from the parcel, I am so quick :-) This clover leaf brooch was the first one I used to see in Crystal Art catalogue and this very item made me think about buying their kits. I consider the shape and the idea of the leaf to be very suitable for the pieces of jewellery. This brooch I like better than Paisley although both of them are nice. In the previous project I didn't like the impossibility to choose other colour palette so it was made  just because I am fond of paisley motifs. This kit was chosen right because of my wish to have such a brooch. I like the diversity of the used beads and green hues. I am very glad with the outcome, it is exactly what I wanted from clover's leaf motif and idea. Thanks to the designers! 


Брошка "Щасливий листок"


Другий проект з посилки, швидко працюю:-) Ця брошка "лист конюшини" була першою з тих, що колись побачила в каталозі Crystal Art і саме вона примусила мене подумати про придбання їхніх наборів. Я вважаю форму і ідею цього листа дуже вдалими для виготовлення прикрас. Ця брошка мені сподобалася більше ніж "Пейслі", хоча вони обидві гарні. В попередньому виробі мені не сподобалася неможливість обрати іншу кольорову гаму тож його було зроблено лише тому, що мені дуже подобається мотив "пейслі". Цей набір було обрано саме через моє бажання мати таку брошку. Мені подобається розмаїття використаних матеріалів та відтінків зеленого. Я дуже задоволена результатом, це саме те, чого я очікувала від мотиву та ідеї листка конюшини. Дякую "Чарівну мить"!


The base of the brooch is embroidered entirely. What I didn't like: very thick and dense felt base. I understand it is necessity because of number and weight of the brooch's materials but it was very hard to cut the ready item out, I soiled the trimming row of the seed beads and had to restore it in a few parts.The process is simple because of the given charts and instructions.


Основа брошки вишита повністю. Що мені не сподобалося: дуже товстий і щільний фетр основи. Його необхідність зрозуміла через кількість і вагу матеріалів, але було дуже важко вирізати вишитий листок. Я пошкодила крайній ряд бісеру в декількох місцях, тож довелося його відновлювати. Процес простий, тому що є і схеми і інструкції.


Next time I would cut the back part by the top part of the brooch because it turned to be smaller from the embroidered. Besides, the top part is so dense that I could refuse from adding the cardboard layer.


Наступного разу я б вирізала нижній шар по верхньому, тому що виявився меншим ніж вишитий. Крім того верхня частина настільки щільна, що я б відмовилася від шару картону.

21 November 2019

Paisley Brooch

The other days I was watching a video about unpacking a parcel by some beading girl and thought that as I had none ready project to share, I could describe my impressions about my last purchase, too, since I hadn't bought none of new materials for quite long. But then some other idea occurred to me. I thought that sharing a post about materials is, in fact, to share plans. But plans are so unstable substance in my case :-) It is so tempting to tell about them but then the blog would risk transforming into the storage of ghost projects instead of being the place of my experience accumulation. Thus I unpacked the parcel without agiotage and embroidered one of the six brooches from it. There is no special order of making the items. The main idea is to finish them all :-) 


Брошка "Пейслі"

Днями я дивилася відео якоїсь рукотворниці, в якому вона розпаковувала посилку і подумала, що оскільки у мене немає жодного закінченого проекту, я теж можу розповісти про враження від мого останнього придбання, тим більше, що я вже давно не купувала нових матеріалів. Але потім на думку спало дещо інше. Я подумала, що ділитися дописом про матеріали - це те саме що ділитися планами. Але плани в моєму випадку така нестабільна субстанція :-) Так спокусливо про них розповідати, але тоді мій блог ризикує перетворитися на склад проектів привидів замість місця накопичення мого досвіду. Тож посилку розпакувала без ажіотажу і вишила одну з тих шести брошок. Головне - закінчити їх всі :-) 


It is my first experience of the kind. I thought about embroidering brooches but couldn't start. The kits from our Ukrainian company simplified the task. What I like: it is really much easier and quicker to use kits as they have all you need for work. 


Це мій перший такий досвід. Я розмірковувала про вишивання брошок, але щось ніяк не могла розпочати. Набори від нашої української компанії спростили завдання. Що мені подобається: справді набагато легше і швидше користуватися наборами, оскільки вони вже мають все необхідне для роботи.


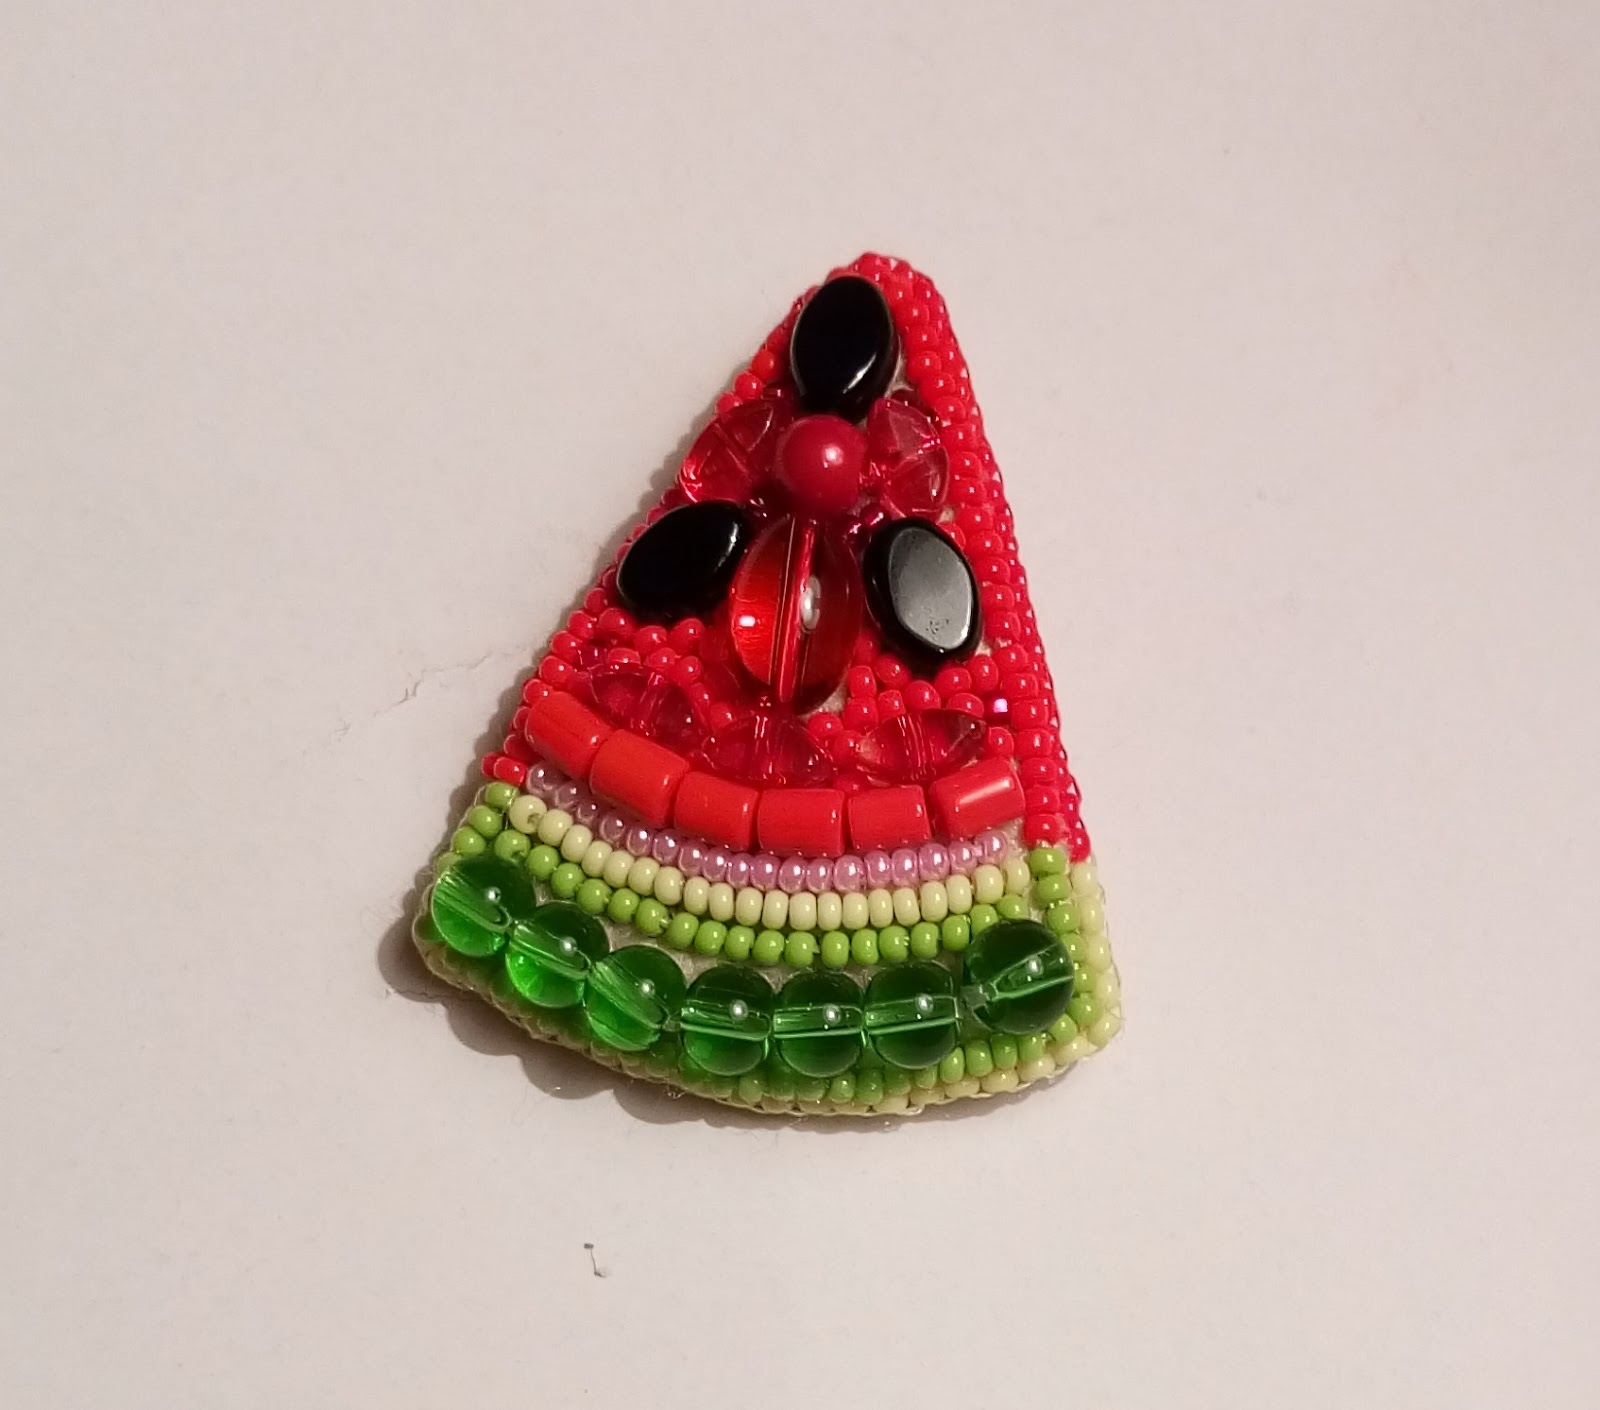
What I don't think I like or don't have a certain opinion for a while: the fact the base of the brooch is seen. Maybe it is the feature of such brooches then it is OK. But, I added extra row of seed beads around the big blue bead and 8.0 seed beads between the brown ones. I also added a couple of seed beads between big green and brown on the top. 


Що мені не подобається або про що я, поки що не маю певної думки: основу брошки видно. Можливо, це особливість таких брошок, тоді все гаразд. Але я додала додатковий ряд бісеру навколо великої синьої намистини і бісер № 8.0 між коричневими намистинами. Також додала пару бісерин між великими зеленими та коричневими на тонкому кінці. 


There are limitless number of variants of embroidered brooches in the Internet but I understand that embroidered in full, with different rhinestones base would make the brooch too heavy for wearing with light clothes. So, in general I am glad with the outcome. 

To be continued...:-)


В інтернеті можна побачити безліч варіантів вишитих брошок, але зрозуміло, що повністю зашита основа та ще з різними камінцями зробить брошку надто важкою для носіння з легким одягом. Тож в цілому мені подобається, що у мене вийшло. 

Далі буде... :-)

10 November 2019

London Sketches Necklace (Bezeled cabochons)


Autumn is in its last weeks and I still have none of the season's projects. And this one is not about autumn as well:-) The idea of making such a necklace was on my mind since my mum presented me a red cup in a cute box last year. The pictures on the box was so teasing with their London's sketches that it was really pity to throw the box away and I decided to make cabochons with them to unite the ready elements in a necklace one day. My red sweater suddenly became the real push to start the project. I don't know why, probably, just because the right time came. Actually, any of these elements can be used for making different piece of jewellery, either for a pendant or bracelet or a ring but I still don't refuse from the idea of making a necklace. Even if I have to make one more sweater to push me to find the time to make it:-)


Намисто "Лондонські замальовки" (Оплетені кабошони)


Осінь вже майже на фінішній прямій, а у мене щось досі немає жодного тематичного проекту. І цей не про осінь теж :-) Ідея створення такого намиста запала мені щойно минулого року мама подарувала мені червону чашку в милій упаковці. Малюнки на коробці так дражнили лондонськими замальовками, що було шкода її викидати, тож я і вигадала зробити з ними кабошони і колись об'єднати готові елементи у намисто. Справжнім поштовхом  розпочати роботу став мій червоний светр. Не знаю чому, можливо просто настав той самий час. Насправді, будь який з цих елементів можна використати для виготовлення різних прикрас: для кулону або браслету чи каблучки. Але я поки що не відмовилася від ідеї зробити намисто. Навіть якщо доведеться сплести ще один светр, щоб примусити мене знайти час для його виготовлення:-)


So the box was unfolded and six sketches cabochons were made. I also made a few more of packing bow but I don't know how many of them I will need and if I need any in general.  


Отже коробку було розібрано і зроблено шість кабошонів. Я також зробила декілька з декоративної пакувальної стрічки, але не знаю, скільки подібних знадобиться і чи потрібні вони будуть взагалі. 


The technique of bezeling cabochons in embroidery technique seems to clear for me already as I've made it several times. However, on YouTube there are many video tutorials in probably any language to learn or check or improve the skill.


Техніка оплетення кабошону в техніці вишивки видається мені зрозумілою, оскільки я це робила вже декілька разів. Проте, на YouTube більше ніж достатньо відео майстер класів будь якою мовою, щоб освоїти чи перевірити або покращити цю навичку.