About Me

My photo
My blog's main subjects are sewing, the thing in which I am experienced the most, and beadwork, which is, in fact, pushed me into blogging. I am also engaged in knitting and crocheting. All together they are the set of skills which I use to make my wardrobe my whole life. These are not my only interests, I also like the English language (that's one of the reasons that my blog is bilingual), try to travel around my country and abroad (when can afford it), am interested in art (to the degree of a dilettante but nevertheless) and adore the people who can create anything beautiful or useful whatever it is :-) So welcome to a needlecrafter diary!

31 October 2017

Brooch for a Friend, or Autumn Rosy Chants

Since my last Rosy Chants more than two years passed and suddenly I thought about this colour again. This time it was provoked by my friend's image when I saw her wearing rosy items of clothes. She looked so lovely... younger, more gentle and very feminine. The colour surely suited her. And at once I decided to make a gift for her using the beads of those hues. A small brooch was my choice because I wanted to make something  to match easily to any kind of clothes from a blouse to a sweater. 


Брошка для подруги, або Рожевий наспів восени

З часу мого останнього Рожевого наспіву минуло вже більше двох років і раптом я знову подумала про цей колір. Цього разу думки спричинив образ моєї подруги, коли я побачила на ній рожеві речі. Вона виглядала такою милою... молодшою, ніжнішою і дуже жіночною. Колір їй дуже личив. І одразу вирішила зробити для неї прикрасу з бісеру таких відтінків. Обрала брошку, тому що хотілося створити щось що пасувало б до будь якого одягу від блузки до светру.


To make the brooch I used the technique of beading peyote leaves. It is not new for me and I already can do that by heart. I already made such leaves for this necklace and this brooch.
This fact doesn't mean I didn't need to be attentive and didn't think about arranging of the elements. It took time!
After sewing the leaves to the base, the middle was filled with crystals of different sizes, shapes and colours. To mask the base the gaps were filled with seed beads picots.


Для виготовлення брошки скористалася технікою нанизування пейоточного листя. Це для мене не нове і я це вже можу робити напам'ять. Таке листя я робила для цього намиста і для цієї брошки.
Але цей факт не означає, що я мені можна було бути неуважною і не думати про те, як краще скомпонувати елементи. На це такі пішов час!
Після пришивання листя до основи, серединку заповнила кристалами різних кольорів, форм і розмірів. Пробіли заповнила піко з бісеру.


Then underneath I added loops with one row of peyote stitch, wanted to make few more rows but then refused from doing that not to  make the brooch to heavy.


Потім під низом додала петлі з бісеру з одним рядом пейоточного стібка. Хотіла додати декілька, але передумала, щоб не зробити брошку надто важкою.


And here it is. It is so good that there is the colour that adds some girlish touch to our images not depending on our age...


Ось така вона. Так добре, що є колір, який завжди додає такий собі штрих дівочості до нашого образу незалежно від нашого віку...

29 October 2017

Tweed Trousers, or Breaking Superstitions


On Friday night I was watching some film and heard one of the characters declaring one of a common superstitions. The commenting voice remarked that if people are truly in somebody or in something, none of superstitions threatens their plans. In global sense it is the issue of believing or non-believing in whatever but in the ordinary life it just can concern a tradition or a token. For example, since my studying in a sewing school I acquired few superstitions typical for the tailoring.  Here are a couple of them: "if to cut an item of clothes in the evening, you will sew it very long" and "if not to remove all the basting thread from the ready apparel, you will remake it in some way". Probably there were some more but I remember these ones because they work every time! On the other hand, I can sew very very long outfits cut at any time of a day (or a week or a month) and the ready dress can be remade on many reasons. Such way of thinking caused my quick sewing of these pair of trousers. Why? Because I cut them in the evening and, to fight against the superstitions, sewed it at once. I only wonder if the this post will  be completed as quicker as possible or the token will play the trick and spread its force on my photos' arrangement... hmm...
All about the necklace is here.


Штанці з твіду, або Подолання забобонів


У вечір п'ятниці я дивилася якійсь фільм і почула як один з героїв озвучив один з поширених забобонів. На що голос за кадром завважив, що якщо люди і справді віддані комусь або чомусь, то жодні забобони їм не загроза. В глобальному сенсі це, звісно, питання віри - невіри у будь що, але в пересічному житті це може бути просто прикметою або даниною традиції. Наприклад, з часу мого навчання кравецький справі я засвоїла пару забобонів типових для цього заняття. Наприклад, "якщо кроїти речі ввечері, будеш шити їх дуже довго" або "якщо не видалити всі зметувальні нитки з готового виробу, будеш його переробляти". Мабуть були ще якійсь, але ці я добре запам'ятала, тому що вони щоразу спрацьовують! З іншого боку, я можу дуже дуже довго шити вбрання покроєне будь якої години дня (чи тижня чи місяця) і готовий одяг може вимагати переробок з багатьох причин. Отакі думки спричинили швидке пошиття цих штанів. Чому? Тому що я покроїла їх ввечері і, щоб подолати забобони, одразу пошила. Єдине мене цікавить, чи буде цей допис настільки ж швидко закінчений чи цього разу  прикмета пожартує і поширить свою силу на впорядкування моїх фото... гмм...


Все про намисто тут.


So the trousers #105B from Burda 10/2006. The easy pattern because it has neither band nor fly. The zipper is in the side seam so to sew the trousers takes not much time. Extra darts create nice fitting around the hips.
The chosen fabric - tweed with delicate shining finishing.


Отже штани 105B з Burda 10/2006. Модель проста тому що немає ані поясу ані ширінки. Блискавка вшивається в боковий шов тож на пошиття і справді витрачається небагато часу. Додаткові виточки створюють гарне облягання по стегнах.
Тканина для пошиття - твід з делікатним блиском.


I didn't change anything in the pattern as well as didn't added. My only piece of advice is to pull both of the trousers details along the knee' s part (wavy lines on the photo) before sewing. The steaming is very important in sewing trousers. And, as we are not professionals, it is the minimum that helps to get better fitting.


Нічого не міняла в моделі так само як і не додавала. Єдина порада - відтягнути обидві половинки штанів уздовж колінної частини (на фото - хвилясті лінії) перед пошиттям. Відпарювання - дуже важливе при пошитті штанів. І, оскільки ми не професіонали, цей мінімум допоможе отримати гарну посадку штанів.


And, as the trousers have one single piece band, I always stitch its facing along the waist line not to let it to turn out while wearing the outfit.


І, оскільки штани мають суцільнокрійний пояс, я завжди відстрочую його обшивку по лінії талії, щоб не виверталася під час носіння вбрання.

26 October 2017

Mystery of Twilight Earrings


The name of the earrings means nothing special... it is just a kind of dedication to the mysterious moment between day and night... The time of awaitng... Even when you know what happens  next, there is some moment of tension in such time... sometimes it is worrying and uncomfortable but sometimes is pretty sweet...
Time after time some strange ideas occur to me. I mean ideas to make the process of my crafting more organised in some way. This time I thought it would be good to make beaded accessories to my future summer outfits in cold seasons, anyway I don't sew as much now as I do on holidays. This is the second pair of earrings made to fulfil the plan:-)


Сережки "Таємниця сутінків"


Нічого особливого назва сережок не означає... просто така собі посвята таємничому моменту переходу дня у ніч... Час очікування... Навіть якщо знаєш, що трапиться наступної хвилини, все одно завжди відчувається якась напруга в цей момент... іноді неспокійний та незатишний, а іноді доволі приємний...
Час від часу мені спадають на думку дивні ідеї по покращенню організації моїх занять рукотворами. Цього разу я подумала, що було б добре зробити прикраси до моїх майбутніх літніх нарядів в холодну пору року, адже все одно зараз я не шию так багато як у відпустці. Це вже друга пара сережок зроблена на виконання цього плану:-)


The earrings are made by this tutorial from +Le gioie di Carmen. I changed the design a little. The bigger element was made with only one row of 4 seed beads of 15/0 for the embellishment and the pikos were made with one 10/0, one 15/0, one 10/0. In this case the last two rows needed axtra reinforcing.
The smaller element was made without any embellishment at all. In this way I liked it better.


Сережки створено за цим майстер класом від +Le gioie di Carmen. Дизайн я трохи змінила. Більший елемент сплетено лише з одним рядом декору з бісеру 15.0, дужки по чотири замість п'яти, а піко - одна бісерина 10.0, одна 15.0, одна 10.0. В цьому випадку два останні ряди потребують додаткового зміцнення.
Менший елемент я залишила без декору взагалі. Мені так більше сподобалося. 


Any kind of needlework is a mystrious thing itself... We take different materials, then assemble and unite them and they get new life...


Будь який вид рукотворів сам по собі таємниця... Ми збираємо матеріали, потім впорядковуємо і з'єднуємо їх і вони отримують нове життя...

23 October 2017

Dolman Pullover, or Retro Circles

I don't know why I chose this second title for the post about my new sewing project. The essential idea of it has nothing in common with the circles. Instead it has much in common with sales, lack of time for knitting and simplicity.
So... I do buy fabrics mainly for the certain projects during last probably 7-10 years. But to buy right fabric one must have on mind the approximate wishing list of patterns. It is right and well-grounded thing to do especially when you don't need any clothes but can't but yield the temptation to make more because of your obsession with sewing. But when you see a piece of fabric, that very persuasively pretends to be warm, for about $3 you have enough reasons to buy it and the match will be found in that list any way, won't it?
I do like knitting and it is a right time to do that and I even started a new project a little more than a week ago but since then it moved for 6 cm... And if there is a chance to make a new pullover only for few hours, any compromise with other hobbies is possible, isn't it?
For such a fabric's pattern simplicity of the model is a must. To make extra constructive lines on such materials is just to waste time and spoil the fabric pattern.
This is what can be called three-in-one project :-)


Пуловер доломан, або Ретро кола


Не знаю чому я обрала таку другу назву для допису про мій новий кравецький проект. Його головна ідея не має нічого спільного з колами. Натомість у цього пуловера дуже багато спільного з розпродажем, браком часу на плетіння і простотою.

Отже... Я і справді останні 7-10 років купую тканини лише під певні проекти. Але щоб купувати тканини, треба тримати в пам'яті  хоч якійсь приблизний перелік речей, які хочеться пошити. Це дуже правильний і обґрунтований погляд на справу особливо коли тобі жодний одяг не потрібен, а ти не можеш не поступатися бажанню шити більше тому, що схиблений на пошитті. Але коли ти бачиш відріз тканини, яка дуже переконливо прикидається теплою,  за якісь 90 гривень, то тут достатньо причин щоб її купити. В списку ж завжди знайдеться щось годяще, чи не так?
Я справді люблю плести і зараз якраз саме час для цього і я навіть набрала петлі на новий светр трохи більше тижня тому, але з того часу робота просунулася на 6 см... А якщо є можливість зробити новий пуловер всього за декілька годин, то з іншими хобі завжди можна домовитися, я ж права?
Для такої тканини простий фасон - необхідність. Робити додаткові конструктивні лінії на подібних матеріалах - марнування часу і псування візерунку тканини.
Ось це називається виріб "три-в-одному":-)


Only while working on the top I thought that the fabric's pattern reminds me something from my childhood. The dress my mum sewed for me when I was 7 years old...  The evolution of the print:-) I still have the patch... And I always say I am not sentimental...

Лише коли вже працювала над виробом, подумала, що візерунок тканини щось мені нагадує знайоме з дитинства: сукню, яку мені мама пошила, коли мені було 7 років... Така собі еволюція візерунку:-) І у мене все ще є клаптик тієї тканини...А я завжди кажу, що я не сентиментальна...


As the pattern is simple, there are just few details to mention. The pattern 0001 from Burda Special issue Classic 2013.
It can be worn as a top, blouse or pullover depending on the used fabrics. Mine is made from a little fluffy knits.
I shortened it for 3 cm and decreased the front neck hole for about 4-5 cm.


Оскільки модель проста, то варто зупинитися всього на декількох деталях. Модель 0001 з Burda Special issue Classic 2013.
Можна носити як топ, блузку або пуловер залежно від використаної тканини. Мій пошито з трохи пухнастого трикотажу.
Я вкоротила модель на 3 см і зменшила виріз горловини переду на 4-5 см.


To process the neck hole I cut the facing: for the back at once, for the front after sewed the upper part and tried it on to check if my head goes through the hole.


Для обробки горловини викроїла обшивку: для спинки одразу, а для передньої частини після того як зшила верхню частину і приміряла, щоб перевірити чи пролазить у мене голова через виріз.


If the fabric is pretty thick, after stitching the facing to the bodice it is worth pressing the seam allowance open to make the seam thinner. It will look neater when the item is ready.


Якщо тканина доволі товста, після настрочування обшивки до основної частини варто розпрасувати припуски на шов, щоб зробити їх тоншими. Виглядатиме охайніше в готовому вигляді.


Thanking to the fabric and the design the pullover is easy to combine with whatever to make any style outfits according to the mood and necessity.
All about the white blouse is herethe necklace is herethe brooch - herethe scarf is herethe trousers - herethe stripy, #113 from Burda 8/2001, and the corduroy, #124 from Burda 9/2008, skirts were sewed long ago.


Завдяки тканині та фасону пуловер легко комбінувати з чим завгодно та створювати вбрання відповідно до настрою та необхідності. Все про білу блузку тутпро намисто - тут, про брошку тутшарф - тут, штани - тутсмугаста, №113 з Burda 8/2001, і вельветова, №124 з Burda 9/2008, спідниці пошиті давним-давно.

22 October 2017

Autumn in the Castle Park Earrings


Every necklace needs to be paired with the matching earrings:-) And especially this last one, and especially when there are so many necessary materials left and the job is as quick as pleasant and it is so easy to make a nice thing without much efforts:-)
(All about the necklace is here.)


Сережки "Осінь у замковому парку"

Кожне намисто потребує пари у вигляді сережок:-) І особливо ось це моє останнє, і особливо, коли залишилося багато відповідних матеріалів, а робота настільки ж швидка наскільки приємна і без особливих зусиль так легко зробити гарну річ:-)
(Все про намисто тут.)


I didn't think much about the earrings' design. It went on its own. The most obvious idea was to make a brick stitch triangle from the cube beads and to add the fringe in the same way as it was for the necklace.


Про дизайн сережок багато не думала. Склалося само собою. Найочевиднішою ідеєю було зробити трикутнички з кубиків цегляним плетінням і додати китиці у такий самий спосіб як і для намиста.


I wish I could end the post with the words, "And here the set on me" but as it is not clear when it will become true, I just say, "And here it is!" :-)


Хотілося б закінчити допис словами "Ось весь набір на мені", але оскільки невідомо, коли це справдиться, то просто скажу "Ось він який!" :-)

21 October 2017

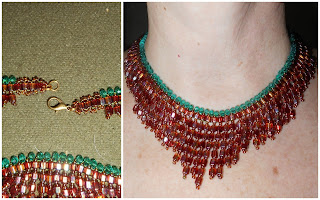
Cube Beads Necklace, or Autumn in the Castle Park


Probably if it is summer now, these cube beads would remind me a hot coastline and romantic sunset or whatever else like that when I was making this necklace. But as it is the time when autumn filled all around with its colours, I can't help thinking about the season's hues. Besides, this autumn I've been very lucky to visit a stunning sight - Radomyshl Castle with its amazing museum atmosphere and small but marvellous park. I dreamt to see such a place in autumn quite long so enjoyed my presence there as much as I was able to. At some moment while strolling around the park  I had a rare feeling of me being a single whole with the surrounding. So it is not surprising that the moment got the reflection into a new piece of jewellery.


Намисто з намистин кубиків, або Осінь у замковому парку


Мабуть, якби зараз було літо, то ці намистини навіювали думки про якесь спекотне узбережжя та романтичний захід сонця або ще щось подібне. Але, оскільки зараз час, коли осінь заповнила все своїми кольорами, я можу думати лише про них. Крім того, цієї осені мені пощастило побувати в приголомшливому місті - замку Радомишль з його чудовою музейною атмосферою та маленьким, але напрочуд дивовижним парком. Я давно мріяла відвідати подібне місце восени, тому бути там стало справжньою насолодою. На якійсь момент, гуляючи парком. я відчула себе єдиним цілим з тим, що мене оточувало. Не дивно, що  таке рідкісне відчуття надихнуло на створення нової прикраси.


I liked the necklace as soon as I saw it here among. The pattern of the necklace is pretty simple but the result depends entirely on the choice of materials. And although the designer says it is possible to use different beads, I am sure the using of the cubes is essential here. I used Toho 4 mm cubes and instead of 3 mm rounds, I used 3x4 mm rondelles. Probably because of the latter I had to omit one 10/0. 


Намисто мені сподобалося щойно я його побачила тут. Модель намиста доволі проста, але результат цілком залежить від обраних матеріалів. І хоча авторка каже, що можна використовувати різні намистини, я впевнена, що використання кубиків має суттєве значення. Я використала кубики  4 мм від Toho, а замість круглих намистин - ронделі 3х4 мм. Можливо саме через них мені довелося відмовитися від однієї бісерини 10.0.


I started with same number of the cubes as in the tutorial. I thought if the ready length would be too short, I could add few cubes later. It was really not enough and even with added cubes I don't know if it is enough because still haven't made the outfit the necklace is meant to match... and hope the fabric is still in the store:-)


Спочатку нанизала стільки ж кубиків, скільки у майстер класі. Я подумала, що якщо це буде недостатньо, потім можна буде донизати ще декілька. Це і справді виявилося недосить і, навіть з доданими кубиками, я не впевнена, що це достатньо, бо ще не пошила вбрання до якого це намисто буде вдягатися... сподіваюся. тканина все ще є у крамниці:-)


Right now when wearing the necklace looks like this. As  the clasp is added, the piece of chain will be used to lengthen the item if it is needed.
The necklace looks splendid. I am very thankful to  +Gina's Gem Creations for the tutorial.


Зараз намисто на шиї виглядає так. Оскільки застібку вже додано, то, за необхідності, намисто можна буде подовжити відрізком ланцюжка.
Намисто виглядає розкішно. Я дуже вдячна  +Gina's Gem Creations за майстер клас.

16 October 2017

Net Earrings, or Mix of Coincidences


As I don't earn for living with my crafts, this my activity is pretty much depends on inspiration. This project was inspired by the set of coincidences. First time I saw this pair of earrings probably on Pinterest and then thought that the idea to take a piece of national motif and recreate it with the help of seed beads is ingenious. I also had no doubt that the motif was Ukrainian. But, as I rarely save whatever on Pinterest without finding the initial source, I found the author and, first surprise, she turned out to be a Mexican. And how talented she is..., hardly there was any item, created by her, that I didn't like. The second wow, she is Klymkiw. Even without reading the article about her, I was sure there is somebody in her family with Ukrainian roots. Probably my wish to make these earrings was real because some time later on YouTube, that never sleeps, this tutorial appeared. That is a mix of coincidences that gave a nice result indeed.


Сітчасті сережки, або Суміш збігів


Оскільки я не заробляю на життя моїми рукотворами, ця моя діяльність доволі істотно залежить від натхнення. Цей проект надихнула серія збігів. Вперше я побачила ці сережки, мабуть на Pinterest і тоді подумала, що взяти частину національного мотиву і відтворити її за допомогою бісеру, надзвичайно винахідливо. У мене також не було сумнівів, що мотив український. Але, оскільки я дуже рідко щось зберігаю на Pinterest не віднайшовши першоджерела, я знайшла автора і, перший сюрприз, вона виявилася мексиканкою. І яка ж вона талановита..., навряд чи серед її робіт були такі, що мені не сподобалися. І тут ще одне "ого!", вона - Klymkiw. Навіть не читаючи статті про неї, я була впевнена, що в її родині є хтось з українським корінням. Мабуть бажання зробити такі сережки було справжнім, бо за деякий час на YouTube, який ніколи не спить, з'явився цей майстер клас. Ось тобі і суміш збігів, яка дала гарний результат.


The diamond part I beaded with fishing line, I thought it would forse the construction. My ready diamond motif is about 6 cm so I thought to make the fringe not longer than 3 cm.
To add the fringe I used beading thread.


Ромбову частину нанизала на лінь, подумала, що так буде краще тримати форму. У мене готовий мотив вийшов біля 6 см, тому китиці вирішила нанизувати не довші за 3 см.
Щоб додати китиці, використовувала бісерну нитку.


And here they are.  I exprerimented with different kinds of seed beads and must say that no transparent or shiny seed beads are good for this project. The pattern is well seen only with monochromic non-transparent seed beads. 


Ось таки вони. Експериментувала з різними видами бісеру і мушу сказати, що жодні блискучі чи прозорі бісерини не годяться. Візерунок добре видно лише на монохромних непрозорих бісеринах.


7 October 2017

Chrysanthemum Ring


As autumn is my favourite time for knitting, the other days I started a new project which promise to be fabulous indeed if only the result is at least a little as nice as I expect it to be. But besides that, the outcome can be unpredictably remote in time or even very remote :-)
So, updating of old projects seems to become more regular now. For example, this time I decided to share my last year work. It was the set of a brooch and the ring which I decided to separate as two different projects. I guess the ring deserves some more attention because it is lucky to be worn pretty often.


Каблучка "Хризантема"


Осінь моя улюблена пора для плетіння, тож днями я започаткувала новий проект, який обіцяє бути приголомшливим, якщо з того вийде хоч приблизно те, що я собі уявляю. Але крім того, результат може бути непередбачувано віддаленим у часі або, навіть, дуже віддаленим:-)
Тож, схоже оновлення старих дописів стає більш регулярним. Наприклад, цього разу я вирішила поділитися моєю торішньою роботою. Це був набір з брошки і каблучки, який я вирішила виділити в два окремі проекти. Думаю, каблучка заслуговує трохи більше уваги, тому що їй пощастило залишати скриньку доволі часто. 


As for the ring, it had no planned conception at all and is a pure improvisation. I made it in the breaks between thinking over the brooch steps. So not everything is photographed here but it is pretty simple. Started with herringbone. It is beaded at once in two directions up and down because every other seed bead is common for every next pair of the herringbone.


Щодо каблучки, вона взагалі не мала жодного попереднього плану і є чистою імпровізацією, бо я її робила в перервах роботи над брошкою поки обдумувала наступні кроки. Тому не все сфотографовано, але все досить просто. Почала з ндебеле. Нанизується одразу в двох напрямках: вверх і вниз, тому що кожна наступна бісерина є спільною для кожної наступної пари ндебеле.


Here the petals are finished with one more 8/0 only (any other variant looked not nice). Inside the petals four 6x4 rondelles are sewed and 4 mm bicone over them. To mask the ring base the arches of 15/0, 10/0, 15/0 are beaded between the petals. If you like big rings, the pairs of super uno(solo) can be added instead as well. And on the wrong side a row of 10/0 seed beads cover the thread and the base to some degree, too.


Тут пелюстки закінчуються лише бісеринами 8/0 (інші варіанти виглядали негарно). Всередину пришиті чотири 6 х 4 ронделі і один 4 мм біконус зверху між ними. Щоб замаскувати основу каблучки між пелюстками додані арки з 15/0, 10/0 і 15/0. Замість них, якщо подобаються великі каблучки, можна додати пари з супер уно (соло). Зі зворотньої сторони нанизаний ряд бісером 10/0 прикриває і нитку і, до певної міри, основу теж.


The ring and the brooch make up a nice set that can be completed with these earrings.


Каблучка і брошка утворюють гарний набір, який можна доповнити цими сережками.

1 October 2017

Tie Neck Dress, or How to Arrange a Photo Session

While I was sewing I didn't think a lot about this introduction to my new project although I like a lot of things about it: the pattern, the fabric, the work on it and the way I look in it... And when I was preparing this post it became obvious why I had no ready idea for that. Because the main adventures of this dress started after  it was ready :-)
What I mean. I couldn't take several more or less acceptable photos of it on me despite few attempts during few days. I had a strong wish to do it on Thursday but by the time of the photographing, it became quite dark and none of the photos turned out to be decent enough to display it here.... Hardly anybody, interested in sewing, would be glad to see on the pictures mostly my cat's eyes that were the brightest detail. Next day, on Friday, it was so cold and windy that I wasn't sure I would  take my coat outdoors to show the dress. But by the time of my coming back from work, it was warm enough if not to mention that the wind was blowing even much more. As I don't like to postpone sharing new projects and despite the weather was against me, mom took few photos. What can I say? You can see the dress but you also can see the hairstyle created by the winds blowing in few directions simultaneously. I know it is natural but in this case I wish I had natural more polished :-) So next day, on Saturday, I asked my cousin to take few photos while we were enjoying the walk. Most of photos were very lightened. So  today, when my friend invited me to have coffee, my first idea was to repeat the try of photographing but then I thought maybe it is better to reconcile the situation and  be happy with what I have so here it is.


All about the cape is here. All about the earrings is here.  


Сукня з коміром-краваткою, або Як влаштувати фотосесію


Поки я шила, не думала про вступ до мого нового проекту хоча в ньому мені багато що подобається: модель, тканина, сам процес пошиття, і те, як я виглядаю в цій сукні... І лише коли я готувала цей допис, стало зрозуміло, чому у мене для того не було ідей напоготові. Тому що головні пригоди сукні почалися коли вона вже була готова :-)
Про що це я? Мені не вдалося зробити декілька більш менш пристойних фото протягом декількох днів. У мене було стійке бажання зробити це у четвер, але на момент зйомки вже майже стемніло і жодне фото не було достатньо пристойним для розміщення у дописі.... Навряд чи хтось, з тих хто цікавиться пошиттям, був би радий бачити на фото очі мого кота, які виявилися найяскравішою деталлю. Наступного дня, у п'ятницю, було настільки холодно і вітряно, що мене взяли великі сумніви щодо можливості зняти пальто на вулиці, щоб продемонструвати сукню. Але на час мого повернення з роботи потеплішало, якщо тільки не згадувати про вітер, який дув ще сильніше. Оскільки я не люблю відкладати поширення нових проектів і незважаючи на те, що погода була проти мене, мама все ж таки зробила декілька фото. Що можна сказати? Сукню можна побачити, але також можна побачити зачіску створену вітрами, які дули у всіх напрямках водночас. Розумію, що це природно, але в цьому випадку я б надала перевагу трохи окультуреній природі :-) Тому наступного дня, у суботу, я попросила мою двоюрідну сестру сфотографувати мене під час прогулянки. Більшість фото виявилася засвіченими. Тому, сьогодні, коли моя подруга запросила мене на каву, моя перша думка була повторити зйомку знову, але потім я подумала, що може краще змиритися із ситуацією і радіти тому, що я вже маю. Тож ось воно тут.
Все про пальто тут. Все про сережки тут.


Well, in my opinion Burda 8/2017 is among the best of their issues. I liked a lot of outfits from it and the first one I chose to make was dress #115, very womanly, with the hint for retro, the times when I started being interested in fashion, with many details but not overloaded with them, with soft draping and delicate gatherings.
I also matched the fabric very quickly and it added even more femininity and gentleness to it. I do like the result a lot:-)


Отже, на мою думку Burda 8/2017 - одне з найкращих чисел журналу. Мені в ньому сподобалося багато речей і перше, що я обрала пошити, була ця сукня 115, дуже жіночна, з натяком на ретро, часи, коли я почала цікавитися модою, з багатьма деталями, але не переобтяжене ними, з Яким драпуванням і делікатним призбируванням.
Я також швидко підібрала тканину, яка своїм візерунком додала ще більше ніжності до неї. Мені справді дуже подобається результат :-)


What I made different - cut the skirt bias. All the rest is nothing unusual.
The front part is easy to process because of absence of the facing.


Що я змінила - покроїла спідницю косою. Все решта - нічого незвичайного.
Передню частину обробити дуже просто через відсутність обшивки.


When doubling details 3 and 4, it is better to baste them along few times to avoid the bulging in the ready dress.
I also recommend to take shorter zipper because a long one was too long.


Дублюючи деталі 3 і 4 варто прокласти декілька наметок вздовж них, щоб уникнути набігання тканини в готовому вигляді  сукні.
також рекомендую взяти коротшу блискавку, бо довга - аж надто довга.


I didn't understand exactly why they used clasps for the fastening, I guess usual zipper would be as good. But as i didn't make this before I followed the instruction and made this one.


Я не зрозуміла напевно, навіщо було робити застібку на кнопки, звичайна блискавка теж підійшла б. Але, оскільки я раніше такого не робила, то зробила як у них за інструкцією.


The last detail - cuffs with two buttons. As always at first I stitched the right side of the cuffs to the wrong side of the sleeve and then the wrong side of the cuffs to the right side of the sleeve.


Остання деталь - манжети на два ґудзики. Як завжди, спочатку настрочила  лицеву сторону манжети до зворотньої сторони рукава, а потім зворотню сторону манжети до лицевої сторони рукава.