

Although it may be vice-versa: it is not white with yellow stripes but yellow with white ones... I don't care actually because anyway yellow stripes on the fabric remind the sunbeams and the fact the dress is compiled with many cut in different directions details just strengthens such perception. Let's add the days full of the sun light and heat and thus one feels as if wrapped in the sun rays:-)
A sleeveless dress is all she wants from this fabric:-) And especially if the body is at least a little suntanned, then yellow will look as effective as possible. Besides, it seems I at last found the hue of yellow that suits me :-)
As the dress #119 from Burda 4/2016 is quite specific, this time I am going to tell both about the way of my sewing and also to share the experience got after the day of wearing the outfit.
(The pendant and the earrings were made especially for the outfit).

Сукня в жовті смужки
Хоча може навпаки - не біла сукня в жовті смужки, а жовта в білі... Мені однаково, бо все одно жовті смужки на тканині нагадують про сонячні промінці, а те що сукня складається з багатьох деталей і покроєні вони всі в різних напрямках, тільки підсилює таке сприйняття. А ще додамо дні залиті сонячним сяйвом і наповнені спекою - от і виходить, що почуваєшся нібито огорнутий сонячними променями:-)
Сукня без рукавів - те, що треба з цієї тканини, особливо якщо тіло має хоч легку засмагу - жовтий колір виглядатиме як найефектніше. Крім того, я, здається, нарешті знайшла відтінок жовтого, який мені до лиця :-)
Оскільки сукня 119 з Burda 4/2016 досить специфічна, то цього разу я збираюсь розповісти і про процес пошиття сукні і про досвід, отриманий після одного дня її носіння.

The first unusual thing about the dress - it is from the issue which is very special for me since I've got it as a present from Burda for my picture they published:-)) I am proud of that and can't but boast and I don't consider it to be a great sin because such things not often happen to me. And despite I already had such an experience last year, the fact of repetition amazes twice more!
The second, the distinctive feature of the dress is its troubling feature as well. Modification B, which I chose as soon as I saw it and even knew what fabric I wanted, consists of few asymmetrical details, and more than that all of them cut in different directions. On the other hand, this latter point simplifies the work as you shouldn't check the stripes on the front part because they are not exactly bias-cut.
Перша незвичайна річ пов'язана з цією сукнею - це модель з числа, яке я отримала від Burda як подарунок за публікацію мого фото:-)) Я цим пишаюсь і не можу не похвалитись і не вважаю це великим гріхом, тому що такі речі зі мною не часто трапляються. Незважаючи на те, що такий факт вже мав місце минулого року, його повторення вражає вдвічі!
Йдемо далі, визначна особливість сукні водночас є її утрудненням. Модифікація В, яку я обрала щойно побачила і навіть знала, з якої тканини її пошию, складається з декількох асиметричних деталей і більш того, всі вони покроєні в різних напрямках. З іншого боку, цей останній нюанс полегшує роботу, тому що не треба думати про збіг смужок на передній частині сукні, оскільки вони не крояться точно по діагоналі.

When I bought the fabric, they only had a remnant about 1.50 m x 140 cm. The instruction requires 1.70 and this time I agreed with it because the dress has a complex design. So what I had could be enough if to arrange the back details on the fabric in this way.
The outfit was cut on the floor because the front part must be cut in one layer of fabric.
One more notion about the material. The sample in the magazine made from the fabric with along stripes but it is not bad if the stripes are wider than 1 cm or if you don't care. But I do. The laws of designing say that if the along stripes are 1 cm width or less, the ready item will make you look fatter, and such across stripes will make you look slimmer:-)

Коли купувала тканину, в крамниці був лише залишок 1,50 м х 140 см. Інструкція вимагає 1,70 і цього разу я з нею згодна, тому що сукня має складний крій. Отож того, що у мене було вистачило тому, що всі деталі спинки я розклала на тканині таким чином.
Процес кроїння відбувався на підлозі, тому що всі деталі переду мали бути розкладені на одному шарі тканини.
Ще одне зауваження щодо тканини. Зразок в журналі пошито з тканини з продільними смужками, але це не погано, якщо смужки завширшки більше 1 см, або якщо тобі байдуже. Мені - ні. Правила конструювання кажуть, якщо продільні смужки 1 см або менше, то готове вбрання тебе повнитиме, а ось такі самі поперечні смужки - надаватимуть стрункішого вигляду:-)

The main headache of the dress is its cutting. All the rest is simple if all the details are ready to be processed. I started with the back. The back details are symmetrical so the stripes must be checked. That's why I also decided to make a zipper into the side seam instead of the back. I wasn't sure I would be able to do that and save the alignment of the stripes.
Головний біль сукні - її крій. Все решта - просто, якщо всі деталі готові до обробки. Почала зі спинки. Деталі спинки симетричні, тому смужки мали збігатися. З цієї причини я вшила "блискавку" у боковий шов замість середини спинки: не була впевнена, що зможу це зробити і зберегти узгодження смужок.

The next troubling is joining the front and back bodice with their facing. I don't do it too often so sometimes forget the order of the steps myself. The tip can be in use also for joining a dress with its lining (e.g., for sleeveless sheath dress).
So at first sew the facings with the corresponding partі. Leave about 4-5 cm unstitched. Then turn the details out and join the shoulder seams of the bodice.
Наступна халепа - з'єднання передньої і задньої частини сукні з обтачками. Я не часто це роблю, тому і сама іноді забуваю порядок дій. Порада також може стати у пригоді, коли до сукні пришивають підкладку (наприклад, у сукні-футляр без рукавів).
Отже спочатку зшиваємо передню і задню частину з відповідними обтачками, не застрочуємо до кінця десь 4-5 см. Вивертаємо деталі на лице і зшиваємо плечові шви основної частини.
Then turn the details out partly to the wrong side again. As you see in the video, it is better to do it from the back because the back has shorter and wider straps. Stitch the pinned details.
Потім частково знову вивертаємо деталі. Як видно з відео, це краще робити зі сторони спинки, тому що вона має коротші і ширші бретелі. Прострочити сколоті деталі.

If now you turn the details out, they look in this way with unstitched parts along the seams of the neck and armholes. So turned them out partly again and stitch the holes. Now the last turning out and the bodice is ready.
Якщо зараз вивернути деталі, вони виглядатимуть таким чином: з не застроченими частинами вздовж швів горловини і пройм. Знову вивертаємо і прострочуємо отвори. Тепер останнє вивертання і основна частина готова.

Then finish the dress in a usual way according to the instruction.
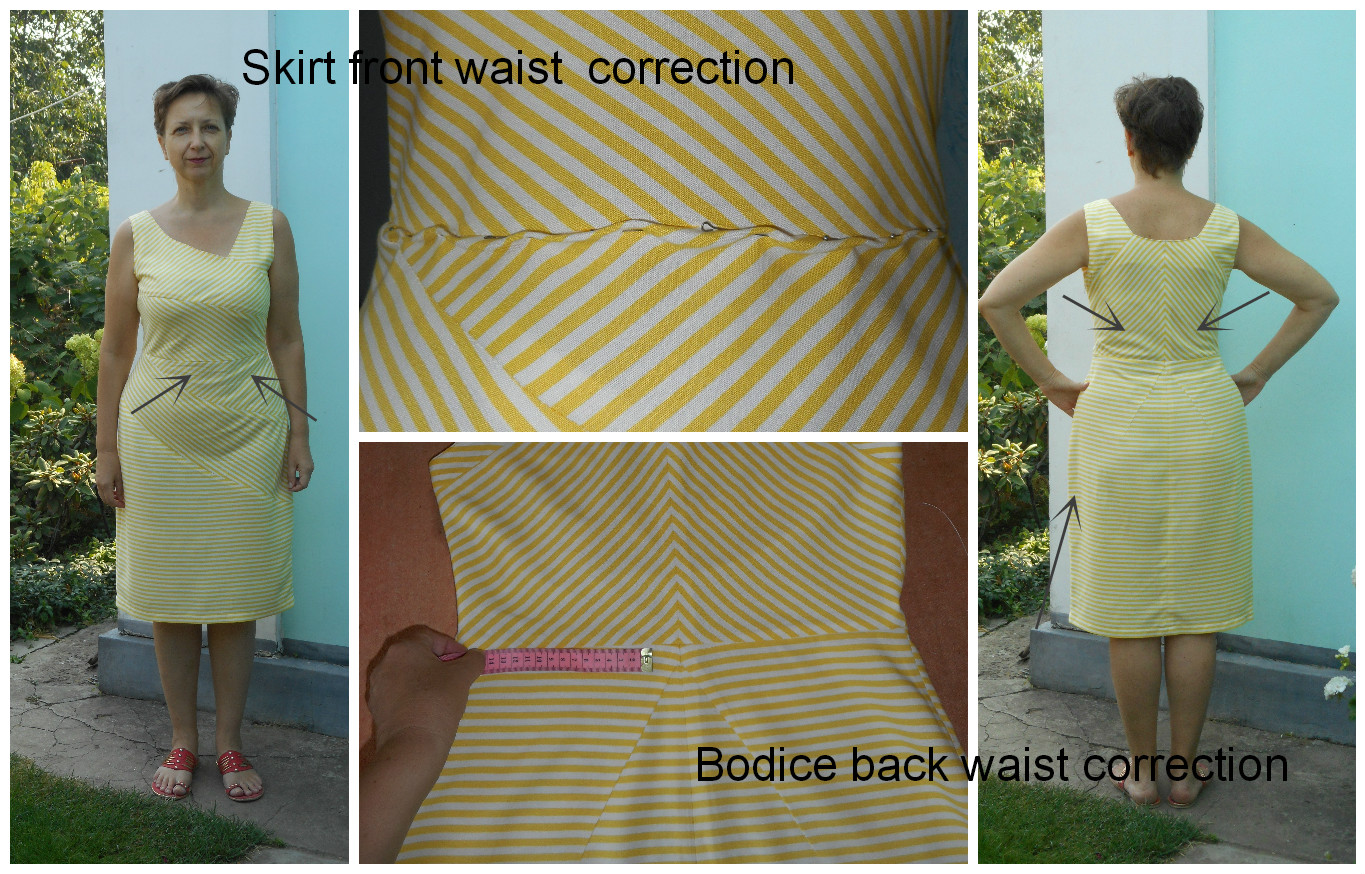
My further tips can be in use if you have the same problem when either trying the dress on or after wearing it at least a day as it happened to me.
It also can be useless for you because your fabric can have different textures and cut in different directions so you mustn't follow the advice if you don't need it.
Закінчуємо пошиття сукні в звичайний спосіб за інструкцією.
Наступні поради можуть знадобитися лише якщо у тебе виникнуть подібні проблеми під час примірки або носіння вже готової сукні як це трапилось у мене.
Також вони можуть і не згодитись якщо у тебе інша тканина, або крій в іншому напрямку, тому порад не треба дослухатись, якщо вони тобі не потрібні.
No comments:
Post a Comment