Розумна, гарна та вправна :-) Useful fun for needleworkers / Корисні розваги для рукотворниць
About Me
- Oksana Starzhynska
- My blog's main subjects are sewing, the thing in which I am experienced the most, and beadwork, which is, in fact, pushed me into blogging. I am also engaged in knitting and crocheting. All together they are the set of skills which I use to make my wardrobe my whole life. These are not my only interests, I also like the English language (that's one of the reasons that my blog is bilingual), try to travel around my country and abroad (when can afford it), am interested in art (to the degree of a dilettante but nevertheless) and adore the people who can create anything beautiful or useful whatever it is :-) So welcome to a needlecrafter diary!
1 May 2018
Plaid Shirt, or Canyon Trip
Ви знали що прогулянка по каньйонах потребує особливої сорочки в клітинку? Мене б не здивувала заперечна відповідь, тому що ця велика думка осяяла мене якраз напередодні моєї подорожі до наших українських каньйонів, Арбузинського і Актового. Імовірно така ідея жевріла десь дуже глибоко в моїй свідомості доволі давно, але оскільки єдиний каньйон, який я мріяла побачити, був той Великий в Аризоні, а подорож до нього є такою ж примарною як і шанс, що вона колись здійсниться, то я на ній ніколи і не зосереджувалася :-)
The model in the magazine is not checkered so I had to take care about matching the fabric pattern on the main points of coincidence on the sides and sleeves myself. In this way I match the plaid on the sleeves.
If the fabric lets, as in this shirt, I try to sew the both edges of a yoke in the same way, I mean to join two yokes and back/front parts of the shirt stitched on the machine. In this way the joining seams are inside both on the back and front and I don't need to make any hand work.
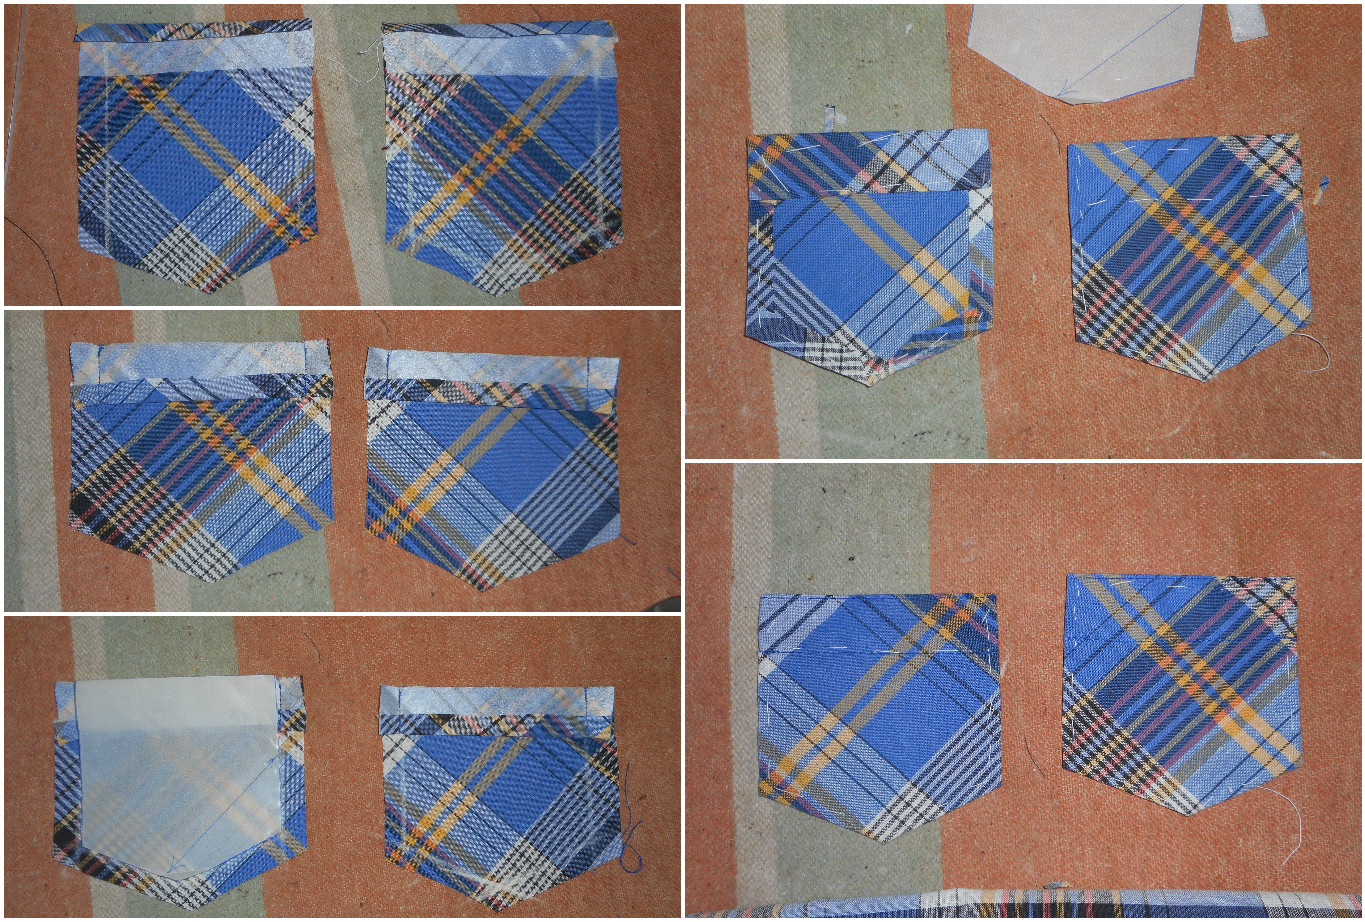
I cut two pockets because they are not too big and as they are bias cut, the only one could look as a patch in this case.
Despite its natural structure and nice colour style, the fabric is of not very high quality. One of it defects was notices only after the cutting because it was on the bottom layer of the fabric. So I had to disguise the defect with the pocket sewed three cm lower than in the pattern. New designs are born in this way :-)
How to sew the collar and the cuffs was told few times, for example, here and here. I won't repeat but much confess that this time I sewed the collar at first to the right side of the blouse and than to the wrong ...hmm... but it is as they recommend in the magazine.
The shirt is nice and comfortable, it doesn't restrict movements because has pretty lose fitting but is not too wide at the same time.
I felt free from all the troubles of every day routine there and could stay on those stones endlessly... In such places you have a feeling as if you are talking to or observing the eternity.. And it is so indeed because those stones were born together with Earth and when we are gone, they will still stay there accumulating the sun's energy and saving their legends.
28 April 2018
Noon in the Castle Earrings
As I took photos of the earrings of this set in a bright sunny morning, I thought they don't look so mysterious as the pendant so let them be named Noon in the Castle :-) I wonder what can be going on in that imaginary castle at night...:-)
Сережки "Полудень у замку"
Оскільки сережки я фотографувала яскравим сонячним ранком, я подумала, що вони не виглядають такими ж таємничими як кулон, тож нехай називатимуться "Полуднем в замку"... цікаво що там відбуватиметься в тому уявному замку вночі...:-)
The earrings are made by the same design from Marie Geraud as for the pendant but for a smaller motif. I beaded them surprisingly quick... during few hours. My rivoli is of different shape, an oval instead of navette and I used Czech 10/0 seed beads.
I also thought about some dangle, like for the pendant, but am not sure it would look good because the designer's jewllery is very refined and doesn't need to be overloaded with extra elements.
Сережки зроблені за тим самою моделлю від Marie Geraud що і кулон тільки для меншого мотиву. Я їх зробила на диво швидко, лише за декілька годин. Ріволі у мене овальний замість наветти і використала чеський бісер №10/0.
Я також думала про якусь підвіску, щось як на кулоні, але все ще не впевнена, що це добре виглядатиме, тому що моделі дизайнера дуже витончені і додаткові елементи можуть зробити їх громіздкими.
26 April 2018
Dawn in the Castle Pendant
When I started beading, for my first creations I bought what they had in my nearest Handicrafts store or unpicked old jewellery, and it was enough during some time... unfortunately, not very long :-) Because the variety of beading materials turned out to be limitless and often not available or affordable for me. And although time after time I yield to the temptation to try some unusual beads, I yet prefer making something of simple ones. This pendant by Marie Geraud's design is a great sample of such jewellery. It requires not many beads, and I even made it simpler by using 10/0 Czech beads.
Why Dawn in the Castle? It seems to be the cutesy to some vague intentions to visit one of the old places... full of stories ready to be told as soon as the imagination is let fly...
Кулон "Світанок у замку"
Коли почала займатися бісероплетінням, для своїх перших виробів я купувала те, що продавалося в найближчий крамниці для рукотворниць або використовувала намистини зі старих прикрас і цього було достатньо протягом певного часу... на жаль, недовго:-) Тому що розмаїття матеріалів виявилося безмежним і часто недоступним, або надто дорогим для мене. І хоча час від часу я поступаюся спокусі спробувати в роботі якісь незвичні намистини, все ж таки надаю перевагу виготовленню прикрас з простих матеріалів. Цей кулон за дизайном Marie Geraud - чудовий приклад такого виробу. Він потребує зовсім небагато матеріалів, і я навіть зробила його ще простішим, використавши чеський бісер №10.
Чому "Світанок в замку"? Здається, це реверанс невиразним намірам відвідати одне таких старих місць... повне історій, які лише і чекають щоб їх розповіли щойно відпустивши уяву на волю...
17 April 2018
Montpensier Candies Bracelet :-)
Generally, I have to get up early tomorrow and it would be right to go to bed right now and post this tomorrow. But I thought the project was simple and quick (if to miss the period of buying the materials stretched in the time for few months:-)) so the post would be the same and decided not to postpone.
I liked these candy beads and especially in yellow. Their form and colour made think about something very warm and sunny, and the name - about something sweet. So I didn't resist the temptation to use them too long :-) The inspiring pattern from Francesca Piombino was found pretty quickly and the bracelet was made in no time: the hardest in this bracelet was to write "montpensier" without mistakes:-)
Браслет "Льодяники Монпансьє":-)
Взагалі-то, мені рано вставати, отже краще за все було б піти спати і опублікувати це завтра, але я подумала, що проект простий і швидкий (якщо проминути період купівлі матеріалів, який розтягнувся в часі на місяці:-)), тож і допис буде такий самий і вирішила не відкладати.
Мені сподобалися ці намистини candy і особливо жовті. Їхня форма і колір нагадували щось таке тепле і сонячне, а назва - щось солодке ("candy" - цукерка). Тож я не довго опиралася спокусі якось їх використати :-) Надихаючий зразок від Francesca Piombino знайшовся швидко, а на плетіння браслету часу пішло ще менше: найскладніше в цьому браслеті було написати без помилок слово "montpensier" французькою:-)
Besides the materials, I changed nothing. On the second step was confused with rolling of the 10/0 seed beads row. On the next step ruffling started :-)
Крім матеріалів я нічого не міняла. На другому етапі трохи збентежило загортання ряду бісеру 10/0, але на наступному етапі почалися утворюватися фалди:-)
In the last row I changed the colour of 10/0 seed beads because green colour became too dominating.
To fasten the bracelet magnetic clasp was used because, as one designer said, when putting on bracelet on your own, a magnetic clasp is the easiest way to fasten it :-)
В останньому ряду замінила колір бісеру 10/0, тому що зелений почав занадто домінувати.
Для застібки використала магнітний замочок, тому що, як сказала одна дизайнерка, коли сам вдягаєш браслет, з такою застібкою найлегше впоратися :-)
12 April 2018
Sparkling Waves Bracelet
Last summer I had a splendid holiday that was spent in the Carpathians. And, despite I used to live in the mountains, it fact it was my first experience to have a rest there. I even climbed Hoverla, our Ukrainian highest top. I was very happy with my that trip and would be glad to spend some time in the mountains again but yet during last summer I felt great lack of the sea as well... Not only the enjoyment from water and swimming but also the view of the sparkling in the sunlight waves themselves were missed. So I couldn't pass by this bracelet from Shelley Nybakke, I liked it from the first sight and even didn't change its name as what else I could say... :-)
Браслет "Сяючи хвилі"
Минулого літа я провела чудову відпустку у Карпатах. І, хоча я колись жила у горах, це фактично був мій перший досвід такого відпочинку. Я навіть видерлася на Говерлу. В тій подорожі я почувалася дуже щасливою і із задоволенням знову провела б час у горах, але все ж таки минулого літа мені не вистачило моря... Сумувала не лише за задоволенням від відчуття води та купання, але і за самим виглядом хвиль, які так неймовірно виблискують у сонячному світлі. Тож не могла проминути цей браслет від Shelley Nybakke, який сподобався мені з першого погляду і я навіть назви його не змінила, бо що ще скажеш... :-)
The bracelet is pretty simple to make. The hardest part is to string the right initial number of the seed beads :-)
I only want to mention that I have leftover of more than 10 grams of 6/0 seed beads and the given in the patter number of 8/0 seed beads were not enough. But that's OK, I used two different colours of them and all of them work well.
I am very glad with the result, a very worthy pattern.
Браслет зробити доволі легко. Найскладніше - нанизати правильну кількість початкових бісерин:-)
Хочу лише сказати, що у мене залишилося більше ніж 10 грамів бісеру №6/0 і пішло на модель більше, ніж зазначено, бісеру № 8/0. Але з цим все гаразд, бо я використала два кольори такого бісеру і вони обидва спрацювали.
Мене дуже порадував результат, дуже гідна модель.
8 April 2018
Oriental Prelude Set
Next day after posting the story about this nameless bracelet I was asked by one of my colleagues if I had invented the name for it. I said no. Then she turned on her imagination and said that its shining and massive form brought to her mind the Oriental Dance movements which are surely can be interpreted as the prelude before making love... (she didn't use this term but it was exactly what she meant :-)) She only was surprised there were no earrings matching the bracelet. Well, as I have nothing against either the preludes or what they can lead to, I made the pair of such earrings and gladly use my colleague's idea for the name.
Набір "Східна Прелюдія"
Наступного дня після поширення допису про цей безіменний браслет, одна з моїх колежанок спитала чи вже вигадала я для нього назву. Я відповіла "ні". Тоді вона увімкнула свою уяву і сказала, що його блиск і масивна форма навіюють думки про рухи східного танцю, який напевно можна розуміти як прелюдію до того що ми називаємо "кохатись"... (вона терміну не вживала, але це вже точно мала на увазі:-)) Дівчина лише була здивована відсутністю сережок в тому ж стилі. Отже, оскільки я нічого не маю проти ані проти таких прелюдій, ані того до чого вони доводять, такі сережки браслетові до пари я зробила і із задоволенням скористаюся ідею моєї колежанкі щодо назви.
As always at first I looked through few tutorials to find something quick and to use the same, as for the bracelet, materials. And even found the one that seemed to be right. But following the tutorial stopped on 2:36 minutes and then it transformed only in a source of inspiration :-)
So I added a loop of seven 3хcut seed beads, fastened and cut the thread. These elements were made 4. The thread from every other is used to complete the beading. Then string one beaded element, one 12 mm pearl, one beaded element on the pin and sew them with the thread with one 15/0, 11/0 and 15/0 in chess order between every 4th seed bead of the 3xcut loop. When the beaded bead is ready different combinations with other elements are possible.
Як завжди спочатку я переглянула декілька МК у пошуках якогось швидкого варіанту гожого для використання тих самих матеріалів що і для браслету. І навіть знайшла один, який здався тим що треба. Але слідування майстер класу припинилося на 2:36 і далі він перетворився лише на джерело натхнення :-)
Отже, я додала петлю з семи бісерин 3хcut, закріпила та відрізала нитку. Таких елементів я зробила 4. Нитка на двох з них залишається для закінчення елементу. Потім нанизала на пін один сплетений елемент, 12 мм перлину, один сплетений елемент і зшила їх ниткою з нанизаними бісеринами 15/0, 11/0 і 15/0 (між кожною 4 бісериною петлі нанизаного елементу) в шаховому порядку. Коли вся намистина готова, її можна комбінувати з іншими різними елементами.
7 April 2018
Corduroy Dress, or How Not to Sew New Pants
Few weeks ago, to be exact on the first Sunday of March, after a nice concert in our Musical Comedy Theatre, I didn't want to go home too soon and, of course, dropped in one of hobby stores in the centre of my city. I was in a playful mood so, after looking around the fabric department and noticing a piece of wine red corduroy, at once decided to buy 1.5 m to sew trousers of it. What can be wrong with corduroy? Thick ridges visually add some weight :-) But it can have much worse features. For example, it can pull like a magnet any fibres or, if used for making trousers, stretch on the knees. This fabric was surely of good quality so I followed my impulse and bought that piece. (I wish it was the only fabric I had purchased then but it doesn't concern the case:-))
When I came home and shared my plan with mum, she asked why I needed such trousers as the corduroy had thick ridges and would make me look fat :-) My answer that I liked the fabric, didn't seem to be very firm, so she suggested making a dress of the material. I asked why I needed such a dress and her idea was it would suit me better in that way. Probably my playful mood had evaporated by that moment because I started thinking over the design of a long-sleeved dress, as the fabric is thick and heavy indeed, that had to be created of 1.5 m of the corduroy :-)
All about the bracelet is here.
Сукня з вельвету, або Як не пошити нові штани
Декілька тижнів тому, а точніше першої неділі березня, мені не дуже хотілося швидко повертатися додому після гарного концерту в нашому театрі Музичної Комедії тож, звісно, я зазирнула в одну з крамниць для рукотврниць в центрі мого міста. Я була в грайливому настрої і, озирнувшись навколо у відділі тканини та помітивши вельвет винно-червоного кольору, одразу вирішила купити півтора метри і пошити з нього штани. Що такого поганого може бути у вельветі? Товсті ребра тканини візуально можуть додавати вагу :-) Але можуть бути і набагато гірші риси. Наприклад, вельвет, як магніт, може притягувати різні волокна, або, якщо пошити з нього штани, може витягуватися на колінах. Ця тканина вже напевно була гарної якості тож я піддалася імпульсу і купила відріз. (Хотілося б що то була єдина тканина, яку я тоді купила, але це вже цієї справи не стосується:-))
Коли я приїхала додому і поділилася планом з мамою, вона запитала навіщо мені такі штани адже вельвет з товстими ребрами повнить :-) Моя відповідь, що мені подобається тканина, мабуть була не дуже переконливою, тож вона запропонувала пошити з цього вельвету сукню. Звісно, я запитала, навіщо мені така сукня, тоді мама припустила, що у вигляді сукні це лічитиме мені краще. Скоріш за все на той момент мій грайливий настрій вже випарувався, бо я стала обмірковувати пошив сукні з довгим рукавом, оскільки тканина справді товста і важка, на яку мало вистачити півтора метри вельвету :-)
Все про браслет тут.
As I could clearly imagine what was possible to sew of such a quantity of the material, the pattern #103 from Burda 10/2017 was found pretty quickly because the magazine was still on my working table after last sewing project.
Although I liked the dress, I wasn't going to sew it. At least now. But this happened. The dress has quite tight fitting in the top part and quite loose silhouette around hips, it makes the outfit comfortable enough but the fabric shouldn't be too soft to keep the shape of the skirt so corduroy is a good choice.
Оскільки я добре уявляла, що можна пошити з такої кількості тканини, модель 103 з Burda 10/2017 знайшлася дуже швидко, тому що журнал все ще лежав на моєму робочому столі після останнього кравецького проекту.
Хоча мені сукня подобалася, я її не збиралася шити. Принаймні зараз. Але трапилося. Сукня має прилягання у верхній частині і доволі вільний силует навколо стегон, що робить її достатньо комфортною, але потребує не дуже м'якої тканини, щоб трималася форма спідниці, тому вельвет - те що треба.
I lengthened the dress by about 7 cm and the sleeves were cut bias. The neck hole was shortened by 3 cm.
Я подовжила сукню десь на 7 см, а рукави покроїла на косу нитку. Горловину вкоротила на 3 см.
Surprisingly confusing part of the sewing for me turned out to be inserting the zipper. I didn't think it would take me almost half a day.
На мій подив, втачування блискавки виявилося для мене клопіткою частиною роботи. Не думала, що у мене на це піде півдня.
To hem the sleeves, I cut cuffs. I got them pretty wide so if it is cold, they can be unrolled but the pile direction will be wrong then :-)
Щоб обробити низ рукава, я покроїла манжети. Вони вийшли доволі широкі, тож, якщо холодно, їх можна розвернути, але тоді напрямок ворсу буде неправильний :-)
And the last detail. My zipper was very long so after cutting it I wanted to process the edge neatly.
І остання деталь. Блискавка у мене була дуже довга, я її обрізала і постаралася охайно обробити край.
2 April 2018
Instead of Something Bracelet
I have no name for this bracelet because I have never been going to make it, at least now. But one of my favourite stories, as it known, is Never Say Never so when a needle worker is going to sew, for example, .... trousers, it may happen that on her way to that project the necessity to bead a bracelet can arise :-)
Браслет "Замість чогось"
У мене немає назви для цього браслета, бо я ніколи не збиралася його робити, принаймні зараз. Але, як відомо, одна з моїх улюблених історій "Ніколи не кажи ніколи", тож якщо рукотворниця збирається пошити, скажімо,... штани, може так трапитися, що на її шляху до того проекту виникне необхідність нанизати браслет :-)
It is my second attempt after this one to work with memory wire.
The idea for the bracelet was found here, on the +offthebeadedpath. I chose it because the bracelet is pretty quick to make, consists of simple affordable materials and it is so easy to use the idea for the own design if to combine different kinds, sizes and colours of beads.
Після цієї спроби, це моя друга робота з дротом з пам'яттю.
Ідею браслету було знайдено тут на +offthebeadedpath. Я його вибрала, тому що браслет доволі швидкий у виготовленні, складається з простих доступних матеріалів і його ідею так легко застосувати для створення власного дизайну, якщо комбінувати різні види, розміри і кольори намистин.
25 March 2018
Gathered Pencil Skirt, or Trip's Silence
I have no idea why but as soon as I saw it in the magazine, this skirt put me into some dreamy mood... what was on mind... some either short or long train travelling... When you look into the window and hear the train wheels clutter as background to your random thoughts about nothing. I like such trips' silence... even if you are in a company, nobody feels bored staying quiet and calm. I am always amazed how easy it is to feel oneself aloof from routine troubles when you leave home for some journey and especially by train. It seems to work as a kind of therapy I guess :-) Obviously if the skirt could spell on me such thoughts, it was doomed to be sewed :-)
Призбирана спідниця олівець, або Тиша мандрівки
Не маю жодного пояснення чому, але щойно побачила цю спідницю в журналі вона занурила мене у мрійливий настрій... про що я міркувала... про якусь коротку або довгу подорож потягом... Коли дивишся у вікно і чуєш гуркіт коліс як фон для своїх випадкових думок ні про що. Я люблю тишу такої мандрівки... навіть якщо ти не сам, ніхто не почувається знудженим залишаючись мовчазним і спокійним. Мене завжди дивувало, як легко відсторонюєшся від щоденної рутини щойно залишаєш домівку заради подорожі і особливо потягом. Здається, це працює як якась терапія :-) Вочевидь спідниця, яка змогла навіяти мені такі думки, була приреченою на пошиття :-)
The pattern #107 from Burda 10/2017. I must confess that the plaid modification (106) with the ruffle was my real favourite but as I had some stripy wool in my stash, I decided it would be nice as well. The only problem was the pattern requires stretch fabric. My wool has some stretching but very very slight. Of course, I could persuade myself it would be enough but much more difficult would be to persuade myself later that I am able to pull on the tight skirt :-)
So I traced and cut the biggest size to compensate the absence of stretching and it turned out to be right. The fabric is very interesting, it has some delicate sparkling effect (on the photo you can see white dots, they are sparkles actually).
Instead of the slit on the centre back I made a pleat as my skirt is for cold weather. I am glad with the outcome and glad that wasn't mistaken with the choice of the pattern. Besides, I see the spring lets me wear the skirt at least the nearest week to work :-)
Модель 107 з Burda 10/2017. Маю зізнатися. що модифікація (106) в клітинку зі шляркою, була моєю улюбленицею, але оскільки у мене в запасах була смугаста вовна, я вирішила, що так теж буде гарно. Єдина проблема - модель потребує еластичної тканини. Моя вовна трохи тягнеться, але майже непомітно. Звісно, я могла б себе переконати, що цього достатньо, але потім переконати себе, що в змозі влізти в тісну спідницю, було б набагато важче:-)
Тож я зробила викрійку і покроїла спідницю найбільшого розміру і вийшло те що треба. Тканина дуже цікава, вона має таке делікатне мерехтіння (на фото видно такі білі цятки, це і є іскри).
Замість шліци, я зробила складку по середині спинки, тому що спідниця для холодної погоди. Результатом задоволена, так само як і тим, що не помилилася з вибором моделі. До того ж весна, схоже, дозволяє поносити спідницю на роботу щонайменше наступний тиждень :-)
The front part looks effective and is made pretty quick.
Передня частина виглядає ефектно і шиється доволі швидко.
As I made a pleat instead of the slit, at first I stitched the centre seam of the pleat to the middle to sew the zipper (usual, not metallic). Then I hemmed the skirt and after that stitched the seam to the end.
Оскільки замість шліци, я зробила складку, спочатку застрочила її шов приблизно до середини, щоб можна було вшити "блискавку" (звичайну, не металеву). Потім підшила низ і потім застрочила шов до кінця.
I also made an ordinary band in my usual way. At first stitched it to the wrong side of the skirt, then bent it and stitched to the right side. To make the loops to hang the skirt some ribbon can be used. as I had nothing matching I made them of the lining fabric.
Також зробила звичайний пояс у мій звичайний спосіб. Спочатку пристрочила його до зворотньої сторони, потім перегнула і настрочила на лицеву сторону. Щоб зробити петлі для подальшого підвішування спідниці, можна використати якусь гожу стрічку, у мене нічого такого не було, тож я їх зробила з тканини підкладки.
17 March 2018
Downtown Hat
Today we had 17 degrees above zero... And then why did I spend the whole day, full of the sunlight and warmth, knitting the new hat? A good question indeed, I asked it to myself, too :-)
The story is not long but I have it anyway. On Thursday, when leaving school to go home, I thought that I have only pink hats to pair my coat and it is the reason why I make and wear only pink/lilac scarves with my blue coat. And if I had a blue hat, I could wear the scarves of any colour I want. It doesn't mean I have those scarves,... it was just a fleeting idea about possible choices :-) And it happened in about ten or fifteen minutes I found myself in the nearest hobby store buying two kinds of yarn to knit a blue hat. And more than that I started the work as soon as was free in the evening!
The pattern Downtown by Annie Cholewa has been on my mind probably since the times I registered on Ravelry. The Night Spark Flower brooch became the perfect accessory for the item. From the first sight I was sure the hat would suit me. And it really is. And it is blue :-)
Шапка "Downtown"
Сьогодні у нас було +17 С... І чому ж тоді я провела цілий день, наповнений сонячним світлом і теплом, вив'язуючи нову шапку? Справді гарне питання, мене воно теж дуже цікавило :-)
Історія коротка, але вона у мене, як водиться, все ж таки є. У четвер, вирушаючи додому зі школи, я подумала, що маю лише рожеві шапки і тому в'яжу і надіваю лише рожеві/бузкові шарфи з моїм синім пальто. А от якби у мене була синя шапка, я б могла надівати які завгодно шарфи. Це не означає, що ті шарфи у мене є,... це була просто швидкоплинна думка :-) І десь через десять-п'ятнадцять хвилин я опинилася в найближчий крамниці для рукотврниць, де купувала синю пряжу двох видів, щоб сплести синю шапку. І більше того, роботу почала того ж вечора щойно звільнившись від справ!
Модель Downtown від Annie Cholewa не залишала моїх думок мабуть з часів реєстрації на Ravelry. Брошка "Нічна іскриста квітка" стала гарним доповненням до виробу. З першого погляду я була впевнена, що шапка мені личитиме. І так воно і є. І вона синя :-)
The hat is knitted with two threads with 3.0 knitting needles. I had different gauge: 21 stitches x 30 rows. But to save some loose in the main part I started to knit the biggest size.
Шапку сплетено у дві нитки на спицях № 3. У мене інша щільність плетіння, але, щоб зберегти певний об'єм в основній частині, почала роботу з найбільшого розміру.
Before starting knitting the ribs I decreased 20 stitches.
Перед тим як починати в'язати "реберця", зменшила кількість петель на 20.
Instead of 2 x 2 ribs I knitted 1 x 1 because it is more elastic. I like the effect of changed colours so to knit the brim cut the Alize yarn and then went on with two threads of Ram.
To add some curve to the top of the hat after finishing the work I steamed the hat along the initial square to stretch it a little.
Замість "реберець" 2 х 2 в'язала 1 х 1, тому що останні більш еластичні. Мені подобається ефект зміненого кольору, тому щоб плести криси відрізала нитку Alize і продовжила роботу двома нитками Ram.
Щоб додати трохи вигину дну шапки, по закінченню роботи трохи відпарувала її уздовж початкового квадрату, щоб трохи його розтягнути.
11 March 2018
Pleated Blouse, or When Estrogen and Age Take Theirs
The preliminary inspirational story to my today's project is quite intimate and not the one to talk too loudly and too public. But what can I do as it is true?:-)
Saying in brief, during last year I gained almost five kilogrammes of weight (it is about 11 pounds), not the thing to be proud of... It does make me upset but only to the level of my ability to wear the clothes I made during last years. Because I already had such weight and used to lost even more about 7-8 years ago. Fortunately, in my wardrobe, if to look for very well, any sizes of clothes could be found:-) And I found one of my favourite skirts that I hadn't worn for few years. Actually, I brought it to light to pair with my Stone Flower sweater but then I thought it would be good to have something else to match the skirt. And it was a very appropriate thought because since New Year's day I've been lucky to work in a very warm classroom so can afford to wear light blouses. And it is the case when done is as quick as said :-) So here it is, my new blouse on me. And, by accident, my old vest caught my eye as well. It seems not to spoil the outfit either :-)
Блузка зі складками, або Коли естроген та вік беруть своє
Вступ про натхнення до мого сьогоднішнього проекту доволі інтимний і не той, який варто обговорювати аж занадто гучно та широкою громадськістю. Але що я можу зробити, якщо це - правда?:-)
Якщо коротко казати, то за минулий рік я набрала майже п'ять кілограмів ваги, і це не те, чим варто пишатися... Мене цей факт і справді засмучує, але лише до рівня моєї здатності носити одяг пошитий за останні роки. Тому що у мене вже така вага була, я колись скинула навіть більше десь років 7-8 тому. На щастя, у мене в шафі можна знайти речі будь якого розміру:-) І я витягла на світ божий свою стару спідницю (одну з улюблених), яку не вдягала вже декілька років. Насправді я її знайшла, щоб носити з цим моїм светром Кам'яна квітка, але потім подумала, що непогано було б мати ще щось гоже до спідниці. Цілком слушна ідея, тому що з Нового року мені пощастило працювати в дуже теплому кабінеті, в якому можна собі дозволити носити легкі блузки. А саме пошиття - це той рідкісний випадок, коли зроблено так само швидко як і сказано:-) І ось вона на мені, моя нова блузка. Вже зовсім випадково на очі мені потрапила ще і стара жилетка. І, здається, вона теж не псує вбрання:-)
The blouse is pattern #111/112 from Burda 11/2017. The modifications are different only in length. To make the blouse I chose the fabric with necktie print, at least we name them here in this way... or named as I mostly used old terms and maybe nowadays it sounds differently :-)
The pleats in the middle of the front drew my attention as well as the pleats on the sleeves, these last ones create the effect of tucked up sleeves. The same effect has this blouse but only because of the draft. As my fabric is quite pied and dotty I had some doubts if the pleats would be seen. But they are.
Блузка - модель 111/112 з Burda 11/2017. Модифікації відрізняються лише довжиною. Для пошиття я обрала тканину з краватковим візерунком.. якщо він і досі так називається бо я користуюся старими термінами і можливо, зараз це звучить на інший лад :-)
І складки по середині переду і на рукавах одразу привернули мою увагу. Складки на рукавах створюють ефект підтягнутого рукава. Такий самий ефект має ця блузка, але просто завдяки конструкції. Оскільки моя тканина строката і ряба, у мене були сумніви чи будуть ті складки помітні. Але вони помітні.
The blouse is easy to make so I surely recommend it even to the beginners.
To cut the fabric it is desirable to check the print not to break the diagonals.
The back slit was shortened, it is just an element of the design because the neck hole is big enough to put the blouse on without that.
I also saw no need to make the fabric loop (how to turn it out, there's a video here) and made an airy one one instead.
Блузка проста у пошитті тому можу рекомендувати її навіть початківцям.
Коли кроїмо, бажано перевірити візерунок, щоб не зрушити діагоналі.
Розріз по спинці я вкоротила, це лише деталь дизайну, тому що горловина достатньо велика, щоб надягати блузку і без неї.
Також я не побачила необхідності робити петлю з тканини (як її вивертати, тут є відео), а замінила її на повітряну.
The neck hole was processed with the bias binding. The technology is well known but I started from stitching the pipe to the wrong side of the blouse, then bent it and stitched to the right side.
Виріз горловини обробила косим кантом. Технологія добре відома, але я спочатку настрочила кант на зворотню сторону блузки, а потім - на лицеву.
The cuffs were sewed at first to the wrong side and then to the right side of the sleeve as well.
Манжети було теж спочатку пришито до зворотньої сторони рукава, а потім - до лицевої.
3 March 2018
Angel's Feather Brooch
I surely liked to play Snow Queen :-) (By the way, it was the only role I used to play in a School Drama club. No, not because I was a bad actress... I was about ten years old then so it was not very actual, I guess. That Drama club worked only one season... at least before our family moved to other place. Well, all that is out of this post's theme anyway:-)) Not to waste the happy moments of inspiration I went on with my angel's feathers and made a brooch to get the set with the earrings. I wanted to make something original.. unexpected to avoid the predictable shape of the wing. Probably that's why the outcome mostly reminds some kind of a winter medal... Maybe even from Snow Queen... So what? I like it :-)
Брошка "Перо Янгола"
Бачу, мені сподобалося гратися в Снігову королеву:-) (До речі, це була єдина роль яку я колись зіграла в шкільному драматичному гуртку. Ні, не тому що я була погана акторка... Мені тоді було років десять, тому, гадаю, це було не так вже і важливо. Той гурток проіснував лише один сезон... принаймні до того як наша родина переїхала в інше місце. Зрештою, це ніяк не стосується теми допису:-)) Щоб не витрачати щасливі моменти натхнення, я продовжила з моїм пір'ям янгола і зробила брошку в пару до сережок. Хотілося зробити щось оригінальне... несподіване і уникнути передбачуваної форми крила. Мабуть тому результат більше нагадує якійсь зимовий орден... може і від Снігової Королеви... То й що? Мені подобається:-)
As it was clear from the previous post, I bezeled five rivolis of the same shape and size. Two of them were used for the earrings and today I just sewed the rest three together to form a brooch. Despite my experience I am still surprised how much time it always takes to sew the ready details... For example, this time it took half a day! Just think, to sew three rivolis and add three bicones and the dangle.
З попереднього допису видно, що я оплела п'ять однакових за формою і розміром ріволі. два з них пішло на сережки, а три останніх я сьогодні зшила разом щоб утворилася брошка.Незважаючи на мій досвід мене все ще дивує як багато часу витрачається на зшивання готових елементів... наприклад цього разу на це пішло пів дня! Лише подумати, на те щоб з'єднати три ріволі, додати біконуси і підвіску.
2 March 2018
Angel's Feather Earrings
When winter is real, it impresses... Of course, it can be absolutely fierce, out of control and bring a lot of trouble but we love it for different moments... For its frosty sunny days when its cold is soft enough and lets dream about home warmth and coziness without thoughts about flue... and for revealing our hidden readiness to be a child again when winter gives us a chance to play snowballs and make a snowman and brings back some natural blush to our cheeks... and when it charms us with bright joyful holidays... and when covering everything around with snow, winter creates such spectacular magic landscapes that only can be imagined in fairy tales and then the world seems to be wrapped in angel's wings... And that's why I called my new earrings Angel's Feather.
Сережки "Перо Янгола"
Коли зима справжня, вона вражає... Звісно, вона може бути абсолютно лютою неконтрольованою і принести немало лиха, але ми любимо її зовсім за інше... За її сонячні морозні дні, коли зимовий холод м'який достатньо для того, щоб помріяти про домашнє тепло і затишок без думок про застуду... і за те що вона витягає на світ нашу заховану готовність знову відчути себе дитиною, коли дає можливість погратися в сніжки або зліпити снігову бабу та повертає щокам трохи природного рум'янцю... і коли зачаровує нас яскравими радісними святами... і коли укриваючи все навколо снігом, зима створює такі неймовірні видовищні пейзажі, які можна уявити лише в казках і тоді тоді весь світ здається огорнутим крилами янгола... Тому так я і назвала мої нові сережки - "Перо янгола".
Although I am not a big fan of white colour on some unknown reason I have enough materials of the kind. So I gathered them and decided to follow my own way to say good bye to winter. (Something tells me the process of "good byeing" can be pretty long:-)) The main element of the earrings is a bezeled navette. All what I could say about my experience of making them is mentioned here. I only can repeat again that even after watching many videos every time it is necessary to make a lot of own work and not only the beading itself. For example, this time I started bezeling with 44 Matsuno 11/0 cut beads. And despite all those materials I thought the laconic form for this project would be the best so just completed the earrings with a dangle.
Хоча я не дуже велика прихильниця білого кольору, якимось невідомим чином у мене накопичилося достатньо відповідних матеріалів. Тож я їх зібрала і вирішила попрощатися з зимою у власний спосіб. (Щось мені підказує, що процес прощання може затягнутися:-)) Головним елементом сережок є обплетена наветта. Все що я могла сказати про свій досвід її виготовлення вже описано тут. Можу лише повторитися, що навіть після перегляду багатьох відео щоразу доводиться виконувати багато роботи самостійно і йдеться не лише про бісероплетіння як таке. Наприклад, цього разу я почала обплетення з 44 бісерин рубки № 11 Matsuno. І незважаючи на всі ті матеріали, зрештою я подумала, що лаконічна форма найкраща, тож закінчила сережки лише додаванням підвіски.
Subscribe to:
Posts (Atom)