About Me

My photo
My blog's main subjects are sewing, the thing in which I am experienced the most, and beadwork, which is, in fact, pushed me into blogging. I am also engaged in knitting and crocheting. All together they are the set of skills which I use to make my wardrobe my whole life. These are not my only interests, I also like the English language (that's one of the reasons that my blog is bilingual), try to travel around my country and abroad (when can afford it), am interested in art (to the degree of a dilettante but nevertheless) and adore the people who can create anything beautiful or useful whatever it is :-) So welcome to a needlecrafter diary!

27 May 2018

Raglan Top, or River Picnic

The end of a school year is always featured with two dominant feelings which give the bunch of many other ones. The first of them is, no doubt, eager awaiting of so close and desirable holiday and the second is awareness of plenty of work that must be done in few weeks to let you enjoy the piece and freedom. Obviously these feelings are in conflict :-) The long warm days strengthen both of these feelings and make you use any chance to avoid the contradiction at least for awhile. To spend time outdoors is a great treatment for the situation. So a couple of days ago me and several colleagues were planning a picnic on the bank of the river. To enjoy the event even more, I thought it would be good to wear something reflecting the mood and the place. Of course, I had in my stash matching fabric meant right for such an occasion. The quickest project for such an incident was to make a top. It was done quicker than said but, unfortunately, the picnic was postponed for indefinite time, what in this case, more likely, means "forever". Next day, instead of the picnic, I went to theatre with my friends but yet I have a top. And its idea does express my wish to spend time in silence on the as empty as possible river bank or seashore where only the sounds  of splashing and swashing water are heard... well... maybe... I don't mind hearing some birds twittering as well :-)


(All about earrings are here, the bracelet - here;
все про сережки - тут, про браслет - тут)

Топ з рукавом реглан, або Пікнік біля річки


Кінець шкільного року завжди характеризується двома головними відчуттями, які, в свою чергу, народжують ще купу інших. Перше з них це, безумовно, нетерпляче очікування такої близької і такої бажаної відпустки. А друге - усвідомлення кількості роботи, яку треба виконати за декілька тижнів, щоб дозволити собі насолоджуватися спокоєм і свободою. Вочевидь ці два почуття знаходяться у вічному конфлікті :-)
Довгі теплі дні посилюють ці почуття і примушують скористатися будь якою можливістю, щоб уникнути протиріччя хоча б ненадовго. Добре допомагає при цьому час проведений десь поза міських вулиць. Тому пару днів тому я і декілька моїх колег запланували влаштувати пікнік на березі річки. Щоб задоволення було повним, я надумала собі вдягти щось таке, що відображало б настрій і місце. Звісно, в запасі у мене була тканина наче створена для такого випадку. Найшвидшим проектом для такої події стало пошиття топу. Справу було зроблено швидше ніж сказано але, на жаль, пікнік було відкладено на невизначений час, що в цьому випадку означає назавжди. Замість пікніку, наступного дня, я пішла з друзями в театр, але футболка у мене все ж таки є. Ідея цього виробу справді виражає моє бажання побути в тиші на як-тільки-можливо-безлюднішому березі річки або моря, де чути лише плескіт хвиль... ну... добре... нехай і пташки трохи поспівають :-)


The pattern #126 from Burda 2/2013. I chose it mostly because of the sleeves that remind the waves and give loose fitting, that is very pleasant on a hot day.
The fabric was probably bought in winter a couple of years ago. Sometimes they sell  pieces of border fabrics, in my case it is knits, that are good to sew some small item, a top or a skirt.


Модель 126 з Burda 2/2013. Вибрала її переважно через форму рукавів, що нагадують хвильки і створюють вільне прилягання, це дуже приємно у спекотний день.
Тканину було куплено, скоріш за все, пару років тому взимку. Іноді продаються купонні тканини, в моєму випадку трикотаж, з яких можна пошити невеликі вироби, топ або спідницю.


The sewing itself is quick and simple so there are no any special tips. The neck hole I processed with the band but folded it at once. In this case it is better to cut the seam allowance along the neck hole in different way, the ready edge will be thinner.


Саме пошиття дуже просте і швидке тому особливих порад немає. Виріз горловини я обробила бейкою, але одразу склала її вдвоє. В цьому випадку, щоб готовий край був тонший, припуски на шви по зрізу горловини краще підрізати по-різному.

21 May 2018

Fringe Earrings, or East Trace V

If the traces I, II, III and IV are observed in the item of clothes, this new one belongs to the item of jewellery :-) Obviously the rope deserves to be paired with some earrings to feel happy :-) I didn't want to postpone making them as I had all the materials in the stash and this fact quite often plays crucial role when choosing what to make next. 
Although the initial idea of the earrings had nothing in common with One Thousand and One Night fairy tales, the outcome, on unknown reason, surely does:-) 


Сережки з китицями, або Східний слід V


Якщо сліди І, ІІ, ІІІ та IV можна відстежити в предметах одягу, то цей новий належить  прикрасі :-) Вочевидь джгут заслуговував на пару сережок, щоб почуватися щасливим :-) Я не хотіла відкладати їхнє виготовлення оскільки мала всі матеріали під рукою, а цей факт доволі часто стає вирішальним у виборі наступного проекту.
Хоча початкова ідея сережок і не мала нічого спільного з казками "Тисячі і однієї ночі" якось так вийшло, що кінцевий продукт вже точно з тієї книжки :-)


The idea was to use a big bead and make some fringe. At first, I couldn't invent how to unite them so just bezelled the bead by this tutorial from Sara Spoltore.
Then added a loop of 4 seed beads and then added the fringe. The bead was beaded with the fishing line, the fringe - with the thread.


Ідея була використати велику намистину і зробити китиці. Спочатку не могла вигадати як їх поєднати, тому просто оплела намистину за цим майстер класом від Sara Spoltore.
Потім додала петлю з 4 бісерин і потім вже визначилася з китицями. Намистину оплетено на ліні, китиці - на нитці.

20 May 2018

Grey Trousers, or It's Better Late Than...


The fabric for these trousers was bought together with the corduroy used for this dress. With certain difference the story repeated here again. (Probably it was the day when everything was not what it seemed  to be and the fabrics had the problems with self-identity in their world :-)). I remember that I liked the quality and the price of the fabric but couldn't decide if I wanted  it for a skirt or for trousers so bought enough to sew any of them. Then the choice was done and the trousers was cut... But if one, who lives in my locality and is going to sew woollen trousers, cuts them in April but then cannot finish the project at once on any reasons, must have in mind that such postponing can lead to the necessity to sew shorts instead of the pants. Last years we almost have no time to enjoy spring here, it passes so quickly that summer seems to come right after winter. It was exactly the case this time. But I do hate UFO's (UnFinished Objects) and mostly don't start anything new until the previous project is done. My shirt already moved the trousers so not to loose interest in this project at all, I yet came back to it yesterday in the morning to have it ready for going to the theatre on Saturday night. In this way I invent some kinds of deadlines for myself. And it works... sometimes :-)
Grey is a perfect colour to combine with whatever and matches red ideally. The play I was going to see was about love so to support the atmosphere and the idea of the performance I couldn't help wearing my red top and Moulin Rouge set ... Probably the choice was right again :-)


Сірі Штани, або Краще пізно, ніж...


Тканину для цих штанів було куплено разом з вельветом використаним для пошиття цієї сукні. До певної міри історія повторилася знову. (Мабуть це був такий день, коли все видається не таким яке воно є насправді і у світі тканин були проблеми із самоідентифікацією :-)). Пам'ятаю, що мені сподобалися якість та ціна тканини, але я одразу не змогла вирішити чи хочу з неї штани чи спідницю, тож купила щоб вистачило на будь що. Потім вибір було зроблено і штани було покроєно... Але, якщо хтось, хто мешкає в моїй місцевості і збирається пошити вовняні штани, кроїть їх у квітні, а потім з різних причин не може закінчити роботу одразу, повинен затямити, що таке відкладання може привести до необхідності замість тих штанів пошити шорти. Останніми роками ми ледь встигаємо насолодитися весною, вона минає так швидко, що літо, здається, наступає одразу після зими. Це якраз був той випадок. Але я насправді терпіти не можу незакінчені речі і майже ніколи не починаю щось нове поки не дошито попередній виріб. Моя сорочка вже посунула штани тож, щоб геть не втратити цікавості до цього проекту, я все ж таки засіла за нього вчора вранці, щоб штани булли готові до вечірнього відвідування театру. Таким чином я вигадую для себе певні "кінцеві терміни" І це працює... іноді :-)
Сірий - чудовий колір для комбінування з будь яким, а з червоним сполучається просто ідеально. П'єса, яку я збиралася дивитися, була про кохання тож, щоб підтримати атмосферу та головну тему вистави, я не могла не вдягнути мій червоний топ та набір "Дрібок Мулен Ружу"... Схоже на те, що і цього разу вибір був правильним :-)


The pattern #0008 from   Burda Special issue Classic 2013. I only changed the bottom line and omitted pockets. The first because for such kinds of trousers it is much better to have the right bottom line with shorter front and longer back. The latter because I rarely make pockets in trousers.


Модель 0008 з спеціального видання Burda Класика, 2013. Я лише змінила лінію низу і відмовилася від кишень. Перше - тому що для таких штанів набагато краще мати правильну лінію низу, коли передня половинка коротша, а задня довша. А друге - тому що я рідко роблю кишені на штанях.


The trousers were mostly sewed like this pair.

Штани пошито майже повністю як цю пару.


Only the band was made in the different way as it consists of two halves.

Лише пояс пришивається в інший спосіб тому що складається з двох частин.


13 May 2018

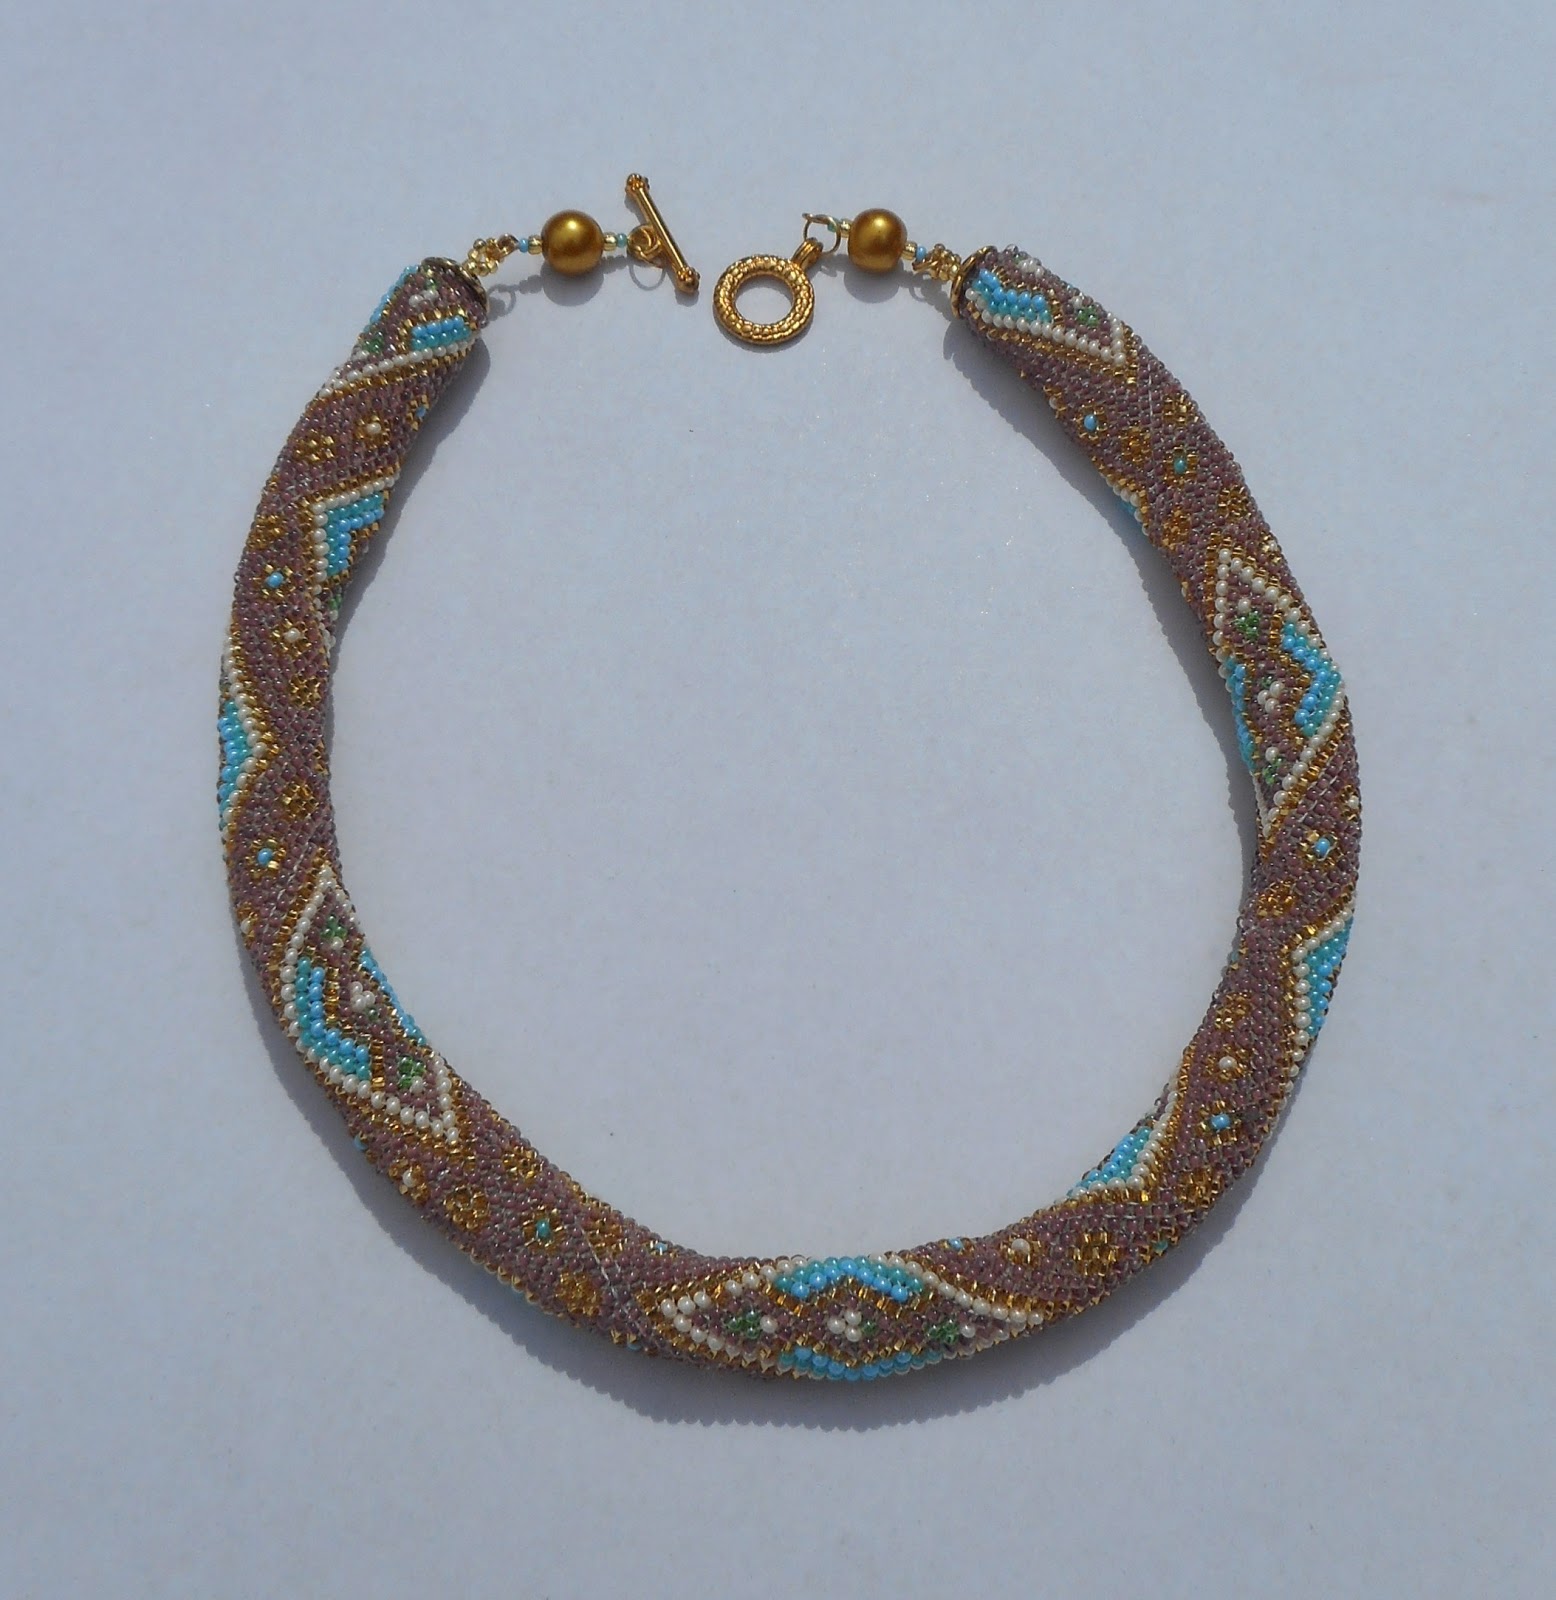
Lozenged Peyote with Twist Rope

Whatever pattern, reminding folk motifs, I see, it seems to be Ukrainian so any alike pattern is doomed to be beaded :-) That's why for my first necklace, made with Peyote with Twist technique, I chose the design from Albina Tezina - Jane Junkert found in this Facebook Community.
It is my third rope of the kind and I got some new experience beside the just practising the technique. Firstly, 1 repeat of the pattern is quite long so this pattern is not good for a bracelet and the longer the rope, the nicer it would look. Secondly, when starting the rope I was not sure if I was going to bead a rope or a bracelet, the choice became obvious only after two repeats so I had to think over the question about the necessary amount of the seed beads. This time they were enough as I used the seed beads of the colours, cinnamon and gold, that I have the most... had:-) But I surely need some formula to count the number for the necklaces. Thirdly, I didn't insert any filling this time what was impossible for the bracelet. Despite the rope is for 21 beads it drapes well enough around the neck, may be because was beaded with two treads and that added some extra density to the rope.


Намисто "Ромби" в техніці перекручений пейот                                              


Який би орнамент, по народним мотивам, я не бачила, він завжди видається українським, тому будь яка подібна модель приречена бути сплетеною :-) Ось чому для свого першого намиста в техніці перекручений пейот я обрала зразок від Albina Tezina - Jane Junkert знайдений в цій спільноті на Фейсбуку.

Це мій третій джгут в цій техніці і у мене з'явився новий досвід крім простої практики нанизування. По-перше, 1 повтор цього візерунку доволі довгий, тому він не дуже годиться для браслету і чим довший джгут, тим гарніше виглядає модель. По-друге, коли починала працювати над джгутом, я не була впевнена, чи робитиму браслет чи намисто, вибір став очевидним після двох повторів зразку тож мені довелося подумати над питанням про необхідну кількість бісеру. Цього разу його вистачило оскільки я використала бісер, кольору кориці та золотий, якого у мене найбільше... було :-) Але мені вже напевно потрібна якась формула для розрахунку кількості бісеру для намист. По-третє, я не використовувала жодних наповнювачів для намиста, що було б неможливо для цього браслету. Незважаючи на товщину джгута в 21 бісерину, він гарно лягає навколо шиї, можливо тому що сплетений на двох нитках і це надало додаткову щільність виробу.


Since my first post about my experience with this technique YouTube was enriched with many new tutorials on the technique so it is easy to find the one you like better.
The bracelet length of the pattern and the ready length of the rope, 41 cm.


З часу мого першого допису про досвід плетіння цією технікою YouTube збагатився великою кількістю нових майстер класів, тому легко обрати, який подобається найбільше.
"Браслетна" довжина моделі та довжина в готовому вигляді, 41 см.


As always, comparatively much time takes the finishing and adding the clasp. The length of the ready necklace can be regulated with extra elements as well.


Як завжди, порівняно багато часу займає закінчення намиста та додавання застібки. Довжину намиста можна регулювати також і за допомогою додаткових елементів.


Despite I like the pattern and am glad to see the necklace is ready I cannot say I am absolutely happy with the result. I feel the lack of the symmetry here because the diagonals of the pattern are not seen well and it seems few more repeats are needed. Maybe because 10/0 seed beads are too big for such a project. I'd love to see more rhombs instead of the paths between them.


Хоч мені подобається модель і я рада бачити готовий виріб, не можу сказати, що дуже задоволена результатом. Як на мене, тут відчувається брак симетрії тому що діагоналі візерунку не дуже добре видно і видається що треба додати ще пару повторів. Можливо тому, що джгут сплетений 10.0 бісером який для цього завеликий. Я б хотіла бачити більше ромбів замість переходів між ними.

6 May 2018

Peyote Twist Bracelet II, or Fair Isle Spring

The spring on that island is, probably, cold and windy, but the bracelet beaded by the pattern of the same name looks very spring and gentle:-) It is my second bracelet in the wonderful technique Peyote with the Twist. I like the beaded crocheted ropes and I crochet well but to string a few meters of seed beads in a strict order on the thread and then to be in panic every time when missing one of those seed beads that breaks the rope pattern is not for me, no... The process of beading in Peyote Twist is pure enjoyment with almost guaranteed result :-)
This time I practised the pattern Fairisle by Cheryl Hamilton. I chose it because it has stripes and easy-to-remember repeats so I didn't have to keep my eyes on the chart all the time.
(All about the spiral rope set is here,
the earrings - here)


Браслет в техніці перекручений пейот ІІ, або Весна на Фейр-Айсл


На тому острові весна, мабуть, холодна і вітряна, але браслет сплетений за однойменною моделлю виглядає дуже мило і по-весняному:-) Це мій другий браслет, сплетений у чудовій техніці перекрученого пейот. Мені подобаються плетені гачком бісерні джгути і плету гачком я теж добре, але нанизати декілька метрів бісерин в певній послідовності і потім щоразу впадати в паніку якщо пропустиш якусь з них і це зіпсує всю роботу, то точно не для мене... аж ніяк. Процес плетіння перекрученим пейотом - це просто чисте задоволення з прогнозованим результатом :-)
Цього разу я зупинилася на схемі "Fairisle" від Cheryl Hamilton. Обрала її тому, що вона має смужки і рапорт легко запам'ятовується, тож не треба весь час вдивлятися в схему.
(Все про спіральний джгут - тут, про сережки - тут.)


To bead this pattern was not hard, as it was mentioned. My first rope in this technique was thin and after finishing the beading, I only had to add a clasp, that bracelet is soft and stretching to some degree: it transformed into a bangle, in fact, and doesn't need to be fastened/unfastened every time now.
This rope is, probably twice thicker so needed some inserting to keep the shape. I used hydro level pipe for that (I had to buy 5 meters of it so now I have to make more than 30 bracelets :-))


Як вже було вище сказано, плести цю модель було неважко. Мій перший браслет в цій техніці був тоненький і по закінченні я мала лише додати застібку, той браслет м'який і до певної міри розтягується: зараз немає потреби застібати/розстібати його щоразу як надягаєш.
Цей джгут, мабуть вдвічі, товстіший, тому треба було чимось наповнити його, щоб тримав форму. Використала гідрорівень (довелося купити п'ять метрів, тож тепер маю зробити більше 30 браслетів :-))


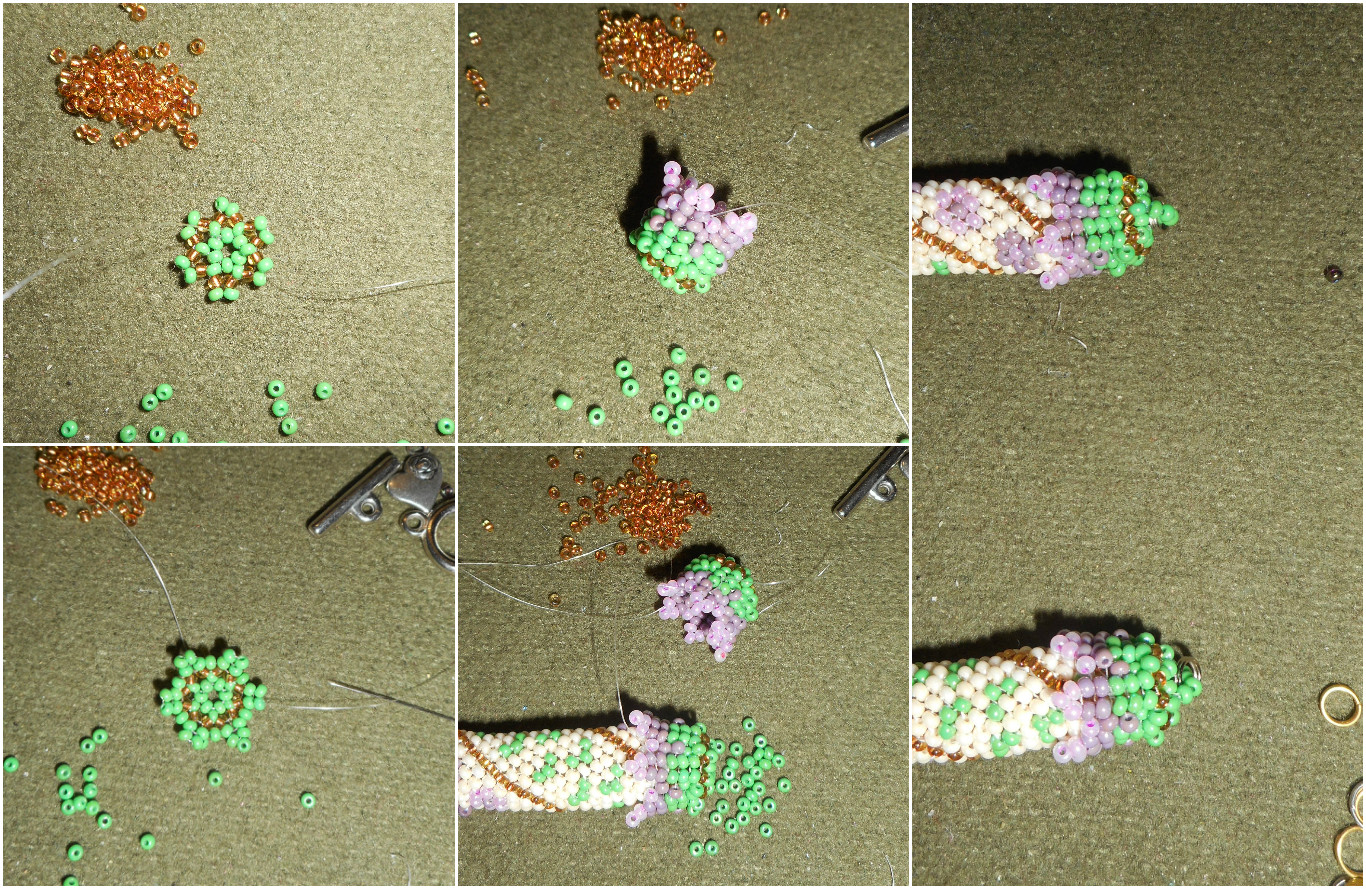
To finish the bracelet, I made the caps on my own because had nothing to match in my stash. They are some kind of flowers beaded in herringbone. The tutorials can be found on the Internet but it is easy to make without any.
The bracelet with the insert is quite rigid so, in my opinion, the sizing is even more important here than usually to wear the bracelet with comfort.


Щоб закінчити браслет, зробила власні кінцевіки, тому що нічого годящого не було в запасі. Це такі собі квіти сплетені в техніці ндебеле. МК є в Інтернеті, але можна при плетінні обійтися і без нього.
Браслет з таким наповнювачем доволі жорсткий, тому, на мою думку, щоб носити браслет було комфортно, визначити правильно розмір в цьому випадку навіть важливіше ніж зазвичай.

1 May 2018

Plaid Shirt, or Canyon Trip


Did you know that the hiking around canyons requires a special plaid shirt? I wouldn't be surprised with your negative answer because this great thought occurred to me right on the eve of my yesterday's trip to our Ukrainian Canyons, Arbuzinskyi and Actovyi. Probably such an idea had lived somewhere deep in my mind for quite long but, as the only canyon I dreamt about was the Grand one in Arizona and the trip to it is as ghostly as the chance to do that, I'd never focused on it :-)

So on Saturday night I decided I must have sewed such a shirt, looked through few magazines, chose a pattern and traced it. On Sunday morning I thought my choice is wrong because the plaid on my fabric is asymmetric so there should be as less details as possible and I looked through few magazines again and traced one more pattern which was used this time. The fabric was in my stash many years, it was bought in the times when there were not many goods in the stores and sometimes I sewed shirts for my father and brother not because I wanted but because there was no good ones to buy. Now there is no need to do that so I guess none of those men  objects to me using the fabric for myself :-)


Сорочка в клітинку, або Подорож до Каньйонів


Ви знали що прогулянка по каньйонах потребує особливої сорочки в клітинку? Мене б не здивувала заперечна відповідь, тому що ця велика думка осяяла мене якраз напередодні моєї подорожі до наших українських каньйонів, Арбузинського і Актового. Імовірно така ідея жевріла десь дуже глибоко в моїй свідомості доволі давно, але оскільки єдиний каньйон, який я мріяла побачити, був той Великий в Аризоні, а подорож до нього є такою ж примарною як і шанс, що вона колись здійсниться, то я на ній ніколи і не зосереджувалася :-)
Тож суботнього вечора я переглянула декілька журналів, відібрала модель і зробила викрійку. Недільним ранком я подумала, що вибір мій нікудишній, тому що клітинка на тканині надто несиметрична і деталей має бути в моделі якнайменше. Тож я знову переглянула декілька журналів і зробила ще одну викрійку, якою і скористалася. Тканина пролежала в моїх запасах багато років, з часів коли товарів в крамницях було небагато і іноді я шила своїм батькові і брату сорочки не тому що хотілося, а тому, що не було чого пристойного купити. Зараз такої необхідності немає, тож, сподіваюся, жоден з тих чоловіків не проти аби я використала тканину для себе :-)


The pattern #114 from Burda 4/2010. The fabric was mentioned to be plaid and, more than that, asymmetric plaid so the sewing is actually of the type Never Say Never :-) But some approximate centre of symmetry must be chosen anyway. In this case the black stripes have symmetry but it is not statement enough so I decided to ignore the plaids and hold the symmetry of horizontal stripes. Not to ponder much about matching the yoke, cuffs and pockets plaids, I cut them bias.


Модель 114 з Burda 4/2010. Тканина, як було зазначено, в клітинку та, більш того, в асиметричну клітинку, тож все пошиття з серії "Ніколи не кажи ніколи" :-) Але в будь якому випадку хоча б приблизний центр симетрії треба визначати. Тут чорні смужки мають симетрію, але вона не достатньо визначена, тому я вирішила ігнорувати клітинки і дотримуватися симетрії горизонтальних смужок. Щоб не дуже заморочуватися з підбором клітинок кокетки, манжетів та кишень, я їх покроїла навскоси.


The model in the magazine is not checkered so I had to take care about matching the fabric pattern on the main points of coincidence on the sides and sleeves myself. In this way I match the plaid on the sleeves.


Модель в журналі не в клітинку, тому про добір візерунку у головних точках збігу, бокових швах та рукавах, мала подбати сама. Так підбираємо клітинку на рукавах.


If the fabric lets, as in this shirt, I try to sew the both edges of a yoke in the same way, I mean to join two yokes and back/front parts of the shirt stitched on the machine. In this way the joining seams are inside both on the back and front and I don't need to make any hand work.


Якщо тканина дозволяє, я намагаюся притачати обидва зрізи кокетки однаково. Маю на увазі, з'єднати обидві кокетки та передню/задню частини сорочки машинкою. У цьому випадку з'єднувальні шви опиняються всередині і мені нічого не треба робити вручну.


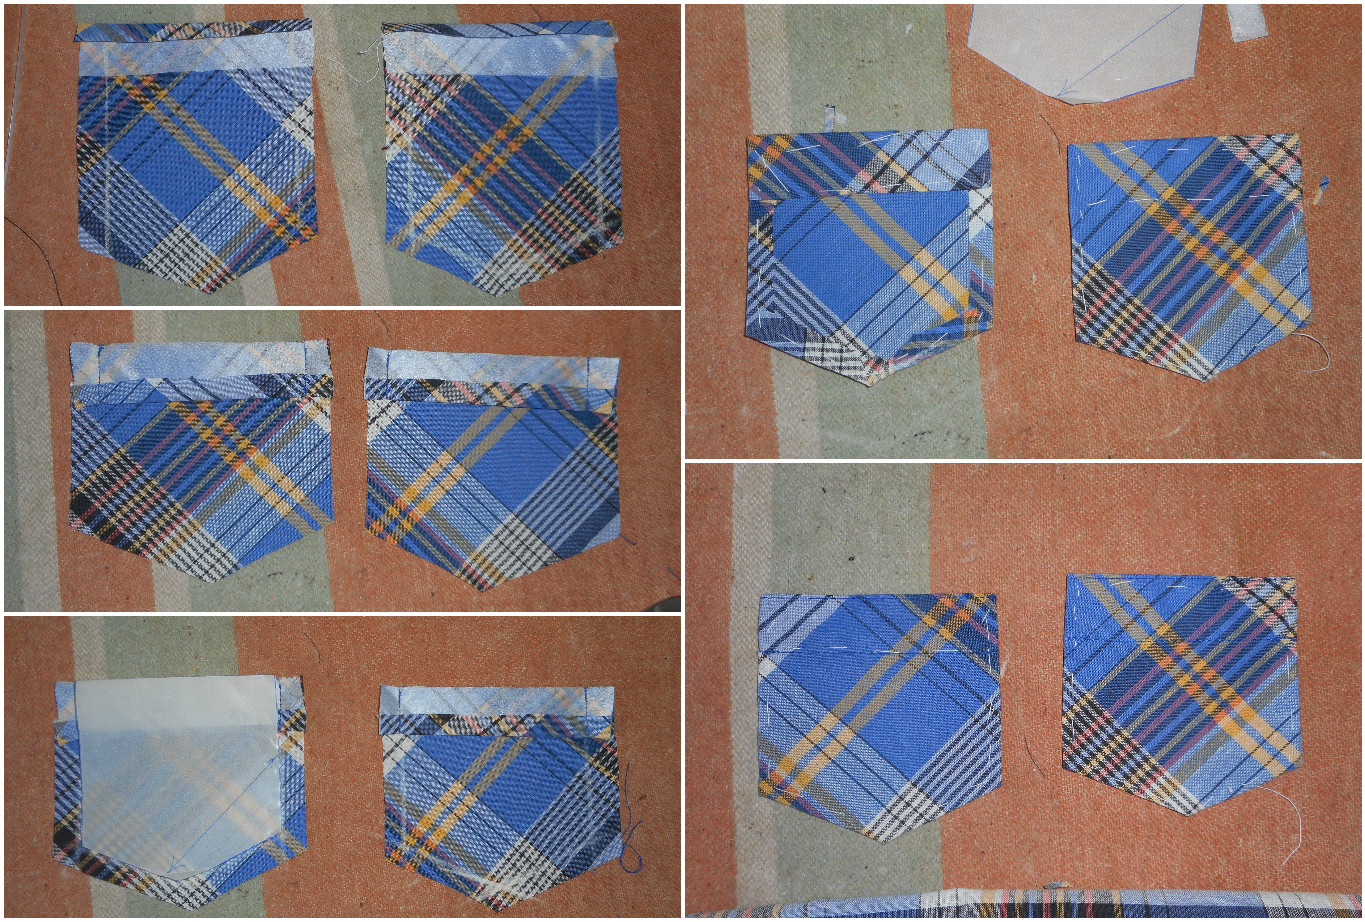
I cut two  pockets because they are not too big and as they are bias cut, the only one could look as a patch in this case.


Покроїла дві кишені, тому що вони невеликі і покроєні навскоси. Єдина кишеня могла б виглядати як якась латка.


Despite its natural structure and nice colour style, the fabric is of not very high quality. One of it defects was notices only after the cutting because it was on the bottom layer of the fabric. So I had to disguise the defect with the pocket sewed three cm lower than in the pattern. New designs are born in this way :-)


Незважаючи на натуральний склад і милу кольорову гаму, тканина не дуже високої якості. І один з її визначних дефектів я побачила вже після розкрою, тому що він був на нижньому шарі тканини. Через це довелося його маскувати за допомогою кишені пришитою на три см нижче ніж у моделі. Ось так народжуються фасони:-)


How to sew the collar and the cuffs was told few times, for example, here and here. I won't repeat but much confess that this time I sewed the collar at first to the right side of the blouse and than to the wrong ...hmm... but it is as they recommend in the magazine.


Як пришивати комір і манжети вже було сказано декілька разів, наприклад, тут і тут. Не повторюватиму, але маю зізнатися, що цього разу спочатку пришила комір до лицевої частини сорочки, а потім до зворотньої... хммм... але це саме те, що вони рекомендують у журналі.


The shirt is nice and comfortable, it doesn't restrict movements because has pretty lose fitting but is not too wide at the same time.


Сорочка гарна і зручна, не обмежує рухів, тому що має вільне прилягання, але при цьому не є надто широкою.


I felt free from all the troubles of every day routine there and  could stay on those stones endlessly... In such places you have a feeling as if you are talking to or observing the eternity.. And it is so indeed because those stones were born together with Earth and when we are gone, they will still stay there accumulating the sun's energy and saving their legends.


Почувалася вільною навіть від думок про щоденну рутину і могла б залишатися на тому камінні безкінечно... В таких місцях завжди буває відчуття ніби ти розмовляєш чи дивишся в очі вічності... І воно так і є, бо те каміння народжувалося разом із Землею, а коли ми підемо, воно так само залишатиметься там, збиратиме енергію сонця і зберігатиме свої легенди.


What else a person needs to feel happy...


А що ще потрібно людині щоб почуватися щасливою...

28 April 2018

Noon in the Castle Earrings


As I took photos of the earrings of this set in a bright sunny morning, I thought they don't look so mysterious as the pendant so let them be named Noon in the Castle :-) I wonder what can be going on in that imaginary castle at night...:-) 


Сережки "Полудень у замку"


Оскільки сережки я фотографувала яскравим сонячним ранком, я подумала, що вони не виглядають такими ж таємничими як кулон, тож нехай називатимуться "Полуднем в замку"... цікаво що там відбуватиметься в тому уявному замку вночі...:-) 


The earrings are made by the same design from Marie Geraud as for the pendant but for a smaller motif. I beaded them surprisingly quick... during few hours. My rivoli is of different shape, an oval instead of navette and I used Czech 10/0 seed beads.
I also thought about some dangle, like for the pendant, but am not sure it would look good because the designer's jewllery is very refined and doesn't need to be overloaded with extra elements.


Сережки зроблені за тим самою моделлю від Marie Geraud що і кулон тільки для меншого мотиву. Я їх зробила на диво швидко, лише за декілька годин. Ріволі у мене овальний замість наветти і використала чеський бісер №10/0.
Я також думала про якусь підвіску, щось як на кулоні, але все ще не впевнена, що це добре виглядатиме, тому що моделі дизайнера дуже витончені і додаткові елементи можуть зробити їх громіздкими.

26 April 2018

Dawn in the Castle Pendant


When I started beading, for my first creations I bought what they had in my nearest Handicrafts store or unpicked old jewellery, and it was enough during some time... unfortunately, not very long :-) Because the variety of beading materials turned out to be limitless and often not available or affordable for me. And although time after time I yield to the temptation to try some unusual beads, I yet prefer making something of simple ones. This pendant by Marie Geraud's design is a great sample of such jewellery. It requires not many beads, and I even made it simpler by using 10/0 Czech beads. 
Why Dawn in the Castle? It seems to be the cutesy to some vague intentions to visit one of the old places... full of stories ready to be told as soon as the imagination is let fly...


Кулон "Світанок у замку"

Коли почала займатися бісероплетінням, для своїх перших виробів я купувала те, що продавалося в найближчий крамниці для рукотворниць або використовувала намистини зі старих прикрас і цього було достатньо протягом певного часу... на жаль, недовго:-) Тому що розмаїття матеріалів виявилося безмежним і часто недоступним, або надто дорогим для мене. І хоча час від часу я поступаюся спокусі спробувати в роботі якісь незвичні намистини, все ж таки надаю перевагу  виготовленню прикрас з простих матеріалів. Цей кулон за дизайном Marie Geraud - чудовий приклад такого виробу. Він потребує зовсім небагато матеріалів, і я навіть зробила його ще простішим, використавши чеський бісер №10.
Чому "Світанок в замку"? Здається, це реверанс невиразним намірам відвідати одне таких старих місць... повне історій, які лише і чекають щоб їх розповіли щойно відпустивши  уяву на волю...


17 April 2018

Montpensier Candies Bracelet :-)


Generally, I have to get up early tomorrow and it would be right to go to bed right now and post this tomorrow. But I thought the project was simple and quick (if to miss the period of buying the materials stretched in the time for few months:-)) so the post would be the same and decided not to postpone.
I liked these candy beads and especially in yellow. Their form and colour made think about something very warm and sunny, and the name - about something sweet. So I didn't resist the temptation to use them too long :-)  The inspiring pattern from Francesca Piombino  was found pretty quickly and the bracelet was made in no time: the hardest in this bracelet was to write "montpensier" without mistakes:-)


Браслет "Льодяники Монпансьє":-)

Взагалі-то, мені  рано вставати, отже краще за все було б піти спати і опублікувати це завтра, але я подумала, що проект простий і швидкий (якщо проминути період купівлі матеріалів, який розтягнувся в часі на місяці:-)),  тож і допис буде такий самий і вирішила не відкладати.
Мені сподобалися ці намистини candy і особливо жовті. Їхня форма і колір нагадували щось таке тепле і сонячне, а назва - щось солодке ("candy" - цукерка). Тож я не довго опиралася спокусі якось їх використати :-) Надихаючий зразок від Francesca Piombino знайшовся швидко, а на плетіння браслету часу пішло ще менше: найскладніше в цьому браслеті було написати без помилок слово "montpensier" французькою:-)


Besides the materials, I changed nothing. On the second step was confused with rolling of the 10/0 seed beads row. On the next step ruffling started :-)


Крім матеріалів я нічого не міняла. На другому етапі трохи збентежило загортання ряду бісеру 10/0, але на наступному етапі почалися утворюватися фалди:-)


In the last row I changed the colour of 10/0 seed beads because green colour became too dominating.
To fasten the bracelet magnetic clasp was used because, as one designer said, when putting on bracelet on your own, a magnetic clasp is the easiest way to fasten it :-)


В останньому ряду замінила колір бісеру 10/0, тому що зелений почав занадто домінувати.
Для застібки використала магнітний замочок, тому що, як сказала одна дизайнерка, коли сам вдягаєш браслет, з такою застібкою найлегше впоратися :-)


12 April 2018

Sparkling Waves Bracelet

Last summer I had a splendid holiday that was spent in the Carpathians. And, despite I used to live in the mountains, it fact it was my first experience to have a rest there. I even climbed Hoverla, our Ukrainian highest top. I was very happy with my that trip and would be glad to spend some time in the mountains again but  yet during last summer I felt great lack of the sea as well... Not only the enjoyment from water and swimming but also the view of the sparkling in the sunlight waves themselves were missed. So I couldn't pass by this bracelet from Shelley Nybakke, I liked it from the first sight and even didn't change its name as what else I could say... :-)

Браслет "Сяючи хвилі"

Минулого літа я провела чудову відпустку у Карпатах. І, хоча я колись жила у горах, це фактично був мій перший досвід такого відпочинку. Я навіть видерлася на Говерлу. В тій подорожі я почувалася дуже щасливою і із задоволенням знову провела б час у горах, але все ж таки минулого літа мені не вистачило моря... Сумувала не лише за задоволенням від відчуття води та купання, але і за самим виглядом хвиль, які так неймовірно виблискують у сонячному світлі. Тож не могла проминути цей браслет від Shelley Nybakke, який сподобався мені з першого погляду і я навіть назви його не змінила, бо що ще скажеш... :-)


The bracelet is pretty simple to make. The hardest part is to string  the right  initial number of the seed beads :-)
I only want to mention that I have leftover of more than 10 grams of 6/0 seed beads and the given in the patter number of 8/0 seed beads were not enough. But that's OK, I used two different colours of them and all of them work well.
I am very glad with the result, a very worthy pattern.


Браслет зробити доволі легко. Найскладніше - нанизати правильну кількість початкових бісерин:-)
Хочу лише сказати, що у мене залишилося більше ніж 10 грамів бісеру №6/0 і пішло на модель більше, ніж зазначено, бісеру № 8/0. Але з цим все гаразд, бо я використала два кольори такого бісеру і вони обидва спрацювали.
Мене дуже порадував результат, дуже гідна модель.

8 April 2018

Oriental Prelude Set


Next day after posting the story about this nameless bracelet I was asked by one of my colleagues if I had invented the name for it. I said no. Then she turned on her imagination and said that its shining and massive form brought to her mind the Oriental Dance movements which are surely can be interpreted as the prelude before making love... (she didn't use this term but it was exactly what she meant :-)) She only was surprised there were no earrings matching the bracelet. Well, as I have nothing against either the preludes or what they can lead to, I made the pair of such earrings and gladly use my colleague's idea for the name. 


Набір "Східна Прелюдія"

Наступного дня після поширення допису про цей безіменний браслет, одна з моїх колежанок спитала чи вже вигадала я для нього назву. Я відповіла "ні". Тоді вона увімкнула свою уяву і сказала, що його блиск і масивна форма навіюють думки про рухи східного танцю, який напевно можна розуміти як прелюдію до того що ми називаємо "кохатись"... (вона терміну не вживала, але це вже точно мала на увазі:-)) Дівчина лише була здивована відсутністю сережок в тому ж стилі. Отже, оскільки я нічого не маю проти ані проти таких прелюдій, ані того до чого вони доводять, такі сережки браслетові до пари я зробила і із задоволенням скористаюся ідею моєї колежанкі щодо назви.


As always at first I looked through few tutorials to find something quick and to use the same, as for the bracelet, materials. And even found the one that seemed to be right. But following the tutorial stopped on 2:36 minutes and then it transformed only in a source of inspiration :-)
So I added a loop of seven 3хcut seed beads, fastened and cut the thread. These elements were made 4. The thread from every other is used to complete the beading. Then string one beaded element, one 12 mm pearl, one beaded element  on the pin and sew them with the thread with one 15/0, 11/0 and 15/0 in chess order between every 4th seed bead of the 3xcut loop. When the beaded bead is ready different combinations with other elements are possible.


Як завжди спочатку я переглянула декілька МК у пошуках якогось швидкого варіанту гожого для використання тих самих матеріалів що і для браслету. І навіть знайшла один, який здався тим що треба. Але слідування майстер класу припинилося на 2:36 і далі він перетворився лише на джерело натхнення :-)
Отже, я додала петлю з семи бісерин 3хcut, закріпила та відрізала нитку. Таких елементів я зробила 4. Нитка на двох з них залишається для закінчення елементу. Потім нанизала на пін один сплетений елемент, 12 мм перлину, один  сплетений елемент і зшила їх ниткою з нанизаними бісеринами 15/0, 11/0 і 15/0 (між кожною 4 бісериною петлі нанизаного елементу) в шаховому порядку. Коли вся намистина готова, її можна комбінувати з іншими різними елементами.

7 April 2018

Corduroy Dress, or How Not to Sew New Pants


Few weeks ago, to be exact on the first Sunday of March, after a nice concert in our Musical Comedy Theatre, I didn't want to go home too soon and, of course, dropped in one of hobby stores in the centre of my city. I was in a playful mood so, after looking around the fabric department and noticing a piece of wine red corduroy, at once decided to buy 1.5 m to sew trousers of it. What can be wrong with corduroy? Thick ridges visually add some weight :-) But it can have much worse features. For example, it can pull like a magnet any fibres or, if used for making trousers, stretch on the knees. This fabric was surely of good quality so I followed my impulse and bought that piece. (I wish it was the only fabric I had purchased then but it doesn't concern the case:-))
When I came home and shared my plan with mum, she asked why I needed such trousers as the corduroy had thick ridges and would make me look fat :-) My answer that I liked the fabric, didn't seem to be very firm, so she suggested making a dress of the material. I asked why I needed such a dress and her idea was it would suit me better in that way. Probably my playful mood had evaporated by that moment because I started thinking over the design of a long-sleeved dress, as the fabric is thick and heavy indeed, that had to be created of 1.5 m of the corduroy :-)


All about the bracelet is here.


Сукня з вельвету, або Як не пошити нові штани


Декілька тижнів тому, а точніше першої неділі березня, мені не дуже хотілося швидко повертатися додому після гарного концерту в нашому театрі Музичної Комедії тож, звісно, я зазирнула в одну з крамниць для рукотврниць в центрі мого міста. Я була в грайливому настрої і, озирнувшись навколо у відділі тканини та помітивши вельвет винно-червоного кольору, одразу вирішила купити півтора метри і пошити з нього штани. Що такого поганого може бути у вельветі? Товсті ребра тканини візуально можуть додавати вагу :-) Але можуть бути і набагато гірші риси. Наприклад, вельвет, як магніт, може притягувати різні волокна, або, якщо пошити з нього штани, може витягуватися на колінах. Ця тканина вже напевно була гарної якості тож я піддалася імпульсу і купила відріз. (Хотілося б що то була єдина тканина, яку я тоді купила, але це вже цієї справи не стосується:-))
Коли я приїхала додому і поділилася планом з мамою, вона запитала навіщо мені такі штани адже вельвет з товстими ребрами повнить :-) Моя відповідь, що мені подобається тканина, мабуть була не дуже переконливою, тож вона запропонувала пошити з цього вельвету сукню. Звісно, я запитала, навіщо мені така сукня, тоді мама припустила, що у вигляді сукні це лічитиме мені краще. Скоріш за все на той момент мій грайливий настрій вже випарувався, бо я стала обмірковувати пошив сукні з довгим рукавом, оскільки тканина справді товста і важка, на яку мало вистачити півтора метри вельвету :-)


Все про браслет тут.


As I could clearly imagine what was possible to sew of such a quantity of the material, the pattern #103 from Burda 10/2017 was found pretty quickly because the magazine was still on my working table after last sewing project. 

Although I liked the dress, I wasn't going to sew it. At least now. But this happened. The dress has quite tight fitting in the top part and quite loose silhouette around hips, it makes the outfit comfortable enough but the fabric shouldn't be too soft to keep the shape of the skirt so corduroy is a good choice.


Оскільки я добре уявляла, що можна пошити з такої кількості тканини, модель 103 з Burda 10/2017 знайшлася дуже швидко, тому що журнал все ще лежав на моєму робочому столі після останнього кравецького проекту.
Хоча мені сукня подобалася, я її не збиралася шити. Принаймні зараз. Але трапилося. Сукня має прилягання у верхній частині і доволі вільний силует навколо стегон, що робить її достатньо комфортною, але потребує не дуже м'якої тканини, щоб трималася форма спідниці, тому вельвет - те що треба.


I lengthened the dress by about 7 cm and the sleeves were cut bias. The neck hole was shortened by 3 cm.


Я подовжила сукню десь на 7 см, а рукави покроїла на косу нитку. Горловину вкоротила на 3 см.


Surprisingly confusing part of the sewing for me turned out to be inserting the zipper. I didn't think it would take me almost half a day. 


На мій подив, втачування блискавки виявилося для мене клопіткою частиною роботи.  Не думала, що у мене на це піде півдня. 


To hem the sleeves, I cut cuffs. I got them pretty wide so if it is cold, they can be unrolled but the pile direction will be wrong then :-)


Щоб обробити низ рукава, я покроїла манжети. Вони вийшли доволі широкі, тож, якщо холодно, їх можна розвернути, але тоді напрямок ворсу буде неправильний :-)


And the last detail. My zipper was very long so after cutting it I wanted to process the edge neatly.


І остання деталь. Блискавка у мене була дуже довга, я її обрізала і постаралася охайно обробити край. 


2 April 2018

Instead of Something Bracelet

I have no name for this bracelet because I have never been going to make it, at least now. But one of my favourite stories, as it known, is Never Say Never so when a needle worker is going to sew, for example, .... trousers, it may happen that on her way to that project the necessity to bead a bracelet can arise :-)


Браслет "Замість чогось"


У мене немає назви для цього браслета, бо я ніколи не збиралася його робити, принаймні зараз. Але, як відомо, одна з моїх улюблених історій "Ніколи не кажи ніколи", тож якщо рукотворниця збирається пошити, скажімо,... штани, може так трапитися, що на її шляху до того проекту виникне необхідність нанизати браслет :-)


It is my second attempt after this one to work with memory wire.
The idea for the bracelet was found here, on the  +offthebeadedpath. I chose it because the bracelet is pretty quick to make, consists of simple affordable materials and it is so easy to use the idea for the own design if to combine different kinds, sizes and colours of beads.


Після цієї спроби, це моя друга робота з дротом з пам'яттю.
Ідею браслету було знайдено тут на +offthebeadedpath. Я його вибрала, тому що браслет доволі швидкий у виготовленні, складається з простих доступних матеріалів і його ідею так легко застосувати для створення власного дизайну, якщо комбінувати різні види, розміри і кольори намистин.